

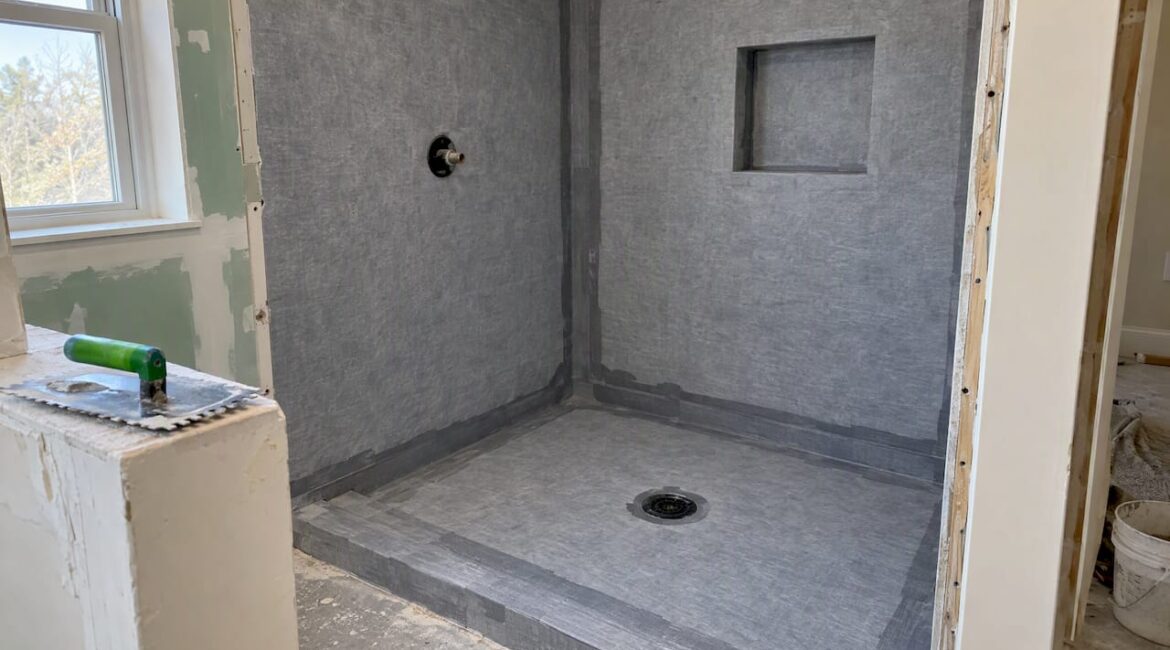
A tiled shower is only as dry as the layer behind the tile. Tile and grout shed most of the water, but the waterproofing system underneath is what keeps your framing, subfloor and walls from rotting. There are three main kinds: bonded sheet membrane, liquid-applied membrane and foamboard panels. Each one works when it is installed correctly, and each one fails at the same weak spots when it isn’t.
This guide explains how the systems differ, how a shower gets waterproofed from pan to walls, how to test the work, and what to do if you already have a leak.
TL;DR
- Tile and grout are not waterproof. A separate system behind them has to manage the water.
- Sheet membranes, liquid membranes and foamboard all work. The right one depends on shower size, shape, schedule and who is installing it.
- Most leaks start at transitions: corners, curbs, niches, benches, drains and pipe openings, not in the middle of a wall.
- Flood test the pan for at least 24 hours before tiling. It is the cheapest insurance in the whole project.
- If you see loose tile, musty odor or soft walls, get the source diagnosed before you re-grout.
Table of Contents
- Why a tiled shower needs a waterproofing system
- The three main types of shower waterproofing systems
- Schluter KERDI vs RedGard: which is better for your shower?
- Where shower waterproofing actually fails
- How a tiled shower gets waterproofed, step by step
- Flood test before any tile goes up
- Signs your tile shower is leaking
- How to fix a leaking tile shower
- Our perspective: the system matters, the detailing matters more
- Planning a shower remodel in Bucks County
- Questions to ask before you hire
- FAQ
- Sources
Why a tiled shower needs a waterproofing system
It is easy to assume that tile, grout and a bead of caulk make a shower waterproof. They don’t. According to Schluter’s guidance on tiled showers, tile coverings are not inherently waterproof, so they have to be installed over a system that manages moisture, protects moisture-sensitive building materials and controls mold growth.
The U.S. Department of Energy’s Building America guide to tub and shower water management makes a related point. Tile and grout are not the complete system. The joints between the backerboard, the finished surround, the pan and the door assembly can all let water in and damage framing and finishes.
That is why a good installer thinks about the shower as a continuous, sealed assembly. The goal is not to stop every drop at the tile surface. It is to make sure any water that gets past the grout is stopped and sent to the drain before it reaches wood or drywall.
The three main types of shower waterproofing systems
Fine Homebuilding’s overview of tile shower waterproofing breaks the products into three groups: foamboard, bonded sheet membrane and liquid-applied membrane. Here is how they compare in practice.
| System | How it works | Strengths | Watch for |
|---|---|---|---|
| Bonded sheet membrane | A thin sheet is bonded to the substrate with thinset, and seams and corners are sealed with banding | High waterproofing, durability and crack isolation | Careful seam, corner and drain detailing |
| Liquid-applied membrane | Painted or rolled onto the substrate in coats | Versatile on odd shapes, niches and benches | Right thickness, right number of coats, full cure time |
| Foamboard | Foam panels serve as both backerboard and waterproofing | Backerboard and waterproofing in one step, light and easy to cut | Every seam and fastener must be sealed with the maker’s approved products |
A fourth approach is the traditional mud-bed pan with a PVC liner under the mortar. It still gets built, and it relies on a properly sloped subfloor so that water that reaches the liner runs to the drain’s weep holes. It is more labor-intensive and less forgiving of shortcuts, which is why many remodelers now prefer a bonded system.
Sheet membranes
Schluter-KERDI is a pliable polyethylene sheet that also acts as a vapor retarder. It is designed for tile directly on top in wet areas, including showers and residential steam showers. The product is 8 mil thick, with a modified polyethylene core and non-woven polypropylene on both faces, and the fleece is what anchors it in the thinset.
The appeal of a sheet is consistency. The thickness is set at the factory, so there is no guessing about whether you applied enough product. The trade-off is more cutting and fitting, particularly around niches, benches and plumbing.
Liquid-applied membranes
Liquid membranes go on with a roller or paintbrush. Fine Homebuilding notes that products such as RedGard and Hydro Ban need to be applied at the specified thickness and number of coats, and that cure times must be observed. RedGard is a ready-to-use, rapid-drying, elastomeric membrane for waterproofing and crack prevention, sold in the U.S. in 1-gallon and 3.5-gallon pails.
Liquid systems are very good at conforming to awkward geometry. Their weakness is workmanship: a coat applied too thin, or tiled over before it cures, is a hidden defect. A fast-track version, RedGard SpeedCoat, uses moisture-cure technology so flood testing and tiling can happen in as little as one day, which helps when the schedule is tight.
Foamboard and prefabricated systems
A wedi shower system is a prefabricated, directly tileable assembly. The base has a closed-cell XPS foam core, a factory-formed slope and integrated drain components. The wall panels use an XPS core with a cement-resin coating and fiberglass reinforcement. Seams and transitions are sealed with the manufacturer’s approved sealants and accessories.
The big advantages are speed and a clean job site, since there is no mortar bed to mix and cure. The key rule is to use only the approved sealants and accessories at joints, because the seams are where the system lives or dies.
Schluter KERDI vs RedGard: which is better for your shower?
Homeowners ask this a lot, and the honest answer is that neither wins in every case. Both are accepted, widely used products. What matters more is the shower you have.
- A large shower with simple flat walls suits a sheet membrane well. The consistent thickness and the quick, predictable coverage make the work easy to inspect.
- A shower with several niches, a bench, a curved wall or lots of pipe penetrations often goes more smoothly with liquid membrane, because you can brush it into corners and around fixtures.
- A tight schedule points toward a fast-curing liquid or a prefabricated foam system.
- Many professionals combine them, using sheet on the large flat surfaces and liquid in tricky spots, as long as the products are compatible and the manufacturer’s instructions are followed.
In our experience, the brand on the box is a smaller factor than the person holding the trowel. A carefully installed liquid membrane beats a sloppy sheet install every time, and the reverse is also true.
Where shower waterproofing actually fails
Most homeowners picture a leak coming through a flat wall. It rarely does. Leaks come from the transitions.
A brochure on leaky showers from a tile-industry source lists the common culprits: a failed or poorly installed pan liner, clogged weep holes, missing or incorrect waterproofing at walls, curbs, benches, niches and seats, unsealed fasteners or accessories, defective drain installation and badly installed shower doors.
Schluter warns that skipping the preslope can leave the mortar bed permanently saturated, and that fasteners driven through a pan liner at the curb can cause large leaks and damage.
The American Society of Home Inspectors adds an important point about drainage. Blocked weep holes stop water from draining, so it rises and creates hydrostatic pressure. That pressure can crack grout or tile and push minerals to the surface. Wicking can also hide a lot of moisture damage. In other words, many shower leaks are drainage problems first and grout problems second.
The edges around the shower matter too. Thresholds, trims and floor transitions outside the shower are part of the same moisture story, and a comprehensive waterproofing and trim strategy helps keep water from creeping into neighboring floor finishes.
How a tiled shower gets waterproofed, step by step
The exact order depends on the system, so always follow the manufacturer’s instructions. This is the general sequence for a wall-and-pan shower, based on the Department of Energy’s guidance for a shower with a preformed acrylic pan.
- Flash the pan flange. The pan flange is flashed to the framing, and the weather-resistant barrier laps over the flashing so water is shed outward, never behind it.
- Set the backerboard. It either sits on the flange or is held back with a 1/2-inch gap above the pan deck, as the guide describes.
- Tape joints and corners. Backerboard joints and corners get fiberglass mesh tape embedded in thinset.
- Apply the waterproofing layer. This is the sheet, liquid or foam system you chose, with special attention to corners, niches, benches, the curb and every pipe penetration.
- Seal penetrations and drain. Valves, shower arms and the drain connection get the system’s matching collars, sealant or banding.
- Keep weep holes clear. On pans with weep holes, mortar and debris must never block them.
- Flood test before tile. More on that next.
A mud-bed pan adds a step before all of this: a preslope under the liner, so water that reaches the liner still runs toward the drain.
Flood test before any tile goes up
This single step catches most installation mistakes while they are still cheap to fix. Fine Homebuilding recommends plugging the drain, filling the pan to a marked level and leaving it for at least 24 hours. If the water level drops, there is a leak that needs correcting before tile is set.
Two practical notes. First, mark the water line with tape so the result is not a matter of opinion. Second, make sure the membrane has fully cured before you fill the pan. A liquid membrane flooded too early can give a false result or get damaged.
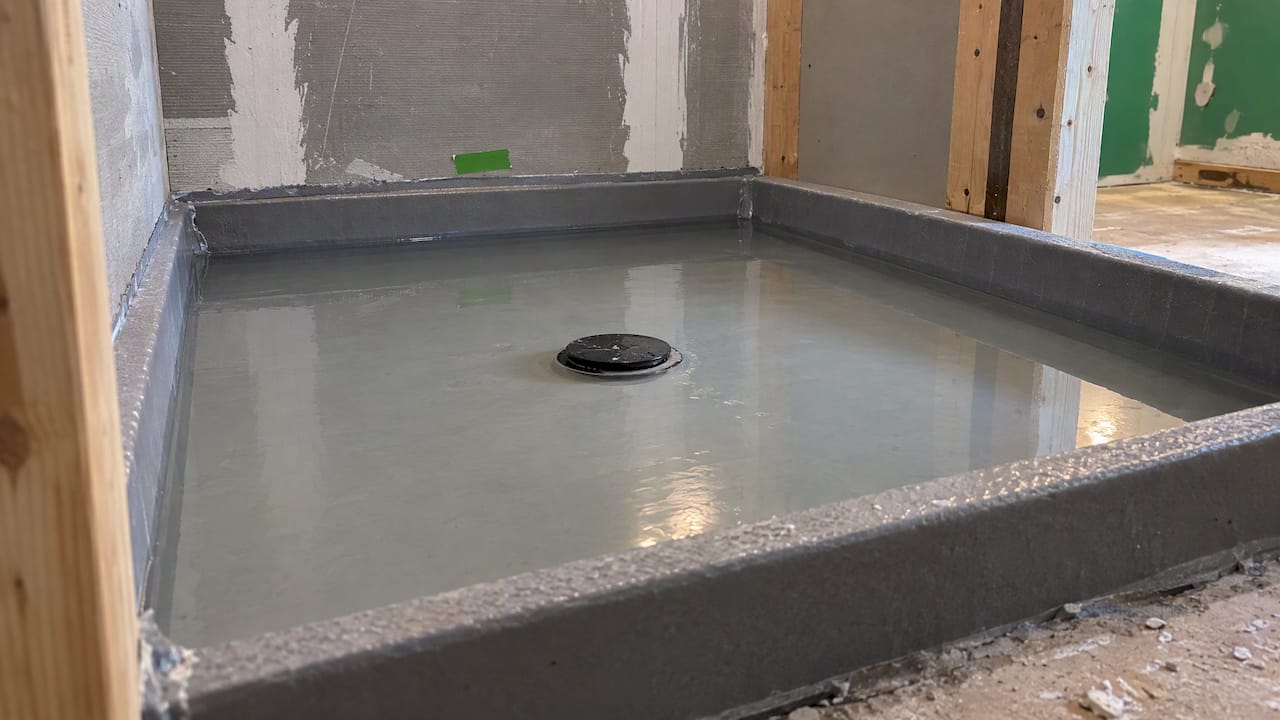
Ask any contractor you are considering whether they flood test, how long they leave it, and whether you can see the marked level. A confident, careful installer will be glad you asked.
Signs your tile shower is leaking
Some leaks show up fast. Others hide for years. The signs fall into a few groups.
- At the tile: loose tile, cracking grout, mineral deposits (efflorescence), stained grout lines.
- Around the shower: damp or discolored flooring outside the stall, bubbling drywall, peeling paint or wallpaper on the adjoining wall.
- In the walls and curb: cracked or loose curb tile, spongy or soft wall areas, deteriorating adjacent walls.
- In the air: a musty odor, or visible mold and mildew.
This Old House lists similar warning signs and adds causes beyond the waterproofing itself: cracked tile, deteriorated grout or caulk, inadequate ventilation and plumbing leaks behind the wall. A slow supply-line drip can look exactly like a failed pan.
How to fix a leaking tile shower
Start with a diagnosis, not a tube of caulk. The ASHI inspection approach tests the likely sources one at a time: faucet and supply components first, then the drain and trap, then wall and door joints, and finally the shower pan. Inspectors monitor surrounding surfaces and use moisture testing, because some leaks are slow or fully concealed.
What happens next depends on what you find:
- Failed caulk or cracked grout at a joint: often a simple repair, if the waterproofing behind is intact and the wall is dry.
- Leaking door or fixture seals: re-seal or replace the part that is leaking.
- Blocked weep holes or drain trouble: clearing and correcting the drain assembly may solve it.
- Failed pan, missing waterproofing, or a saturated or moldy wall: the tile has to come out. Re-grouting over a failed membrane only hides the problem while the framing stays wet.
If you have soft walls, a persistent odor or a stain spreading on a ceiling below, call a qualified contractor or plumber soon. Hidden moisture gets more expensive the longer it sits.
Our perspective: the system matters, the detailing matters more
We get asked which product is best, and we understand why. But after years of remodeling bathrooms in Bucks County, our answer is that homeowners should spend less time comparing brand names and more time asking how the transitions will be handled.
When we plan a shower, we talk through the whole assembly with you: the pan, the curb or curbless entry, niches, benches, valves and the door. We give honest recommendations, even when the simpler choice is the right one, and we manage the project from consultation to completion so the waterproofing is not left to chance between trades.
We also believe in leaving a clean, safe job site. Mess is more than an annoyance in a shower rebuild, since dust and debris in a pan or a membrane seam can compromise the work. And we encourage every homeowner to ask for a flood test. A shower that holds water for a day before tile is a shower you can trust for years.
If you are weighing a curbless design, our guide to curbless shower pros and cons explains how the entry affects waterproofing and slope.
— Jeff
Planning a shower remodel in Bucks County
If you are replacing a shower or rebuilding one after a leak, our team handles the full bathroom remodel, from demolition and waterproofing to tile and fixtures. You can see what we do on our bathroom remodeling services page, or read our bathroom remodeling tips for Bucks County homes before you call. Budgeting for a switch from tub to shower? Our tub to shower conversion cost guide walks through what to plan for.
Questions to ask before you hire
Whichever contractor you choose, these questions separate careful shower builders from hurried ones:
- Which waterproofing system will you use, and why for my shower?
- How will you handle niches, benches, the curb and pipe penetrations?
- Will you flood test, and for how long?
- How is the pan sloped, and are weep holes kept clear if my pan has them?
- Who is responsible if a leak appears later, and what does the agreement say?
Get the answers in writing in your contract. Clear answers are a good sign.
FAQ
What is the best waterproofing material for a shower?
There is no single best material. Bonded sheet membranes, liquid-applied membranes and foamboard systems all work when installed to the manufacturer’s instructions. Sheet membranes give consistent thickness, liquids handle complex shapes, and foam systems are fast and clean. Choose based on your shower’s design and your installer’s experience.
Can I waterproof a tile shower with just grout sealer?
No. Sealer treats the grout surface, but it does not replace a waterproofing layer behind the tile. Tile coverings are not inherently waterproof, so the system underneath is what protects the framing and walls.
How long should I flood test a shower?
Fine Homebuilding recommends at least 24 hours, with the water level marked at the start. If the level falls, there is a leak to fix before you tile. Let the membrane cure fully before you fill the pan.
Can a leaking tile shower be repaired without tearing it out?
Sometimes. If the leak comes from failed caulk, a cracked grout joint or a worn fixture seal and the wall behind is dry, a repair may be enough. If the pan or waterproofing has failed, or the wall is soft, moldy or saturated, the tile needs to come out so the problem can be fixed properly.
Is KERDI or RedGard better?
Both are well-established products. KERDI is a sheet with a set factory thickness, while RedGard is a liquid that has to be applied at the right thickness and cured. Many installers pick based on the shower’s shape and the schedule rather than the brand.
Sources
- Tiled Shower Waterproofing Systems | Schluter
- Measure Guideline: Water Management at Tub and Shower | U.S. Department of Energy
- Three Ways to Waterproof Tile Showers | Fine Homebuilding
- Schluter-KERDI product page | Schluter
- Schluter-KERDI technical data | Schluter
- RedGard technical data sheet | Custom Building Products
- RedGard SpeedCoat data sheet | Custom Building Products
- wedi Technical Handbook
- Leaky Showers brochure
- Essential Water Management in Tiled Showers | Schluter
- Tiled Showers | American Society of Home Inspectors
- Saving a Soggy Shower Wall | This Old House
- Inspecting Tiled Showers and Shower Pans | American Society of Home Inspectors