


Get three written estimates, verify the contractor’s license and insurance directly with the issuing sources, require a detailed contract tied to payment milestones, confirm permits are pulled before work starts, and hold final payment until you’ve walked the completed job. That’s the whole checklist. Everything else in this guide just shows you how to execute each piece without getting burned.
TL;DR:
- Verify licensing and insurance directly with the issuing agencies before scheduling any in-home estimates to avoid scams and ensure contractor credibility.
- Obtain three detailed, itemized proposals that include labor, materials, permits, and allowances, and compare them side by side for discrepancies.
- Establish a payment schedule based on project milestones with lien releases at each stage and hold back 5 to 10 percent until final approval.
- Confirm permits are pulled and inspections are scheduled or completed to meet code requirements and protect future resale or insurance claims.
- Document and address any red flags like non-responsive contractors or missing references immediately, utilizing the job file and permit records as evidence if disputes arise.
Table of Contents
- Your Hire a Contractor Checklist, Step by Step
- How Do You Compare Contractor Estimates Fairly?
- Verify License, Insurance, and Business Stability
- What Belongs in Your Contract, Payment Schedule, and Lien Protection
- Do You Need a Permit, and Who Should Pull It?
- What Red Flags Mean You Should Walk Away
- What a Reputable Remodeler’s Contract Actually Looks Like
- A Homeowner’s Blind Spot: Skipping the Insurance Call
- A Local Alternative to Building This Checklist Yourself
- Where to Verify a Contractor’s Credentials
- Sources
Your Hire a Contractor Checklist, Step by Step
We’ve walked enough homeowners through kitchen and deck projects to know the hires that go sideways almost always skip one of these steps. Follow them in order.
- Define the scope before you call anyone. Write a one-page brief covering materials, finishes, and square footage. Bidders who work from the same brief give you comparable numbers.
- Build a shortlist of 3 to 5 contractors using referrals, local trade associations, or verified directories, not just the first search result.
- Request itemized written proposals from at least three of them. Line items should cover labor, materials, permits, and allowances.
- Verify license and insurance before you sign anything, including a Certificate of Insurance you confirm directly with the insurer.
- Check references and visit a current job site if possible. A contractor with nothing to show you is telling you something.
- Put permit responsibility in writing and confirm it against your local building department’s records.
- Agree to a milestone-based payment schedule with lien releases collected at each stage and a portion held back until the work passes final inspection.
- Keep a job file with every contract, COI, permit, and change order in one place, digital or physical.
That order matters. Homeowners who verify insurance and licensing before comparing price almost always end up with a shorter, cleaner shortlist. This is also where a homeowner’s checklist for choosing a remodeling contractor can help you sanity-check your own brief before you send it out.
- Get your written brief and 3+ bids before any phone screening.
- Confirm license and insurance status before scheduling in-home estimates.
- Never let deposit size or sales pressure move faster than your paperwork.
How Do You Compare Contractor Estimates Fairly?
Price differences only mean something when every bidder priced the same job. Your written brief should specify material brand and grade, finish level, and any allowances (say, $8 per square foot for tile) so contractors aren’t guessing at your budget or padding it.
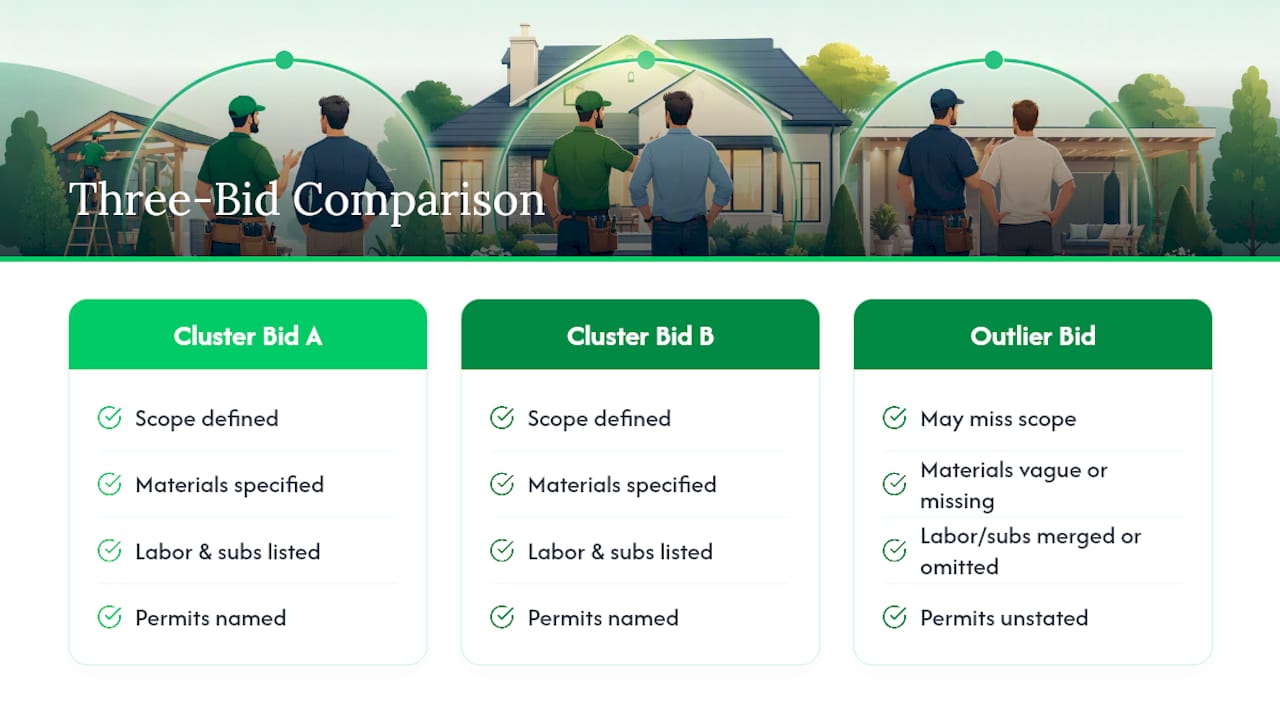
A complete proposal lists labor and subcontractor costs separately from materials, names permit fees, spells out allowances and exclusions, and gives a start date, a completion date, and a payment schedule. NAHB’s builder checklist recommends treating any proposal missing these as incomplete, not just cheap.
Watch for outliers. A bid running roughly 30% above or below the other two usually signals missing scope or padded margin, so ask the low bidder directly what’s excluded before you get excited about the number.
Pro Tip: Line up all three proposals side by side in a spreadsheet, row by row, before you call anyone back. Gaps jump out fast once they’re not buried in three separate PDFs.
Verify License, Insurance, and Business Stability
Your state’s contractor license lookup tool will show classification, license status, and any complaint history in about two minutes. If the license doesn’t match the trade you’re hiring for (say, general versus electrical), ask why before moving forward.
A Certificate of Insurance should list general liability and workers’ compensation coverage with current dates. Calling the insurer listed on the COI to confirm its active takes about as long as verifying a license, and it closes off the most common forged-document scam in the trade.
When you call references, ask three things: did the crew show up when scheduled, did the final cost match the estimate, and would they hire this contractor again for a bigger job. Vague answers to the last question are a signal worth taking seriously.
- A permanent business address and consistent phone number across estimates, contract, and invoices.
- Supplier or subcontractor references who can confirm the contractor pays its bills.
- Branded vehicles or a physical shop, since a purely digital presence carries more risk if something goes wrong mid-project.
Contractors with a fleet, a shop, and supplier relationships have more to lose by walking away from a job, which is why vetters weigh business permanence almost as heavily as licensing.
What Belongs in Your Contract, Payment Schedule, and Lien Protection
A contract worth signing spells out the full scope, a materials list, a realistic schedule, the payment plan, a change-order process, warranty terms, who pulls permits, and how disputes get resolved. Anything verbal isn’t enforceable once the drywall’s up.
- Tie payments to completed milestones, not to the calendar. A rough deposit range is 10 to 30% at signing, with the rest split across framing, rough-in, and finish stages.
- Collect a conditional lien release at each payment, which protects you if the contractor doesn’t pay a subcontractor or supplier down the line.
- Hold back 5 to 10% in retainage until the final walkthrough is complete, not until the contractor says it’s done.
- Walk the finished job with a punch list in hand and release final payment only after every item on it is checked off.
- Keep every signed change order, even small ones, in your job file.
- Never pay for materials in cash without a receipt tied to the invoice.
This structure protects you whether you’re gutting a kitchen or replacing a roof, because the risk of a mid-project walkoff never fully disappears until the last punch-list item is signed off.
Do You Need a Permit, and Who Should Pull It?
Permits exist so an inspector, not just your contractor, confirms the electrical, structural, or plumbing work meets code. Skipping that step can cost you at resale or with your insurer if something fails later.
Call or check your local building department’s online records to confirm a permit was pulled and see whether inspections are scheduled or completed. If a contractor asks you to pull the permit yourself, treat it as a warning sign, since permits are normally the contractor’s responsibility and put liability on them, not you.
- For homes built before 1978, confirm the contractor follows the EPA’s lead-safe renovator requirements before any surface disturbance begins.
- Ask which specific inspections apply to your project (framing, electrical, final) and get the expected dates in writing.
What Red Flags Mean You Should Walk Away
Some warning signs are worth stopping the hire over immediately, not just noting for later.
If a contractor stops responding or performing mid-project, document everything first: photos, texts, invoices, the contract itself. Send a written demand for a specific remedy and deadline before anything else. From there, your escalation options include a complaint to the state licensing board, small claims court for smaller disputes, a mechanic’s lien filing if you’ve been left exposed, or mediation if your contract specifies it. Your job file and permit records become your evidence.
- Federal rules also give you a right to cancel certain home-improvement contracts within a short window after signing, so check that clock if you’re having second thoughts early.
What a Reputable Remodeler’s Contract Actually Looks Like
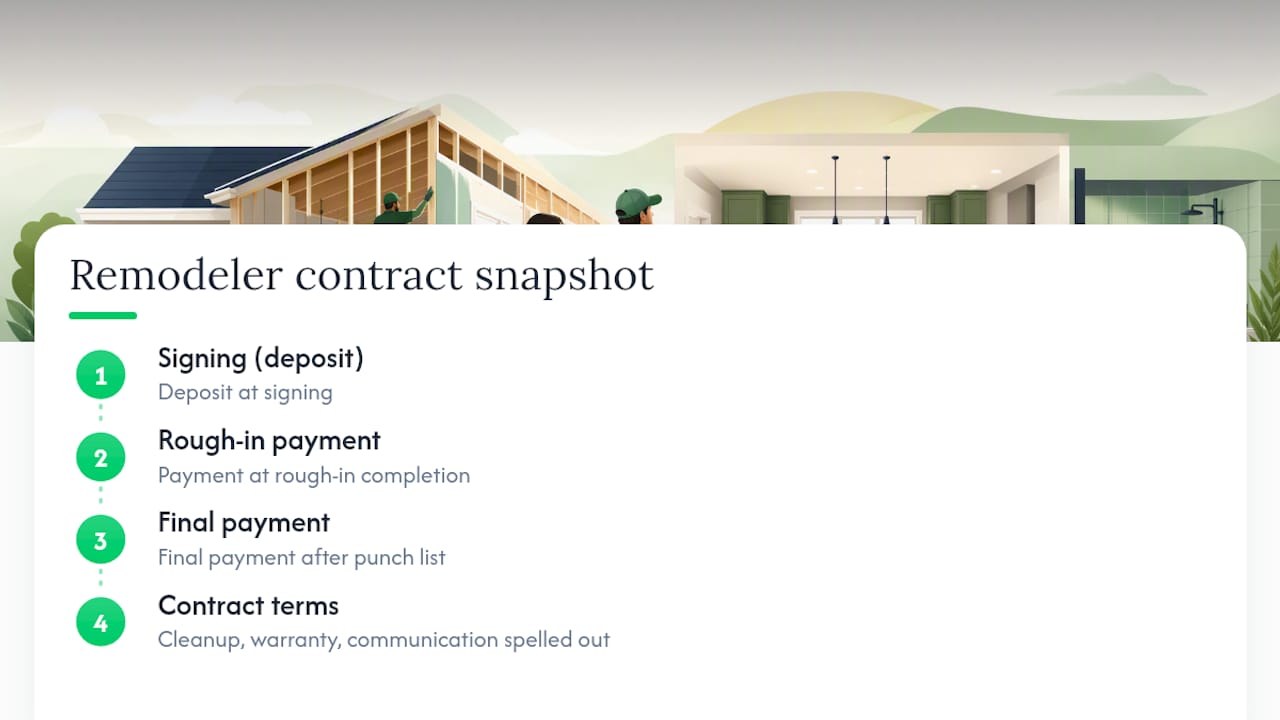
Homeowners often ask what a real proposal from a professional crew reads like, beyond the checklist version. Ours spells out daily cleanup responsibility, warranty terms on workmanship, and a communication commitment so you’re never guessing what happened on-site while you were at work.
A typical kitchen remodel runs a deposit at signing, a payment at rough-in completion, and a final payment after the punch list, spread across four to eight weeks depending on scope. Our approach to post-remodel cleaning spells out exactly what “clean” means in the contract, not just as a vague promise.
Pro Tip: Ask any contractor how they handle daily cleanup and communication before you sign. Their answer tells you more about the next eight weeks than their portfolio does.
A Homeowner’s Blind Spot: Skipping the Insurance Call
The mistake I see homeowners make most often isn’t skipping the checklist entirely. It’s stopping at “they showed me a COI” instead of actually calling the insurer listed on it. A forged or lapsed certificate looks identical to a real one on paper.
That two-minute phone call is the single highest-leverage step on this entire list, because it’s the one step that catches fraud before it costs you money. Do it before you sign, not after a problem shows up. Document the call date and who you spoke with in your job file, right alongside the contract and permits.
— Jeff
A Local Alternative to Building This Checklist Yourself
Running this whole vetting process solo, license lookups, insurer calls, reference checks, contract review, takes real hours most homeowners don’t have between work and family. Jaghomesnow, working out of Bucks County, PA, is built so you don’t have to run that gauntlet alone: every project starts with a written, itemized contract, verified insurance, and a milestone payment schedule already in place before a single wall comes down.

We handle kitchen and bathroom renovations, custom decks, basement finishing, additions, roofing, siding, and window and door replacement across Bucks County and Montgomery County. Cleanup expectations, warranty terms, and communication commitments are written into the contract, not left as a verbal promise. If you’d rather skip the vetting legwork and start with a contractor who already meets this checklist, request a consultation with JAG Home Enhancements and get a real proposal for your project.
Where to Verify a Contractor’s Credentials
Confirm licensing directly through your state’s contractor board lookup tool, and cross-check standing with the Better Business Bureau. For pre-1978 homes, confirm lead-safe certification through the EPA before signing. Homeowners weighing specific interview questions can also review this remodeling contractor interview guide or this list of kitchen and bath remodeler questions before their first estimate call.
Sources
- FTC: Buyers remorse and the cooling-off rule
- NAHB: Checklist for finding and hiring a builder or remodeler
- How to vet a contractor: the 14-point checklist