

A punch list is the tracking tool a project team uses at closeout to record, assign, and resolve every remaining defect or incomplete task before final payment. This article gives you a copyable template with the right columns, a step-by-step walkthrough process, and a room-by-room inspection checklist you can bring to the job site starting today.
TL;DR:
- A punch list should include specific details such as item ID, location, trade category, priority, and photo links to ensure clear communication and accountability.
- Conducting the final punch walk at the appropriate project stage—utilities live and safety confirmed—avoids wasting time and prevents missed issues.
- Assigning each defect to a single responsible party and documenting verification photos before and after repairs reduces dispute risks and streamlines closeout.
- Prioritizing safety and water-related issues ensures critical defects are addressed immediately, protecting property and safety during project completion.
- Using a structured template with dropdowns for trade category and priority enables quick filtering, while zone-by-zone inspections improve defect detection efficiency.
Table of Contents
- What Is a Punch List, and How Is It Different From a Checklist?
- When Should You Schedule the Punch Walk, and Who Should Attend?
- What Should a Punch List Template Include?
- How Do You Run a Punch Walk Step by Step?
- Room-by-Room Inspection Checklist for the Final Walk
- How Do You Assign, Track, and Close Punch List Items?
- Best Practices and Mistakes That Sink a Closeout
- Who Handles What: Contractor and Homeowner Responsibilities at Closeout
- Why Disciplined Punch Lists Protect Your Margin
- Let JAG Home Enhancements Handle Your Closeout
- Sources
- FAQ
What Is a Punch List, and How Is It Different From a Checklist?
A punch list is a formal, working document created near the end of a project to capture what still needs fixing before the owner signs off and final payment releases. It’s not just a to-do list. Every item gets an owner, a due date, and a status that moves toward reinspection and closure.
A generic checklist just confirms tasks happened. A punch list does more: it assigns responsibility, sets a deadline, and builds in a verification loop before anything counts as done.
Two versions exist on most jobs:
- Rolling punch lists get updated throughout construction as trades finish their scope, catching issues before they get buried under the next phase of work.
- Final punch walk happens at substantial completion, when the team does one comprehensive sweep of the whole property before handover.
Most experienced project managers run both. Rolling lists prevent surprises; the final walk catches what slipped through.
When Should You Schedule the Punch Walk, and Who Should Attend?
Timing matters more than most schedules account for. A final punch walk should happen once utilities are live, the site is safe to move through without hard hats or fall protection, and most of the contracted work is visibly complete. Walking a job too early just means walking it twice.
Bring the right people, and the walk moves fast:
- Project manager or general contractor runs the walk and owns the master list.
- Subcontractors for trades with open items should attend, or at least be reachable by phone.
- Architect or inspector signs off on code-related and design-intent items.
- Homeowner or owner’s representative flags anything that matters to them personally, since some issues only show up when someone lives with a space.
Before anyone walks the site, confirm floor plans and specs are on hand, devices are charged for photos, and everyone knows this walk produces one master list, not five competing ones.
What Should a Punch List Template Include?
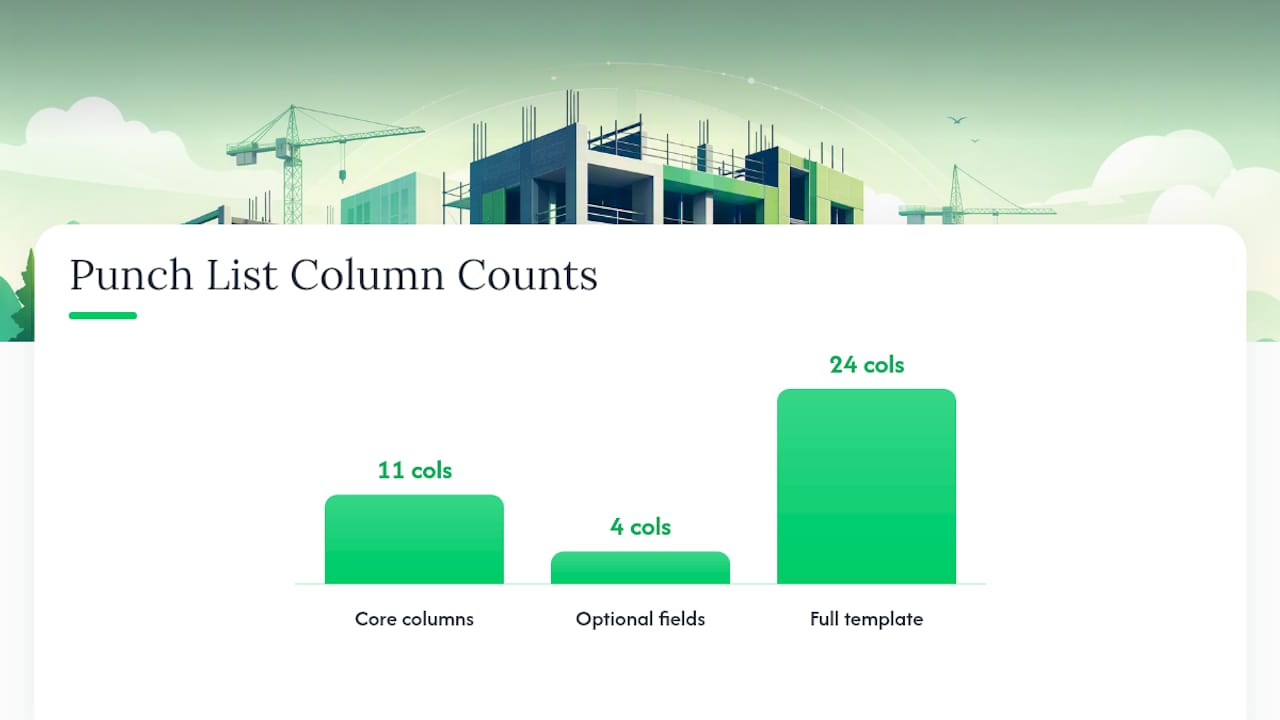
A punch list template only earns its keep if it captures enough detail that nobody has to guess what “fix the door” means three weeks later. Templates commonly run 23 to 24 structured columns once you account for schedule and cost impact fields, but most jobs run fine on a tighter core set.
The minimum columns you actually need:
- Item ID — a unique number for tracking and cross-referencing photos
- Description — specific and observable (“hairline crack, drywall seam” not “wall looks bad”)
- Location/zone — room, wall, or exact spot (“kitchen, north wall by window”)
- Trade category — electrical, plumbing, carpentry, painting, and so on
- Assigned to — one name or one company, never a group
- Priority — critical, standard, or cosmetic
- Date identified
- Due date
- Status — not started, in progress, in review, completed
- Notes
- Photo links
Optional fields worth adding for bigger jobs include a spec or drawing reference, a material or part number, an inspector name, and a reinspection date. A complete punch list template often separates these into distinct sheets: one for project info, one for the punch items themselves, one as an inspection checklist with pre-written items, and a dashboard that rolls everything into completion rates.
Format matters as much as fields. Excel or Google Sheets works well for analysis and filtering by trade. Mobile apps win on-site because you can snap a photo and log an item in the same motion, without transcribing notes later. PDF sign-off sheets still have a place for the final walk, since a signed document carries weight in a dispute that a spreadsheet link doesn’t.
Pro Tip: Build your template with a dropdown for trade category and priority instead of free-text fields. It sounds minor, but it’s what lets you filter 80 open items down to the 6 that belong to the electrician in about two seconds.
How Do You Run a Punch Walk Step by Step?
A punch walk without a sequence turns into a wandering conversation. Here’s the order that actually produces a usable list.
- Confirm access and documentation before anyone walks in. Utilities should be on, the site safe to move through, and floor plans, specs, and the punch list template loaded on a phone or tablet.
- Move zone by zone, not room by random room. Skipping around guarantees you’ll miss something on the second floor because you got distracted by the kitchen.
- Test function, not just appearance. Open every door and drawer, run every faucet, flush every toilet, and cycle GFCI outlets and dimmers through their full range. A thorough functional walkthrough catches the failures a visual scan misses entirely, like a dimmer that flickers only at 40% brightness.
- Mark and photograph on the spot. Use blue tape to flag the defect physically, then take one photo showing context and one close-up, logging the file name directly into the item so nobody has to guess which crack belongs to which unit.
- Assign priority and a due date immediately, not after the walk when memory has already started to blur which item was urgent.
- Have subs available if possible. Briefing trades in advance and keeping them on standby for quick fixes cuts your reinspection cycles dramatically, since some items take five minutes to close if the right person is standing there.
- Distribute the finished list within 24 hours. Momentum dies fast once everyone scatters back to other jobs.
- Set a reinspection cadence and update status as items close, rather than waiting for one final push at the end.
Pro Tip: Number your photos to match the Item ID in your template before you leave the site, not after. Renaming 40 photos from your truck at 6 p.m. is how location details get mixed up.
Room-by-Room Inspection Checklist for the Final Walk
A punch walk goes faster and catches more when you know exactly what to test in each space instead of eyeballing finishes. A well-built home inspection punch list typically runs 30 to 40 functional checks across a property, and most of them cluster around a handful of predictable trouble spots.
Kitchen
- Cabinet doors and drawers open, close, and align without rubbing
- Countertop seams are tight, with no chips near the sink cutout
- Appliances power on and vent properly (range hood, dishwasher, disposal)
- Faucets run hot and cold with no drips at the base
- Outlets and under-cabinet lighting all function, GFCIs trip and reset
Bathroom
- Faucets and shower valves deliver consistent pressure and temperature
- Shower and tub drain fully with no standing water after two minutes
- Grout and caulk lines are continuous with no gaps at tub and floor joints
- GFCI outlets trip and reset correctly near any water source
- Exhaust fans run quietly and actually move air (hold a tissue near the vent)
Bedrooms and living areas
- Doors and drawers throughout operate smoothly with even gaps
- Flooring transitions sit flush with no lippage between materials
- Baseboards meet walls with no visible gaps or nail pops
- Windows open, close, and lock; screens fit without gaps
- Closet doors track properly and latch if applicable
Mechanical
- HVAC registers deliver airflow in every room, not just near the unit
- Thermostat responds to setpoint changes within a reasonable window
- Water heater shows no leaks at connections and reaches temperature
- Filter access panels are reachable without tools
Exterior
- Deck railings are rigid with no movement when pushed
- Stair treads are level and securely fastened
- Sealants around windows and doors show no gaps or cracking
- Door thresholds sit flush with no daylight showing underneath
- Grading near the foundation slopes away from the house, not toward it
Run these checks room by room and you’ll close most of your punch list before you’ve even left the property.
How Do You Assign, Track, and Close Punch List Items?
A clean status workflow keeps a punch list from turning into a permanent fixture on your project. Four stages cover almost every job: Not Started, In Progress, In Review, and Completed. Anything sitting in “In Progress” for two weeks without movement deserves a phone call, not another status update.
Assignment works best when one person owns each item, never a shared “the crew” label that lets responsibility slide between three different people. Export trade-filtered views so the electrician only sees electrical items, and the painter isn’t scrolling past 40 unrelated rows to find their three.
Evidence standards protect everyone. Photograph the defect before the fix and after, note the exact location, and reference the relevant spec or drawing number when a dispute over quality is even remotely possible.
On a typical closeout, a handful of KPIs tell you everything: completion rate as a percentage of total items, count of overdue items past their due date, and critical items broken out by trade so nobody buries a life-safety issue behind twenty cosmetic touch-ups.
- Not started → In progress → In review → Completed
- One responsible party per item, no shared ownership
- Before/after photos plus exact location notes
- Dashboard tracking completion rate, overdue count, and critical items by trade
Best Practices and Mistakes That Sink a Closeout
The difference between a punch list that closes cleanly and one that drags for a month usually comes down to a handful of habits.
- Keep exactly one master list. Duplicate lists floating between email threads and paper notes guarantee something gets fixed twice or missed entirely.
- Be specific to the point of boredom. “Chip in trim, hallway, 3 feet from bedroom door” beats “trim issue” every time someone has to find it later.
- Treat water and safety issues as critical, always. A slow leak or an exposed wire doesn’t wait for the cosmetic punch items to clear first, and prioritizing these issues protects the property and everyone’s timeline.
- Don’t let new requests hide inside the punch list. If the owner wants a fixture upgraded rather than repaired, that’s a change order, not a defect. Blending the two erodes your schedule and your margin at the same time.
Pro Tip: If an item shows up on the list without a photo, treat it as unverified until someone documents it. Verbal reports of “it’s fine now” have sunk more closeouts than any actual construction defect.
Who Handles What: Contractor and Homeowner Responsibilities at Closeout
A punch list only works when both sides know their job. The contractor is responsible for keeping the site clean and organized through closeout, documenting every fix with photos, and staying reachable for reinspection instead of disappearing after the last item gets marked complete. Post-project cleaning standards belong in the contract, not left as a verbal promise.
The homeowner’s job is just as concrete: attend the walk or review the list promptly, decide which items matter most if trade-offs come up, and keep a copy of everything for warranty purposes. Most professional remodelers structure payment around milestones, with a final holdback released once punch items close and sign-off is documented. Knowing what to expect from a contractor before the walk even happens prevents most of the friction that shows up at the finish line.
Why Disciplined Punch Lists Protect Your Margin
Every checklist you skip catches up with you later, usually at the worst possible moment. Treating the punch list as a testing gate rather than paperwork means fewer callbacks, fewer disputes over “I thought that was included,” and fewer late nights fixing things that should have been caught during the walk. Addressing defects early costs less than fixing them after handover, every single time. The contractors who protect their margin are the ones who never treat the list as optional.
— Jeff
Let JAG Home Enhancements Handle Your Closeout
If you’d rather not manage the walk, the template, and the reinspection cycle yourself, A contractor-led closeout service can document every fix with before-and-after photos, maintain a clean job site through final sign-off, and remain available for reinspection until every item on the list is actually closed, not just marked “in progress” and forgotten.

Whether your project is a full kitchen remodel or a new deck, a team can walk the site with you and manage the punch list from first draft to final payment… If you’re planning a renovation and want a contractor who treats closeout as seriously as the build itself, start by reviewing how to choose a remodeling contractor in Bucks County and reach out to get your project scoped.
Sources
- Construction punch list explained — Procore
- Free construction punch list template — BuildBite
- Remodeling punch list: what homeowners should check — HouseFixLog
- Free construction punch list checklist (23 items) — Opteam
FAQ
What Should Be Included on a Punch List?
A punch list should include a unique item ID, a specific description, the exact location, trade category, assigned party, priority level, dates identified and due, current status, notes, and photo links documenting each defect.
What Is a Punch List in a Project?
A punch list is the closeout document that tracks every remaining defect or incomplete task on a project, assigning each one to a responsible party with a deadline before final sign-off and payment.
What Is a Punch List vs. a Checklist?
A generic checklist confirms tasks happened, while a punch list assigns ownership, sets due dates, and includes a reinspection workflow to verify each item actually gets resolved before closeout.
What Is a Punch List Walkthrough?
A punch list walkthrough, or punch walk, is a structured, zone-by-zone site inspection where the team functionally tests fixtures and finishes, photographs defects, and logs each issue for assignment and tracking.