

Most sagging decks are repairable if the damage is limited to one joist, one post, or a settled footing. Stop using the deck immediately if you feel bounce underfoot, see a visible dip, or notice separation at the house. Document what you see with photos, shore the sagging section if you can do it safely, and then work through the diagnosis below before deciding between targeted repairs or calling in a contractor.
TL;DR:
- Sagging joists or posts with more than a quarter inch of softness generally require replacement, not just patching, due to loss of shear strength.
- Footings must be properly below the frost line, level, and stable, as soil movement or improper size causes most deck settlements despite framing repairs.
- The ledger connection is the most dangerous failure point because water intrusion often rots wood behind the siding or corrodes bolts, risking sudden collapse.
- Permanent repairs involve sistering joists to full bearing and bolting or replacing damaged beams, with hardware rated for exterior use to ensure long-term stability.
- Regular maintenance, including annual inspections and addressing drainage issues, prevents future sagging and extends the lifespan of the deck.
Table of Contents
- How Do You Diagnose the Cause of a Sagging Deck?
- How Do You Safely Jack Up and Shore a Sagging Deck?
- How Do You Permanently Repair Joists and Beams?
- When Do Footings and Posts Need Repair or Replacement?
- Why Is Ledger Board Damage the Most Dangerous Deck Problem?
- Should You Repair a Sagging Deck Yourself or Hire a Contractor?
- How Do You Prevent a Deck From Sagging Again?
- How Does JAG Home Enhancements Approach Sagging Deck Repairs?
- Do You Need a Permit to Repair a Sagging Deck?
- What Materials Hold Up Best in Deck Repairs?
- What’s the Real Priority When Fixing a Sagging Deck?
- Ready to Fix Your Sagging Deck the Right Way?
- Sources
How Do You Diagnose the Cause of a Sagging Deck?
A sagging deck almost always traces back to one of four places: the posts and footings, the joists, the beam, or the ledger where the deck meets your house. Finding the right culprit before you pick up a tool saves you from patching a symptom while the real problem keeps working underneath.
Start with a slow walk across the entire surface. Feel for soft spots, listen for creaks that sound different from normal deck noise, and look for a visible slope toward one corner. Check where the deck meets your house. Any gap that has opened up between the ledger board and the siding is a signal you cannot ignore, since it usually means the ledger connection is pulling away.
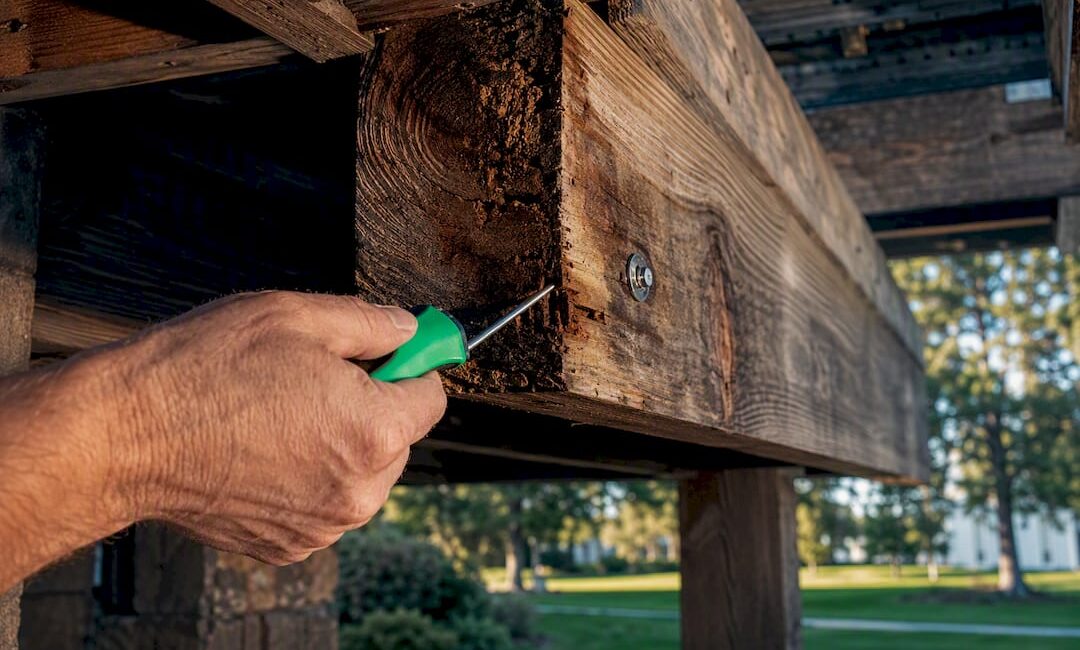
The probe test tells you more than a visual check ever will. Press an awl or a flathead screwdriver into the wood at joist ends, at the ledger, and anywhere the surface looks discolored or soft. Wood that lets the tool sink more than a quarter inch has likely lost enough strength to need replacement rather than patching, since rot at that depth compromises the wood’s shear strength at exactly the point where it bears the most load.
Posts and footings deserve their own look. Check for a gap between the post base and the concrete pier, a post that leans instead of standing plumb, or a footing that has visibly tilted or cracked. Any of those point toward soil movement or an undersized footing, a common root cause behind sinking and sagging decks that homeowners often mistake for a simple framing problem.
For beam deflection, a string line or a long level across the beam’s bottom edge will show you the dip. Builders generally use a deflection limit around L/240, meaning a 12-foot beam span shouldn’t sag more than about half an inch under normal load. You don’t need to calculate this precisely as a homeowner. If you can see a visible bow with a straightedge, that’s your answer.
Before you start, gather a few basic tools:
- Spirit or laser level for checking slope across the deck surface
- Awl or flathead screwdriver for the rot probe test
- Measuring tape and a flashlight for tight crawl spaces under the deck
- Camera or phone to document conditions before you touch anything
If you find rot at multiple bearing points, a leaning multi-story deck, or any sign the ledger has separated from the house, stop the inspection and treat the deck as unsafe until a professional looks at it.
How Do You Safely Jack Up and Shore a Sagging Deck?
Once you know where the problem is, temporary stabilization lets you work underneath the deck without risking a collapse. This is not a permanent fix. It buys you the time and access needed to make the real repair.
Clear the deck completely first. Every piece of furniture, grill, and planter needs to come off before you touch a jack, since unloading the structure reduces the force you’re fighting against. Wear safety glasses and gloves, and never position yourself or anyone else underneath a section that’s lifted but not yet supported. If you hear a sudden loud crack or see a connection point shift unexpectedly, stop and back the jack off immediately.
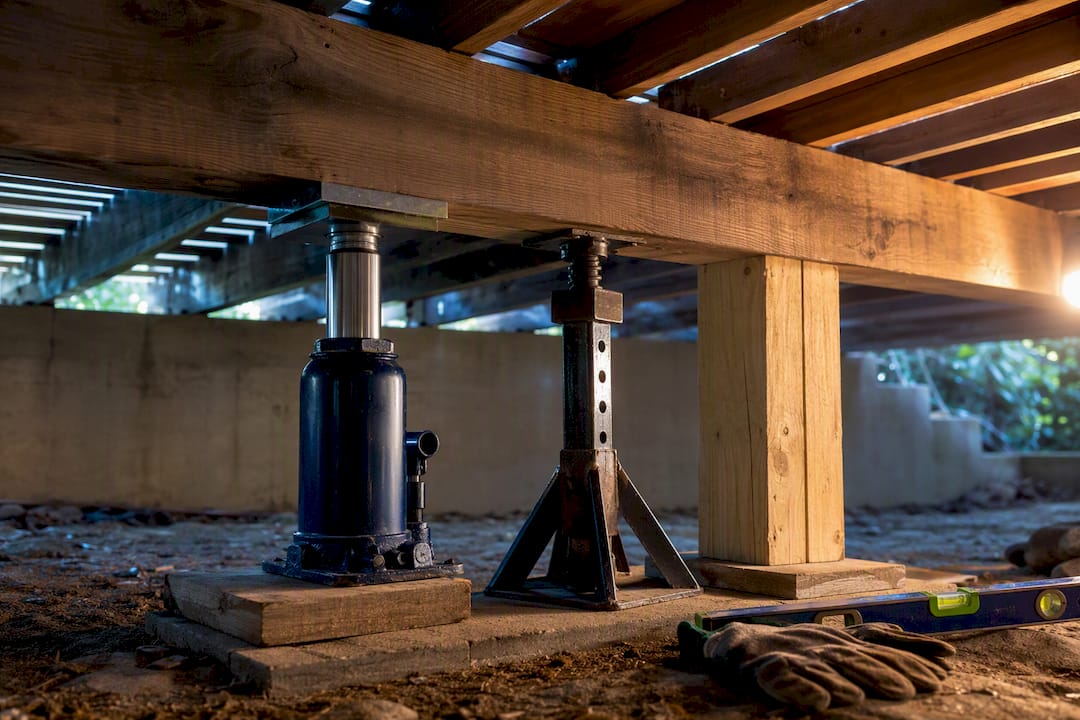
- Position a hydraulic bottle jack on a stable mud sill or steel base plate directly under the sagging beam or joist, never on bare soil.
- Set a short section of 4×4 lumber between the jack’s piston and the framing member. The jack should never contact the frame directly.
- Raise the jack in small increments, no more than a quarter inch at a time.
- Pause 15 to 20 minutes after each increment to let the structure relax before lifting again.
- Watch and listen the entire time. Loud pops, sudden give, or visible cracking mean you stop and reassess.
- Once the section is level, transition to permanent temporary support, doubled lumber braces or adjustable jack stands rated for the load, and label them clearly so nobody mistakes them for finished work.
This slow, incremental approach exists for a reason. Structural repair guides consistently recommend lifting gradually and letting the wood relax between adjustments, because wood that’s been sagging for months has adapted to that shape, and forcing it back too fast can crack joints or snap fasteners that looked fine under normal load.
Pro Tip: Never rely on the jack alone as your support while you work. Once you’ve reached the target height, swap in a rated jack stand or doubled lumber post before you crawl underneath. A hydraulic jack can lose pressure without warning, and you don’t want to be under the deck when it does.
How Do You Permanently Repair Joists and Beams?
Temporary shoring gets you access. Permanent repair is what actually stops the sagging from coming back, and this is where the biggest mistakes happen if you rush it.
Sistering joists is the standard fix for a joist that’s cracked, split, or moderately rotted but still structurally sound at both ends. You add a new joist alongside the damaged one, matched in size, and fasten it with construction adhesive and through-bolts rather than nails alone. The sister needs full bearing at both ends, resting on the same beam or ledger the original joist does. A short patch that doesn’t reach full bearing on both ends provides far weaker load transfer than a full-span sister, which is the single most common corner homeowners cut and the one that causes the repair to fail within a season or two.
Beam problems need a different approach. If a beam has deflected under load, you may be able to reinforce it by doubling or tripling the member with properly bolted connections, following a consistent bolt pattern rather than a handful of scattered lags. But reinforcement only works if the existing beam is still structurally sound. A beam with significant rot at a bearing point isn’t a reinforcement candidate. It’s a replacement job.
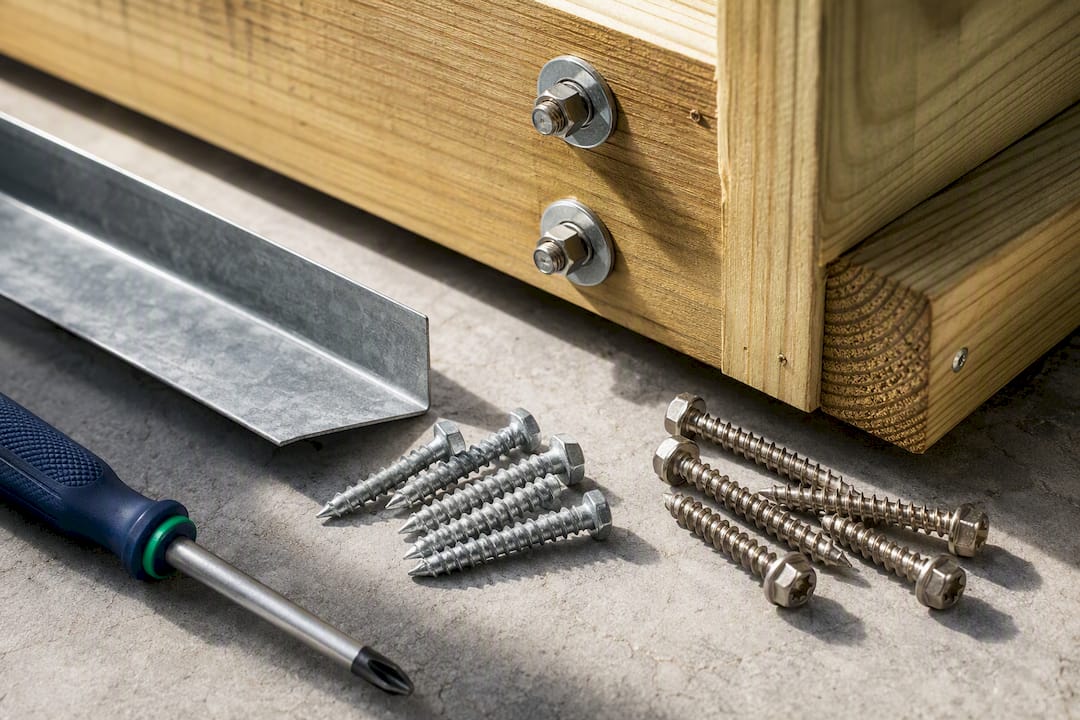
Fasteners matter more here than almost anywhere else on the deck. Use hot dipped galvanized or stainless steel carriage bolts and structural lag screws, never standard interior wood screws, and pair every joist and post connection with an approved hanger or connector rated for exterior structural use.
The quarter inch rule. Anywhere your probe test sank more than a quarter inch during inspection, treat that as the boundary between repair and replacement. Wood that soft has already lost meaningful shear strength at the exact point where the load transfers, and no amount of sistering or bolting restores that.
A few practices to avoid entirely:
- Notching a post to seat a beam directly, which weakens the post and is often restricted under current building codes in favor of approved metal post-to-beam connectors
- Lagging structural connections into sheathing only, with nothing solid behind it to bear load
- Using undersized or interior-rated hardware anywhere exposed to weather
If you’re weighing whether a section is worth reinforcing versus tearing out, our guide on assessing and treating rotted wood walks through the same soft-wood judgment calls that apply here.
When Do Footings and Posts Need Repair or Replacement?
Frame repairs won’t hold if the footing underneath them is failing. A footing problem shows up differently than a joist problem, and telling the two apart early saves you from redoing work.
Look for a concrete pier that’s visibly tilted or cracked, a post that has sunk below its original height, or water that pools consistently around the base after rain. Any of those point to the ground itself, not the wood above it, and settled or undersized footings combined with poor drainage are among the most common reasons decks sink and re-sag even after the framing has been repaired correctly.
- After shoring the deck and removing the failed post, dig the new footing below your local frost line, since local code sets that depth and it varies significantly by region.
- Add a gravel base for drainage before pouring concrete, and let the concrete cure fully, typically several days to a week depending on temperature, before loading it.
- Embed a post base anchor in the wet concrete rather than setting the post directly in it, and use ground-contact-rated lumber for the new post.
- Reconnect the post to the beam with an approved connector, not a notch, and remove temporary shoring only once every connection is torqued down.
If your soil is consistently wet, sandy, or has shifted enough to move multiple footings at once, this is where a specialist earns their fee. Helical piers get driven mechanically to a stable soil depth and don’t depend on the same frost line assumptions a poured footing does. That equipment and the soil engineering behind it are outside typical DIY territory, and getting it wrong means redoing the entire foundation in a year or two.
Why Is Ledger Board Damage the Most Dangerous Deck Problem?
The ledger board is the single connection holding your entire deck to your house, and it carries more of the structure’s total load than any individual post or joist. When it fails, it tends to fail without much warning, which is why ledger problems get treated differently than everything else on this list.
Pull back the flashing where the ledger meets the siding and look closely. Water intrusion behind flashing is the most common way ledgers rot from the inside while looking fine from underneath. Test the ledger’s actual attachment, not just to the sheathing, but into the solid band or rim joist behind it, since screws into sheathing alone provide almost no real holding strength.
Repair options depend on what you find:
- If the band joist behind the ledger is sound, re-fastening with proper ledger screws (not deck screws) and correcting the flashing often solves the problem.
- If the ledger itself shows rot or the bolts are corroded, full replacement with new lumber and correct flashing is the safer path, done with temporary shoring supporting the deck while the work happens.
- Large gaps between ledger and house, rot found behind the flashing, or heavily corroded bolts are signals to bring in a contractor or structural engineer rather than push forward alone.
Should You Repair a Sagging Deck Yourself or Hire a Contractor?
Some repairs are genuinely reasonable for an experienced DIYer with the right tools and patience. Others carry enough risk, or require enough specialized knowledge, that doing them wrong creates a hazard you’re living with every time you step outside.
Red flags that mean it’s time to call a professional:
- Multiple bearing points showing rot at the same time, not just one isolated joist
- Any sign the ledger has separated from the house or shows rot behind the flashing
- Footings that are cracked, tilted, or sitting in consistently wet, unstable soil
- A deck with more than one story of height above the failing section
Sistering a single joist, replacing a deck board, or shoring a section for inspection are all within reach for a confident DIYer. Ledger replacement, footing underpinning, and any repair involving unstable soil generally are not, both because of the tools required and because a mistake there risks the whole structure.
On cost, small localized repairs run considerably less than a full rebuild when the underlying frame is still sound. Guides on deck repair economics generally put targeted fixes as considerably cheaper than a full rebuild, though once rot spreads past a certain point, tearing out and rebuilding can actually cost less than chasing piecemeal patches across a failing frame.
If you’re getting quotes, ask every contractor for proof of license and insurance, at least three recent references, and a written scope that spells out exactly what gets replaced versus repaired. Our guide on choosing a remodeling contractor covers the questions worth asking before you sign anything.
How Do You Prevent a Deck From Sagging Again?
A deck that’s been repaired correctly can still sag again if the conditions that caused it the first time never got addressed. Prevention comes down to a short, repeatable maintenance habit rather than a one-time fix.
Walk the deck each spring and fall, run the probe test at a few joist ends and the ledger, and tighten any hardware that’s worked loose. Clear leaves and debris away from post bases and footings so water doesn’t pool there, and correct grading or add flashing anywhere runoff drains toward the house instead of away from it. When you replace lumber, ground-contact-rated boards and corrosion-resistant fasteners cost more upfront but resist the rot and hardware failure that caused the original sag. Our seasonal deck maintenance schedule breaks this into a checklist you can run twice a year.
Pro Tip: Check your deck right after a hard freeze/thaw cycle or a major storm. Ground movement from freezing and thawing is one of the quietest ways footings shift, and catching it early means a five-minute fix instead of a full footing replacement.
How Does JAG Home Enhancements Approach Sagging Deck Repairs?
Jaghomesnow, operating as JAG Home Enhancements, builds and repairs custom decks throughout Bucks County and the surrounding Pennsylvania region. Every sagging-deck job follows the same sequence: a full structural inspection, safe shoring where needed, repairs to the actual load path rather than cosmetic patches, an upgrade to corrosion-resistant fasteners and connectors, and a final walkthrough with a maintenance plan for the homeowner. That’s the same order this guide has walked you through, just carried out by a crew that does it every week instead of once a decade.
Do You Need a Permit to Repair a Sagging Deck?
Permit requirements vary widely depending on where you live and how extensive the repair is. Many jurisdictions exempt cosmetic work, like replacing boards or railings, from permitting, but structural repairs involving footings, beams, ledgers, or posts frequently require a permit and a follow-up inspection, since those changes affect the deck’s load path and safety.
The trigger is usually the scope of work, not the fact that repair is happening at all. Swapping a single rotted joist for a matching one might not require a permit in your municipality. Replacing a footing, adding a helical pier, or rebuilding a ledger connection almost always does, because inspectors want to verify the new work meets current structural standards before it gets covered up.
Contact your local building department before you start any repair that touches footings, beams, posts, or the ledger. Ask specifically whether your planned scope requires a permit and what inspection stages they’ll want to see, since some departments require a sign off before you close up the work and another after. Skipping a required permit doesn’t just risk a fine. It can complicate an insurance claim or a future home sale if the work isn’t documented as code-compliant.
If your project is complex enough to involve an engineer, that engineer’s stamped drawings usually smooth the permitting process considerably, since inspectors have documented calculations to review rather than a verbal description of what you plan to do.
What Materials Hold Up Best in Deck Repairs?
The materials you choose during a repair determine whether you’re back under the deck in three years or in fifteen. This is not the place to save money with whatever lumber is cheapest at the yard.
For any wood touching the ground, footings, or within splash range of the soil, use ground-contact-rated pressure-treated lumber, not the standard above-ground treated lumber sold for decking boards. The difference in chemical treatment concentration is what keeps ground-contact lumber resistant to rot in conditions that would break down standard treated wood within a few years.
Hardware deserves the same scrutiny. Hot dipped galvanized or stainless steel fasteners resist the corrosion that ordinary zinc-coated screws succumb to within a handful of seasons, especially in pressure-treated lumber, which contains chemicals that accelerate corrosion in lower-grade metal. Corrosion at fastener points combined with undersized footings is one of the recurring reasons deck repairs fail early, often within a few years of the original fix.
Flashing at the ledger connection matters just as much as the lumber grade. Self-adhering flashing tape designed for exterior use, installed correctly behind the siding and over the ledger, keeps water from finding its way into the one connection that carries the most structural weight. If you’re upgrading railings or beam-to-post connections as part of the repair, modern hardware options for these connections have improved considerably over what was standard even a decade ago.
What’s the Real Priority When Fixing a Sagging Deck?
Most advice on this topic treats the jacking and the sistering as the hard part. It isn’t. The probe test is the part homeowners skip, and it’s the single step that tells you whether you’re looking at an afternoon repair or a job that needs a contractor.
Here’s what I think gets underweighted: drainage. Everyone focuses on the visible fix, the joist, the beam, the post, and almost nobody goes back afterward to ask why the wood rotted or the footing settled in the first place. Fix the joist without fixing the grading that’s been dumping water at the base of that post, and you’ll be back under the deck in three years doing it again. Boss Decks makes this point well, and it’s the one piece of conventional advice I’d push back on hardest: treating a sagging deck as a carpentry problem alone, when it’s often a water management problem with carpentry symptoms.
If you take one thing from this guide, take the quarter inch rule and apply it honestly. It’s tempting to talk yourself into “it’s probably fine” when the screwdriver sinks a little too far. Don’t. That’s the line between a Saturday repair and a structural risk you’re living on top of.
— Jeff
Ready to Fix Your Sagging Deck the Right Way?
If your inspection turned up more than one bad joist, a shifting footing, or any hint of trouble at the ledger, Jaghomesnow gives Bucks County homeowners a faster path to a safe deck than piecing it together yourself over several weekends. JAG Home Enhancements handles the full sequence, diagnosis, shoring, structural repair, and hardware upgrades, with the same corrosion-resistant materials and connector standards covered throughout this guide.

Before you request an estimate, take a few photos of the sagging area, note where you felt bounce or saw gaps, and jot down roughly how long the problem has been getting worse. That information helps our team scope the visit accurately on the first trip instead of the second. Whether the fix turns out to be a targeted repair or points toward a full rebuild, you can start with a look at our custom deck building and repair services and request an estimate today.
Sources
- Top structural and wood-related changes in the 2021 IRC (Simpson Strong-Tie)
- Rapidrepair
- Sistering joists guidance – Trex RainEscape