

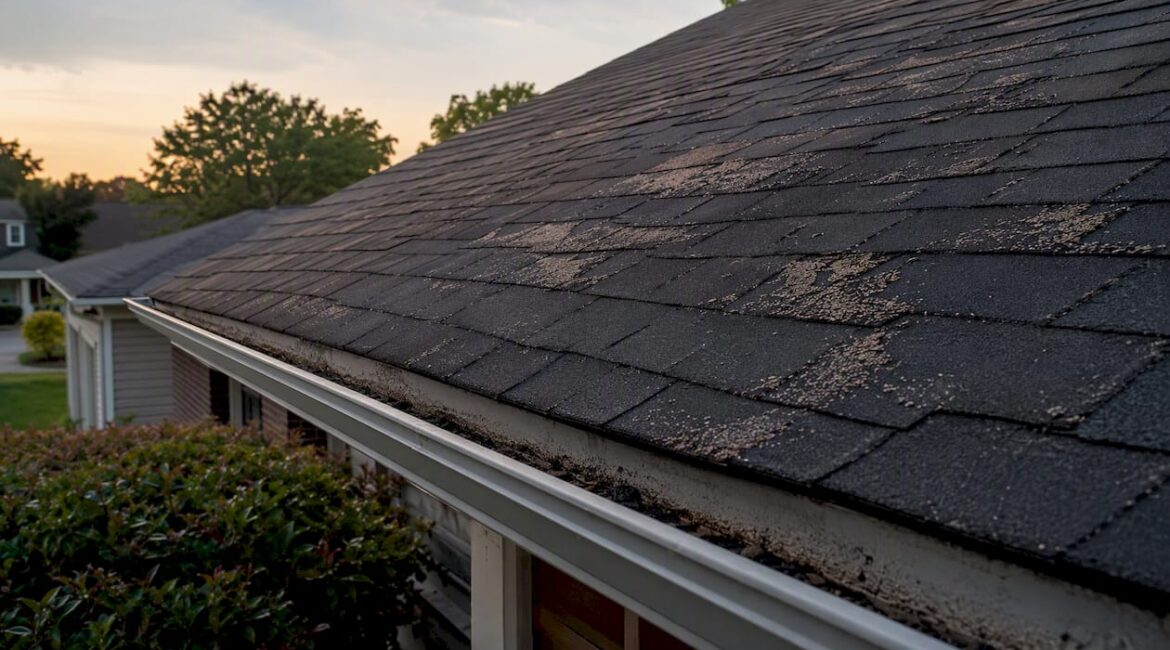
The clearest signs of a roof leak are yellow or brown water stains on your ceiling, a musty odor in the attic, and active dripping after rain. If you spot any of these, contain the water immediately with a bucket and document everything with photos before calling a professional.
- Yellow or brown ceiling stains, often with a ring-like edge, point to water pooling above your drywall.
- Granules collecting in your gutters or missing shingles visible from the ground signal shingle failure that lets water in.
- A musty smell in the attic, even without visible dripping, often means moisture has been sitting long enough to begin growing mold.
Pro Tip: Take photos of every stain, wet spot, or damaged area the moment you notice them. Timestamps on those images can support an insurance claim and help a roofer trace the source faster.
Key Takeaways
Early detection of roof leaks prevents mold, protects structural integrity, and keeps repair costs manageable before minor damage becomes a major replacement.
| Point | Details |
|---|---|
| Start inside, then go up | Ceiling stains, peeling paint, and attic moisture are your first reliable indicators. |
| Flashings fail most often | Chimneys, skylights, and vent boots are the highest-risk leak entry points on most homes. |
| Act within 24–48 hours | Mold growth can begin within 24–48 hours of sustained moisture; document and contain immediately. |
| Professional inspections cover 8–30+ checkpoints | A thorough inspection pairs drone imaging with an attic walkthrough for an accurate diagnosis. |
| Jaghomesnow inspects attic-first | Jaghomesnow uses an attic-first diagnostic approach with full photo documentation for Bucks County and Montgomery County homeowners. |
Table of Contents
- What do interior signs of a roof leak look like?
- How to inspect your attic for hidden leak evidence
- What exterior signs can you spot safely from the ground?
- Where does water most often enter a roof?
- What should you do the moment you discover a leak?
- When should you call a pro, and what will it cost?
- How can you reduce the risk of future leaks?
- How professionals trace and fix a roof leak
- Why early detection is the only strategy that actually saves you money
- Jaghomesnow handles roof inspections and repairs in Bucks County
- Useful sources
What do interior signs of a roof leak look like?
Interior stains, peeling paint, and exterior signs are among the most recognizable homeowner-visible indicators of roof leaks, and knowing what each one means helps you prioritize your response.
Yellow or brown ceiling stains are the most common first signal. They often appear as a discolored ring or spreading blotch, and the color deepens the longer the moisture sits. Peeling or bubbling paint on walls or ceilings usually follows, as trapped moisture pushes through the finish. Sagging or drooping ceiling panels are a more serious sign — that means water has been accumulating above the drywall long enough to add weight, and a collapse is possible. Peeling wallpaper near exterior walls is another indicator that often gets dismissed as humidity, but it frequently traces back to a slow leak traveling along a wall cavity.
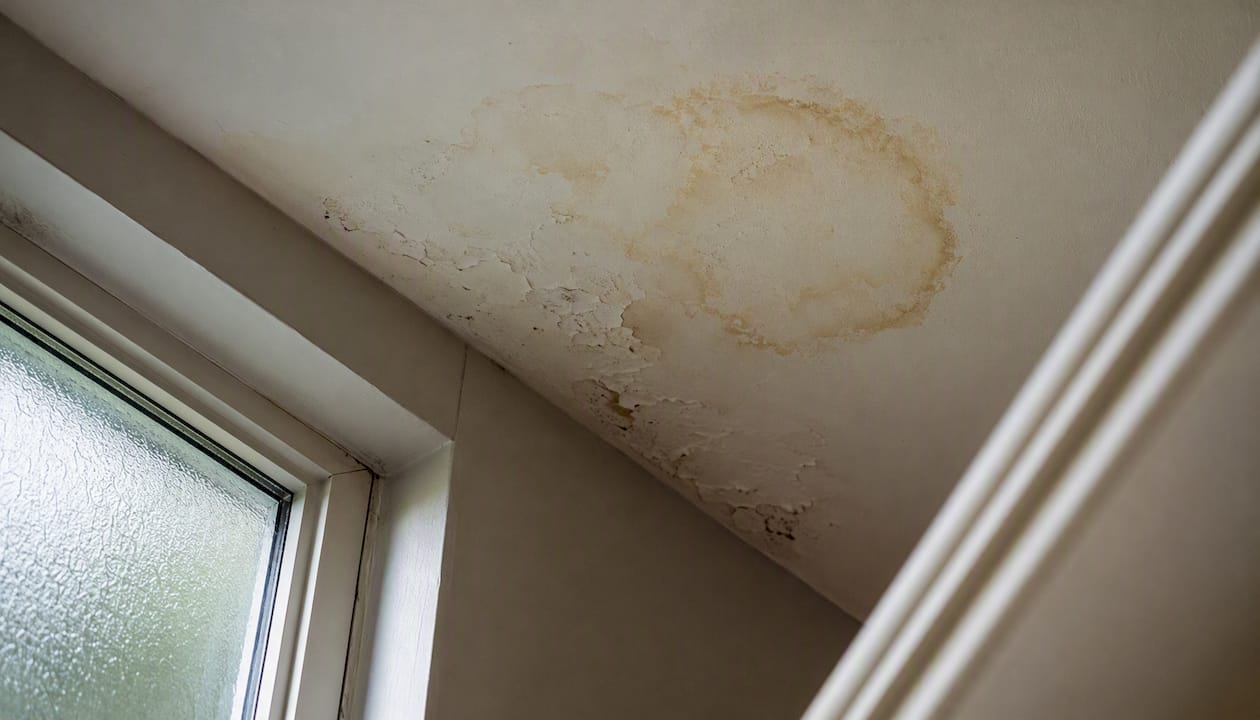
One thing that surprises many homeowners: the stain on your ceiling is rarely directly below the entry point. Water follows rafters, sheathing, and insulation horizontally before it drips down, sometimes traveling several feet from the actual breach.
Pro Tip: Once you spot a stain, use a pencil to trace the outer edge of the wet area. Check it again in 24 hours. If the ring has grown, the leak is active. If it has stayed the same, the leak may have dried but the source still needs to be found.
How to inspect your attic for hidden leak evidence
The attic is where most leaks reveal themselves before they reach your living space. A careful attic check can confirm a roof leak, help you trace the source, and tell you how long the problem has been building.
Before you go up, take a few safety precautions. Bring a bright flashlight or headlamp. Step only on joists, never on the insulation between them, since the drywall below cannot support your weight. Watch for electrical wiring running through the space, and if you see standing water, active dripping near wiring, or the attic feels structurally unsound, come back down and call a pro.
Once you are safely inside, work through these steps:
- Scan the underside of the roof deck for dark streaks, staining, or soft spots in the sheathing.
- Look for rusted nails protruding through the deck. These are called “shiners” — nails that missed the framing and collect condensation on cold nights. Shiners can drip and mimic a leak, but the fix is ventilation improvement, not a new roof.
- Check insulation for compression, discoloration, or a damp, heavy feel. Wet insulation loses its thermal value and can hide mold underneath.
- Look for any daylight visible through the decking. Even a pinhole of light means a gap that water can enter.
- Trace any staining upslope and horizontally from the wet spot. Water rarely drips straight down; it travels along rafters and sheathing before falling, so the actual entry point is usually higher and to the side of where you see moisture.
Poor attic ventilation can also create moisture patterns that look exactly like a roof leak. If you see condensation on nails or frost in winter but no obvious water path from above, roofing ventilation issues in Bucks County and Montgomery County may be the cause rather than a breach in the roof covering itself.
What exterior signs can you spot safely from the ground?
You do not need to climb on your roof to get a useful picture of its condition. A pair of binoculars and a slow walk around your home’s perimeter will reveal most of the warning signs worth acting on.
Granules in your gutters, curling or missing shingles, and sagging rooflines are strong indicators of shingle failure or structural issues that increase leak risk. Granule loss is particularly telling because it signals that shingles are aging past their protective threshold. Once the granule layer wears thin, UV exposure accelerates shingle breakdown and water infiltration follows.
Look specifically for:
- Missing or displaced shingles, especially after a storm.
- Shingles that are curling at the edges or cupping in the center.
- Cracked or split shingles along ridges and hips.
- Visible rust stains running down from flashing points.
- Sagging areas anywhere on the roofline, which can indicate rotted decking underneath.
For flat or low-slope roofs, ponding water that sits for more than 48 hours after rain is a primary failure signal. Drainage scuppers and membrane seams are the most common failure points and should be checked after every significant storm.
Pro Tip: Photograph your roofline from all four sides twice a year, in spring and fall. Side-by-side comparisons over time reveal gradual shingle deterioration that is nearly impossible to notice in a single inspection.
When the damage looks significant or you cannot see the full picture from the ground, a professional roof walk or drone inspection is the right call. Knowing how to prepare for a roof inspection beforehand helps you get the most out of that visit.
Where does water most often enter a roof?
Flat, unbroken shingle fields rarely leak on their own. Water almost always finds its way in at transitions, penetrations, and edges, where two materials meet or where a fastener or fitting creates a gap.
- Chimney flashing: Step flashing along the sides and counter flashing at the top are both vulnerable to rust, separation, and dried-out sealant. This is one of the most common leak sources on older homes.
- Skylight flashing: The curb and apron around a skylight must be sealed tightly. A gap as small as a hairline crack at the corner joint is enough to let water in during a driving rain.
- Plumbing vent boots: The rubber collar around each vent pipe degrades over time, especially under UV exposure. A cracked or split boot is a fast path for water to enter.
- Valley flashings: Roof valleys channel large volumes of water during heavy rain. Damaged or improperly lapped valley metal or underlayment directs that water straight into the decking.
- Drip edges: A missing or bent drip edge at the eaves allows water to wick back under shingles and rot the fascia board below.
- Gutters and downspouts: Clogged gutters cause water to back up under the shingles at the eaves, a condition called ice damming in winter and simple overflow in summer. Fascia and soffit damage often follows.
“Flashing failures are responsible for a disproportionate share of roof leaks. Checking flashings at chimneys, skylights, vents, and sidewalls is a required step in any methodical leak diagnosis — not an optional one.”
Professionals identify flashing and vent boot failures as among the most common problems found during a roof inspection, and many of these failures are invisible from the ground but obvious once a roofer gets eyes on the transition points.
What should you do the moment you discover a leak?
Safety comes first, then containment, then documentation. That order matters.
If water is dripping near a light fixture, outlet, or electrical panel, turn off the circuit breaker for that area before touching anything. Water and live electricity are a serious hazard. Do not climb on a wet roof, especially during or right after a storm.
Once the electrical risk is managed, place a bucket under any active drip and lay towels or plastic sheeting to protect flooring and furniture. If you can safely access the attic and see a clear drip point, a piece of plywood under the drip can redirect water away from insulation. Do not attempt to apply roofing tar or sealant on a wet surface in the rain — it will not bond and may make a professional repair harder.
Pro Tip: Call your insurance agent the same day you discover a significant leak. Most policies require prompt notification, and delays can complicate coverage. Keep a written log of the date, time, and conditions when you first noticed the problem.
For a full walkthrough of the insurance documentation process, the roof insurance claim process guide covers what adjusters look for and how to protect your claim.
When should you call a pro, and what will it cost?
Some roof problems are clearly beyond DIY territory: active leaks during rain, sagging decking, visible mold in the attic, or any damage after a major storm. But even smaller issues benefit from a professional eye, because what looks like a minor stain can be the surface sign of a much larger problem underneath.
A professional inspection typically covers 8–30 or more specific checkpoints, including shingle condition, flashing integrity, ventilation, gutters, sealant condition, nail pops, and drainage. The current best practice pairs drone imaging for a full-field view with a targeted walk-on at critical features and a complete attic walkthrough.
Attic dampness, mold, damaged or missing shingles, and clogged gutters are urgent signs that require prompt repair to avoid structural damage. Here is a general cost picture for the most common repair scenarios:
| Service | Approximate Cost Range | Key Cost Factors |
|---|---|---|
| Professional roof inspection | $400 | Roof size, slope, access difficulty |
| Minor leak repair (sealant, boot replacement) | $400 | Number of penetrations, material type |
| Moderate leak repair (flashing, shingle section) | $400–$1,000 | Extent of damage, decking condition |
| Major repair or partial replacement | $1,000+ | Roof area, material, structural damage |

Left unrepaired, a leak escalates quickly. Mold can begin growing within 24–48 hours of sustained moisture exposure. Insulation loses its thermal value within days of saturation. Structural rot in decking and rafters develops over weeks to months, and by that point, what started as a $400 flashing repair can become a full roof replacement.
Pro Tip: Ask your roofer for itemized photo documentation of every defect found during the inspection. That report protects you if the damage worsens, supports an insurance claim, and gives you a baseline for future inspections.
How can you reduce the risk of future leaks?
Routine maintenance is the most cost-effective roof protection you have. Most leaks do not appear without warning — they develop gradually from deferred maintenance that could have been caught and corrected cheaply.
A practical seasonal schedule:
- Spring: Clean gutters after winter debris accumulation, inspect flashing around chimneys and skylights for frost damage, check vent boots for cracking.
- Late summer: Clear debris from roof valleys, trim overhanging tree limbs before fall storms, check that all downspouts are directing water at least six feet from the foundation.
- After major storms: Walk the perimeter and use binoculars to check for displaced shingles, dented flashing, or debris sitting in valleys.
Schedule a professional inspection every one to three years, depending on your roof’s age. Roofs older than 15 years benefit from annual checks. If you are in Bucks County or Montgomery County and wondering whether your roof is approaching the end of its service life, the guide on knowing when it’s time for a roof replacement walks through the specific signals to watch for.
Pro Tip: Replace worn vent pipe boots proactively — they typically cost under $50 in materials and an hour of labor. A failed boot left in place can cause thousands of dollars in water damage to insulation and decking.
How professionals trace and fix a roof leak
A skilled roofer does not start on the roof. The diagnostic process begins in the attic, where moisture patterns tell a more complete story than the roof surface alone.
Here is the step-by-step process Jaghomesnow follows on a leak investigation:
- Attic mapping: The inspector enters the attic and maps all visible moisture staining, dark spots, and wet insulation. The location of each mark is noted relative to roof features above.
- Up-slope and horizontal tracing: Because water travels along rafters and sheathing before dripping, the inspector traces each stain upslope and laterally to find the highest and outermost point of moisture intrusion.
- Roof walk or drone imaging: The inspector moves to the exterior, checking the area above the attic findings first. Drone imaging captures the full field; a targeted walk-on examines flashings, penetrations, and shingle condition at close range.
- Water testing: When the source is not visually obvious, a controlled hose test isolates sections of the roof systematically, starting low and working upward, until the entry point is confirmed.
- Repair plan and documentation: Every defect is photographed, described, and included in a written report. Jaghomesnow provides before-and-after photo documentation so you can see exactly what was found and what was corrected.
Not every damp spot is a roof leak — condensation from poor ventilation and plumbing leaks can produce nearly identical interior signs. A methodical attic-first inspection is what separates an accurate diagnosis from a costly guess.
Pro Tip: Before hiring any roofer, ask these questions: Do you carry liability insurance and workers’ comp? Will you provide a written scope of work and warranty? Can I see before-and-after photos from a similar repair? A contractor who hesitates on any of these is a contractor worth reconsidering.
Why early detection is the only strategy that actually saves you money
The conventional wisdom is that roof leaks are a repair problem. The reality is that they are a detection problem. By the time a stain appears on your ceiling, water has usually been moving through your roof assembly for weeks. The stain is the last symptom, not the first event.
What most homeowners underestimate is the compounding nature of water damage. A small flashing gap costs a few hundred dollars to seal. Left for one winter, that same gap can saturate insulation, rot decking, and introduce mold into wall cavities — a repair scope that can run into thousands of dollars and, in some cases, affect indoor air quality for months. The health implications of mold exposure are well documented, and the structural consequences of rotted rafters are not reversible without significant reconstruction.
Proactive inspection, seasonal maintenance, and fast response when you spot early warning signs are not just financially smart. They protect the long-term livability of your home. A roof that is checked and maintained regularly rarely fails catastrophically. One that is ignored almost always does.
Jaghomesnow handles roof inspections and repairs in Bucks County
When you have spotted the warning signs and need a professional to trace the source, Jaghomesnow provides thorough roofing inspections and repairs for homeowners across Bucks County and Montgomery County, PA. The process starts in the attic, where moisture patterns tell the real story, and moves to a targeted exterior check with full photo documentation of every finding.

You get a written report, before-and-after photos, and a clear repair plan before any work begins. No guesswork, no vague estimates. If the inspection reveals damage beyond a simple repair, Jaghomesnow handles full roofing replacements with the same clean jobsite standards and direct communication that homeowners in the area rely on. To get started, visit the contractor selection guide for Bucks County homeowners or contact Jaghomesnow directly to schedule your inspection.
Useful sources
- Leaking Roof: Here’s What to Do – State Farm®
- Roof Leaks: diagnosis & repair guide
- 5 Steps for Roof Leak Cause Determination
- 30-point roof inspection checklist
- Roof inspection checklist – Angi
- Roof Damage to Watch For: 15 Silent Signs Your Roof is Failing
- How to Find a Roof Leak – Locate Leaks on Roofs Without an Attic – IKO
- Roof Leak Detection Guide: 8 Signs to Watch For