


This keeps leverage in your hands and money moving with actual progress.
TL;DR:
- Milestone-based payment schedules link payments to specific, verifiable project stages rather than calendar dates, preventing premature payouts.
- Payments should be proportionate to the work completed, with clear definitions of “done” and verification methods like inspections or photos.
- For projects under $5,000, a deposit-plus-final scheme suffices, while larger projects benefit from multiple milestones or progress billing tied to detailed schedules of values.
- Incorporating escrow and conditional lien waivers in large projects enhances financial security for homeowners.
- Contractual schedules should include detailed milestone definitions, verification procedures, payment amounts, and timing to safeguard both homeowner and contractor interests.
Table of Contents
- What Is a Contractor Payment Schedule for Remodeling?
- Why a Clear Payment Schedule Matters
- Types of Payment Schedules and Which Fits Your Project
- How to Build a Milestone-Based Payment Schedule
- Sample Payment Schedules by Project Size
- Verification, Retainage, and Safe Payment Methods
- Handling Change Orders, Delays, and Payment Disputes
- How JAG Home Enhancements Structures and Verifies Payment Schedules
- Get a Written, Milestone-Based Payment Schedule Built Into Your Contract
- Sources
What Is a Contractor Payment Schedule for Remodeling?
A contractor payment schedule is the written timeline in your remodeling contract that spells out when you pay, how much, and what has to happen first. It is not the same thing as a price quote. A quote tells you the total cost; the schedule tells you how that total gets released over the life of the project.
The stronger version, and the one this article builds toward, breaks the total into milestones. Each milestone names a deliverable, defines what “done” means for that stage, sets a dollar or percentage amount, and specifies how you verify it before paying. This is sometimes called a remodeling contractor payment plan, a construction payment schedule, or simply payment terms for remodeling. They all point to the same document: a table that turns a vague promise into an enforceable checklist.
Here is why the distinction matters for you specifically. When a schedule is milestone-based rather than date-based, you are never paying for time that has passed. You are paying for work that exists, that you can see, and that someone (an inspector, a photo, your own eyes) has confirmed. That single shift is what separates a contractor payment structure that protects you from one that just protects cash flow for the contractor.
Why a Clear Payment Schedule Matters
A payment schedule is really a leverage map. Every dollar you have not yet released is a dollar of insurance against unfinished work, and every dollar you hand over early is leverage you give away. Homeowners who front-load deposits without milestones tend to discover this the hard way when a contractor slows down, disappears for a stretch, or delivers work that does not match the estimate.
The stakes are bigger than any one project. Slow payments cost the construction industry $208 billion in 2022, and 37% of contractors reported delays severe enough to stop work outright. That statistic runs in both directions. Contractors who cannot count on timely draws slow down or walk off jobs, and homeowners who release money too early lose the ability to make anyone finish.
Five rules will get you through almost any proposed schedule, whether you are reviewing one a contractor wrote or building your own:
- Anchor to milestones, not calendar dates. “Payment due 30 days after signing” tells you nothing about what should be finished by then.
- Match payment size to delivered value. A framing milestone that represents a reasonable fraction of total labor should trigger a payment aligned with that value.
- Define “done” in writing, before work starts. Vague phrases like “rough-in complete” invite disputes; specific ones like “plumbing and electrical rough inspections passed, inspector card on file” do not.
- Hold back a meaningful final payment. A meaningful holdback is common, and it should not release until punch-list items are cleared.
- Consider escrow for large deposits. Placing the full contract amount in escrow with staged releases gives both sides certainty without one party fronting risk for the other.
Types of Payment Schedules and Which Fits Your Project
Not every remodel needs the same structure. A $3,000 bathroom faucet swap does not warrant a six-milestone contract exhibit, and a $150,000 whole-house renovation should not run on a simple deposit-and-final arrangement. Four structures cover nearly every remodeling scenario.
Milestone-based schedules tie payments to specific, verifiable completion points, like “demolition complete” or “cabinets installed.” This is the safest default for most remodels because it keeps money aligned with visible progress. The tradeoff is that it takes more upfront work to define each milestone clearly, and vague wording undermines the whole approach.
Progress (percentage) billing pays out a percentage of the total contract value at set intervals, often monthly, based on an estimated percentage of completion. This is standard on large commercial jobs and works reasonably well on big residential additions, but it depends on an honest, detailed schedule of values to avoid disputes over what “60% complete” actually means.
These show up more in labor-only arrangements or long-duration projects with a dedicated crew, but they weaken your leverage since payment is not contingent on measurable output.
Deposit-plus-final structures are the simplest: a deposit to start, one payment at completion. Fine for a small repair or a single-day job. Risky for anything with multiple phases, because there is nothing between the deposit and the final payment to hold anyone accountable mid-project.
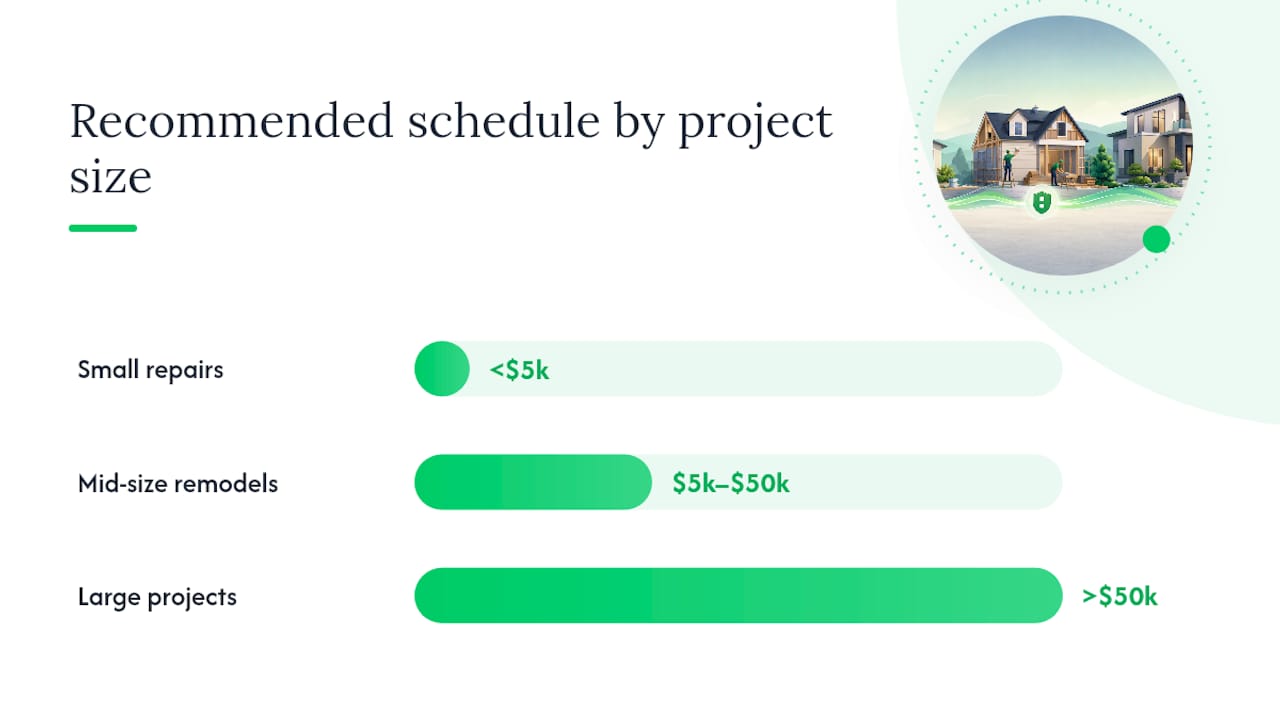
A rough guide for matching structure to project size:
- Small repairs and single-trade jobs (under $5,000): deposit-plus-final, often 50/50.
- Mid-size remodels ($5,000 to $50,000): milestone-based with 3 to 6 draws, such as a bathroom or kitchen remodel.
- Large, multi-phase projects (above $50,000): progress billing with a formal schedule of values, or milestone-based with sub-milestones for each trade.
One practical exception applies across all sizes. Long-lead or custom-ordered materials, cabinets, windows, specialty tile, often require a separate deposit tied to the order and delivery date rather than to a construction milestone. That deposit protects the contractor from carrying the cost of a custom order you might cancel, and it is a normal, reasonable ask as long as it is documented separately from the main schedule.
How to Build a Milestone-Based Payment Schedule
Building your own schedule, or auditing one a contractor hands you, follows a repeatable process. Whether you are learning how to schedule contractor payments for the first time or tightening up a contract you have already been sent, these six steps apply to any project size.
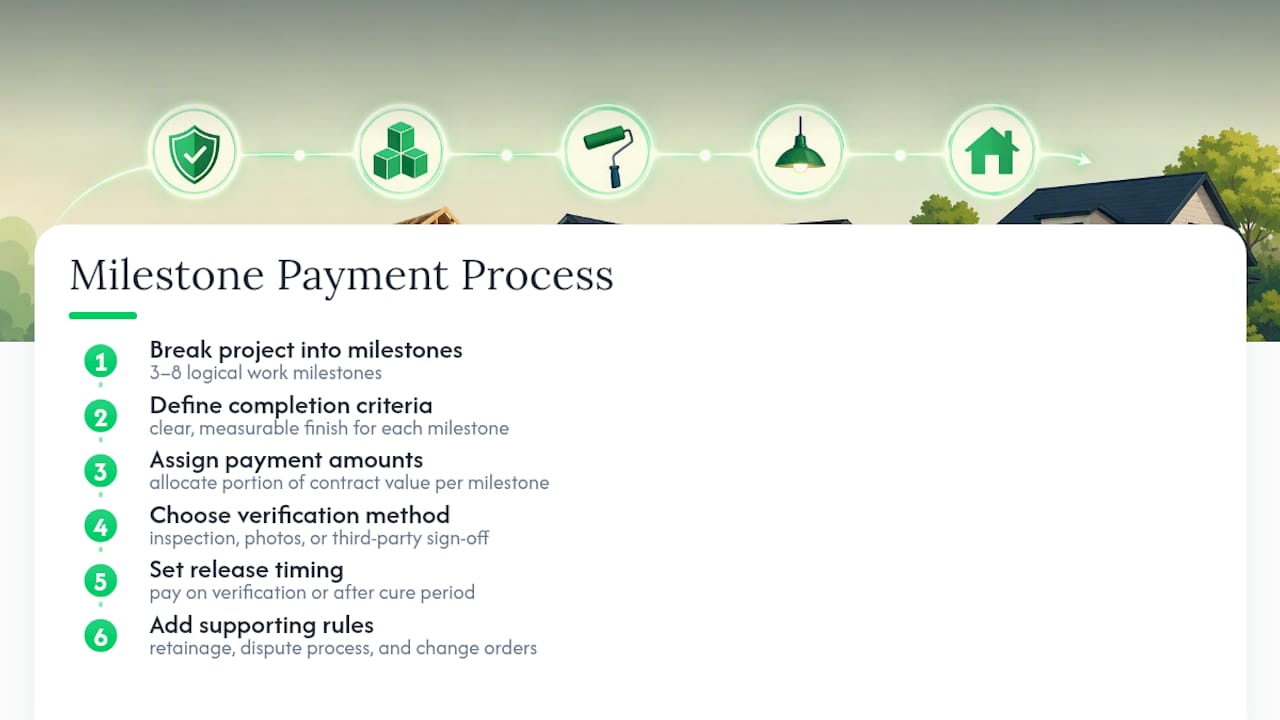
1. Break the project into 3 to 8 milestones
Start with the scope of work, not the calendar. A bathroom remodel might break into demolition, rough-in, tile and waterproofing, fixtures and cabinetry, and final punch list. A kitchen might add a separate milestone for custom cabinet delivery. Fewer than three milestones gives you too little leverage; more than eight usually means you are tracking sub-tasks that belong inside a milestone rather than as separate ones.
2. Name each milestone and define “done” in measurable terms
“Rough-in complete” is not measurable on its own. “Plumbing and electrical rough inspections passed; signed inspector card on file” is. Every milestone needs this level of specificity, because the definition is what you will point to later if there is ever a disagreement about whether payment is owed.
3. Assign a percentage or dollar amount to each milestone
Bigger, labor-heavy phases should carry more weight than quick ones. Demolition often looks impressive but represents a small share of total labor cost; do not let a milestone’s visual drama inflate its price tag.
4. Set the verification method for each milestone
This is where a schedule earns the word “verifiable.” Options include a municipal permit inspection, a joint walkthrough with signatures from both parties, dated photos attached to the invoice, or, for larger jobs, a third-party inspector. Tying verification to a permit card wherever inspections are already required removes most of the subjectivity around what counts as finished.
5. Set release timing
Specify how many business days after verification the payment is due, commonly five. This protects the contractor from open-ended delays on your end and gives you a clear window to inspect before money moves.
6. Add the supporting rules
The schedule itself is only half the exhibit. Attach the retainage percentage, accepted payment methods, the requirement for a conditional lien waiver at each payment, and the process for handling change orders. All six elements, milestone name, definition of done, verification, amount, payment method, and release timing, should appear as columns in your contract exhibit, not buried in prose elsewhere in the contract.
For larger renovations with several trades overlapping in one phase, split that phase into sub-milestones. A “rough-in” milestone that covers plumbing, electrical, and HVAC in one lump payment removes your leverage if one trade finishes late. Breaking it into three inspection-tied sub-payments keeps each trade accountable on its own timeline.
Pro Tip: If a contractor asks for a large upfront deposit on a sizable project, propose escrow instead. The full contract amount sits with a neutral third party and releases on the same milestone triggers, so the contractor has certainty the funds exist and you never lose control of money for undelivered work.
Sample Payment Schedules by Project Size
Numbers make this concrete. Below are two adaptable templates, one for a mid-size bathroom remodel and one for a larger kitchen and bath combination project. Percentages assume the deposit falls at or below what your state allows, so check your local rules before finalizing anything.
$40,000 bathroom remodel, 5 milestones
| Milestone | Trigger / Definition of Done | Verification | Payment |
|---|---|---|---|
| Deposit | Contract signed, permits filed | Signed contract on file | 10% |
| Demolition and rough-in | Old fixtures removed; plumbing/electrical rough passed | Inspector card, photos | 20% |
| Waterproofing and tile | Shower pan tested, tile set and grouted | Joint walkthrough | 25% |
| Fixtures and cabinetry | Vanity, toilet, fixtures installed and functional | Photos, walkthrough | 25% |
| Final retainage | Punch list cleared, final inspection passed | Signed walkthrough, lien waiver | 20% |
$100,000 kitchen and bath remodel, 6 milestones
| Milestone | Trigger / Definition of Done | Verification | Payment |
|---|---|---|---|
| Deposit | Contract signed, custom cabinets ordered | Order confirmation, contract | 10% |
| Demolition | Old kitchen/bath removed, site protected | Photos | 10% |
| Rough-in | Plumbing, electrical, HVAC inspections passed | Inspector cards | 20% |
| Cabinetry and countertops | Cabinets and countertops installed level and secure | Joint walkthrough | 20% |
| Finishes and fixtures | Tile, paint, fixtures, appliances installed | Photos, walkthrough | 20% |
| Final retainage | Punch list cleared, final inspections passed | Signed walkthrough, lien waivers | 20% |
Smaller repairs can scale down to a simple three-draw version: deposit, midpoint, and final. Larger, multi-phase additions should scale up to monthly progress billing tied to a detailed schedule of values, with retainage held out of every draw rather than saved entirely for the end. Preset splits like 50/50 for small jobs or 33/33/34 for mid-size projects work as a starting point, but they should still map to actual milestones rather than the calendar. If your project timeline runs long, our bathroom remodel week-by-week guide shows how real phases line up against a schedule like the one above, and our kitchen renovation timeline does the same for larger kitchen projects.
Verification, Retainage, and Safe Payment Methods
A milestone means nothing if you cannot prove it happened. Four verification methods cover almost every situation you will run into on a residential remodel:
- Municipal permit or inspection sign-off, the strongest form of proof since it comes from a third party with no financial stake in the project.
- Joint walkthrough with signatures, where you and the contractor physically confirm the milestone together and both sign a short form.
- Dated photos attached directly to the invoice for that draw, useful for milestones that do not require a permit.
- Third-party inspector, worth the cost on large projects where you want an independent set of eyes beyond the municipal minimum.
Retainage, the percentage held back until the very end, typically runs 1% to 10% depending on project size and contract terms.
At each payment, ask for a conditional lien waiver. This document states that the contractor and their subcontractors will not file a mechanics lien against your home for the amount you just paid. Without it, you can technically pay a contractor in full and still face a lien from a subcontractor the contractor never paid. It costs you nothing to ask for one, and any contractor who bills professionally will not hesitate to provide it.
On payment methods, ACH transfer and check are the standard, traceable options; a credit card works too and adds a layer of dispute protection through your card issuer. Avoid cash entirely. It leaves no paper trail if a milestone dispute ever ends up in front of a mediator or a small claims judge. For a deeper look at which payment methods contractors typically accept and why traceability protects you as the payer, this guide to contractor payment solutions breaks down the tradeoffs.
Handling Change Orders, Delays, and Payment Disputes
Scope changes are normal on almost every remodel. The problem is not that plans change; it is when they change without updating the payment schedule to match. Require a signed change order before any additional work begins, and make sure that change order states how it affects the remaining milestones, both in scope and in dollars. Our change order process guide walks through what that document should include.
Delays happen too, often from permit backlogs or supplier lead times on custom materials, not from anyone doing anything wrong. When a delay hits:
- Document the cause and the expected new timeline in writing.
- Revise the payment schedule to reflect which milestones shift and by how much.
- Agree explicitly on which payments pause and which continue, since a delay in one trade should not necessarily freeze a milestone in an unrelated one.
If a dispute arises over whether a milestone was actually met, work through it in this order:
- Stop payment only on the specific milestone in question, never the whole schedule, since withholding unrelated payments damages trust and your legal position both.
- Document the gap with photos and specific reference to the milestone’s written definition of done.
- Propose a joint walkthrough first, then mediation or arbitration if the walkthrough does not resolve it.
- Consult a construction attorney before withholding a final payment entirely or considering a mechanics lien dispute, since deadlines and procedures vary by state.
The instinct during a delay is often to freeze all payments as leverage. Resist that. Refusing to pay for milestones that genuinely were completed weakens your credibility if the dispute ever escalates, and it gives the contractor a legitimate grievance of their own. Hold back only what is actually in question.
How JAG Home Enhancements Structures and Verifies Payment Schedules
We write milestone definitions in plain, specific language before a single hammer swings, not after a homeowner asks for one. A rough-in milestone on one of our jobs reads something like: “Rough-in complete: plumbing and electrical rough inspections passed; signed inspector card on file.” No ambiguity, no room for a disagreement about whether the stage is actually finished.
Every milestone gets documented three ways: dated photos at each stage, permit and inspection cards kept on file, and a signed walkthrough with the homeowner before we invoice.
We think this level of specificity should be the standard homeowners expect from any contractor, not a bonus feature. A schedule that reads like a vague IOU protects nobody. A schedule with named milestones, defined completion criteria, and documented verification protects both the homeowner writing the checks and the crew doing the work. That alignment is what actually keeps a remodel on schedule and off the local small claims docket.
— Jeff
Get a Written, Milestone-Based Payment Schedule Built Into Your Contract
Jaghomesnow gives Bucks County homeowners something most remodeling contracts skip entirely: a payment schedule you can read and verify before you sign, not one you have to reverse-engineer after a dispute starts. We map milestones directly into your contract exhibit, define what “done” means for each phase in writing, and support punch-list sign-off so your final retainage releases only when the work is actually finished.

If you are weighing options for a deck build, a kitchen remodel, or a full exterior renovation, the schedule matters as much as the design. Our team can walk you through how milestone mapping and verification apply to your specific project size, whether that means staged draws on a kitchen and bathroom remodel or delivery-tied deposits on custom decking materials for a custom deck build. Start by reviewing how to choose a remodeling contractor in Bucks County and then reach out for a quote that comes with a schedule already built in, not one you have to negotiate line by line after the fact.
Sources
Before signing anything, check your own state’s contractor board for deposit limits. California’s CSLB rule capping down payments at $1,000 or 10%, whichever is less, is a useful benchmark, though your state’s cap may differ.
For background on schedule structure and industry cash-flow data, NetSuite’s construction payment schedule guide and Autodesk’s breakdown of payment schedule types both explain retainage norms and schedule-of-values in more depth than any single article can. For a ready-made contract exhibit, the EstimationPro payment schedule template and the BuildSafeEscrow staged-payment guide both offer downloadable formats you can adapt to the sample tables above.
- Construction Payment Schedules: Importance & Free Template | NetSuite
- Free Contractor Payment Schedule (2026) | EstimationPro AI
- Construction payment schedule types | Autodesk