

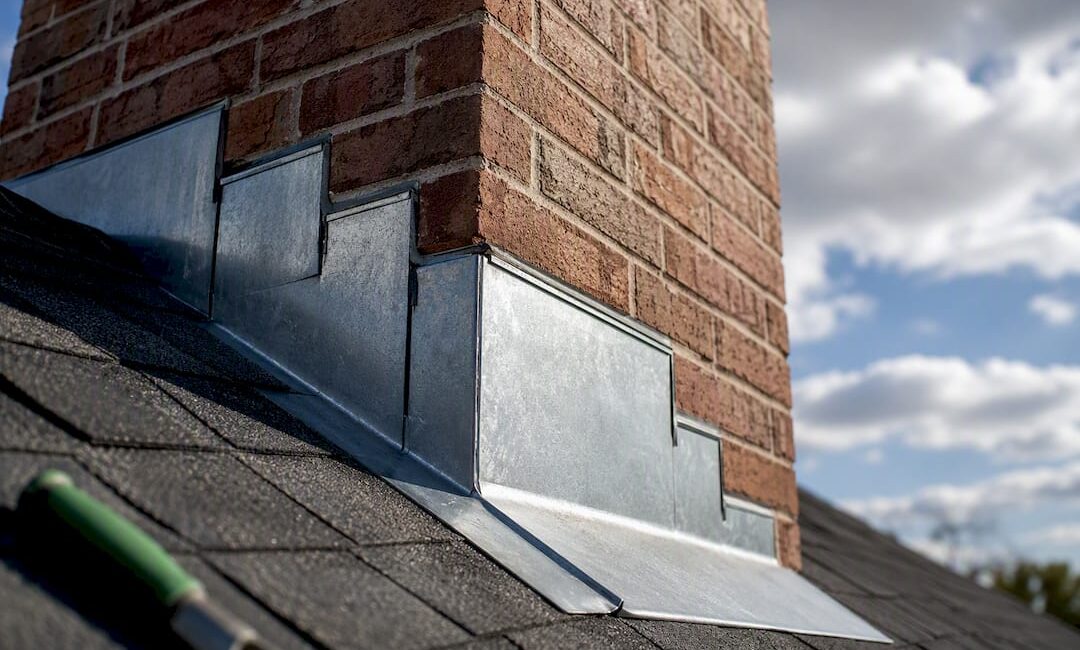
Most chimney leaks call for one of two fixes: a reseal if the metal is sound, or a full reflash if it isn’t. If a contractor’s only recommendation is caulk applied from the roof surface, get a second opinion. That’s a temporary patch, not a repair, and it usually means nobody actually diagnosed the problem.
TL;DR:
- If a chimney leak persists after a reseal, it likely involves corrosion or detachment of specific flashing components like step or apron flashing.
- Proper diagnosis requires inspecting for rust, cracks, or lifted metal, and performing hose tests and attic checks during rain to pinpoint failure modes.
- Full reflash is necessary for widespread corrosion or previous failed repairs, involving cutting a reglet groove, embedding new flashing, and replacing underlayment if needed.
- Costs vary based on chimney width, roof pitch, and access, with more extensive repairs requiring more material, labor, and sometimes masonry work.
- DIY reseals are feasible if only sealant degradation is involved, but complex reflash or masonry repairs need professional contractors with specified, detailed, line-item quotes.
Table of Contents
- What Chimney Flashing Repair Actually Involves
- How Do You Know Which Failure Mode You Have?
- What Are Your Repair Options: Reseal, Patch, or Full Reflash?
- What Does Chimney Flashing Repair Cost, and How Long Does It Last?
- Should You DIY the Repair or Hire a Professional?
- How Do You Get a Reliable Diagnosis Before You Pay for Anything?
- Why Jaghomesnow Approaches Chimney Repairs This Way
- A Contractor’s Take on What Actually Goes Wrong Here
- Get a Diagnosis-First Chimney Inspection From Jaghomesnow
- Sources
What Chimney Flashing Repair Actually Involves
Chimney flashing isn’t one piece of metal. It’s a system of overlapping parts, and each one has a specific job. When homeowners call about a “flashing leak,” they’re usually describing a failure in one of four components working together (or failing to).
The apron flashing (or base flashing) sits at the bottom of the chimney on the downhill side, directing water away from the point where the chimney meets the roof deck. Step flashing runs up the sides, with individual L-shaped pieces woven between each row of shingles. Counter flashing, sometimes called cap flashing, is embedded into the mortar joints and folds down over the step flashing like a lid, keeping water from working its way behind the metal. On chimneys wider than 30 inches, a saddle or cricket sits on the uphill side, a small peaked structure that splits water flow around the chimney instead of letting it pool against the brick.
The layering logic matters more than any single piece: every upper layer has to shed water over the layer below it, like shingles on a roof. Break that lap sequence anywhere, and water finds its way in.
Materials vary in cost and longevity:
- Galvanized steel: affordable, widely used, but prone to rust over 15 to 20 years
- Aluminum: lightweight and rust-resistant, though it can corrode against certain masonry
- Copper: the most durable option, often outlasting the roof itself
How Do You Know Which Failure Mode You Have?
A leak near the chimney can trace back to one of six distinct problems, and they often look identical from the ground. Getting the diagnosis wrong is how homeowners end up paying twice.
- Dried, cracked sealant at the counter flashing joint, where the metal was originally caulked into the mortar reglet and that sealant has aged out.
- Rusted-through step flashing, usually on older galvanized systems, where pinholes let water seep behind the shingles.
- Detached or lifted counter flashing, often from wind, ice, or a botched original installation that never got embedded properly.
- Missing or undersized cricket on a wide chimney, causing water to pool and back up under the shingles on the uphill side.
- Corroded apron flashing at the base, letting water run straight down into the roof deck below.
- Masonry-related leaks that mimic flashing failure but actually originate in a cracked crown or deteriorating mortar joints above the flashing line.
A few simple checks can narrow this down before you call anyone. Get into the attic during or right after a rain event and look for active drips near the chimney chase. Run a garden hose over specific sections of the flashing, one at a time, while someone watches the attic below. Take photos from a ladder (never walk onto a wet or steep roof), and use binoculars from the ground to check for visible gaps, rust streaks, or lifted metal.
Pro Tip: If the flashing looks intact and sealed but the leak still shows up after rain, don’t assume it’s a flashing problem. Cracked chimney crowns and failed mortar joints cause leaks that look exactly the same from inside the attic, and no amount of new flashing will fix a masonry crack.
What Are Your Repair Options: Reseal, Patch, or Full Reflash?
Not every leak needs a complete teardown. The right fix depends on how much of the system has actually failed, and matching the repair to the failure mode is what keeps costs reasonable.
Reseal. This applies when the metal itself is still in good shape and the only failure is degraded sealant at the counter flashing joint. A contractor removes the old, cracked caulk, cleans the reglet groove, and applies a fresh bead of high-grade polyurethane sealant, embedded properly rather than smeared over the surface. Done right, a reseal buys 5 to 10 years before it needs attention again.
Partial repair. When only a section has failed, such as rusted step flashing on one side or a corroded apron piece, a contractor can replace that section without disturbing the rest of the system. This works well when the counter flashing embedded in the masonry is still sound and only the shingle-side components need attention.
Full reflash. This is the real fix for widespread corrosion, a chimney that’s never had proper counter flashing, or repeated leaks after multiple reseal attempts. The process involves saw-cutting a new reglet groove into the mortar joint, embedding new counter flashing into that groove, weaving fresh step flashing under the surrounding shingle courses, and replacing underlayment if it’s deteriorated. Reusing old flashing during this process, or simply surface-mounting new counter flashing without cutting a reglet, is a shortcut that leads to failure within a few years.
Cricket installation. If your chimney measures wider than 30 inches on the uphill side, a cricket isn’t optional. It gets built into the reflash as a small peaked frame, sheathed and flashed like a miniature roof section, splitting water flow before it can pool against the brick.
What Does Chimney Flashing Repair Cost, and How Long Does It Last?
Cost tracks directly with which failure mode you’re dealing with, and the range is wide enough that a vague quote should make you suspicious.
These ranges reflect national averages, and your actual quote will move based on a few real factors. A wider chimney needs more material and possibly a cricket. A steep roof pitch slows the work and raises labor cost through added safety rigging. Difficult access, a chimney tucked against a dormer or set far from a ladder point, adds time. And if the decking or masonry underneath has rotted or crumbled, that’s an added repair on top of the flashing itself.
One detail worth knowing before you schedule anything: if your roof is already due for replacement, tackling flashing during that reroof costs meaningfully less than doing it as a standalone job later, since the roofer is already removing shingles around the chimney.
Should You DIY the Repair or Hire a Professional?
A reseal is genuinely within reach for a careful homeowner. If the metal is intact and the only issue is dried-out caulk, cleaning the old sealant out of the reglet and applying a fresh bead of polyurethane sealant is a job most people can handle safely from a stable ladder, without ever stepping onto the roof surface.
Full reflash work is a different category entirely. It calls for cutting a mortar reglet with a grinder, bending sheet metal to fit the chimney’s exact dimensions, and pulling up multiple courses of shingles to weave in new step flashing correctly. Get this wrong and you’ve created a bigger leak than you started with. Masonry repairs, cracked crowns, deteriorating mortar joints, need a mason, and coordinating that trade with your roofer matters more than most homeowners expect.
Watch for these red flags when you’re collecting quotes:
- A quote that mentions “seal” or “caulk” but never mentions removing or inspecting the existing metal
- Any plan to reuse old flashing on a full reflash job
- A scope of work with no measurements, materials, or line items, just a lump-sum number
- No mention of checking chimney width against the 30-inch cricket threshold
Ask every contractor these questions before you sign anything:
- What specific failure mode did you diagnose, and how did you confirm it?
- Will the counter flashing be embedded into a cut reglet, or surface-mounted?
- Is my chimney wide enough to require a cricket, and is one included in this quote?
- What’s the expected service life of this repair, in writing?
If your roof is already showing other signs of trouble, it’s worth having that full inspection happen at the same time rather than treating the chimney in isolation.
How Do You Get a Reliable Diagnosis Before You Pay for Anything?
A clear diagnosis is what separates a repair that lasts decades from one you’ll be paying for again in three years. Follow this sequence before you accept any quote.
- Reproduce the leak. Run a hose test on specific flashing sections while a second person watches the attic, and note exactly which section produces the drip.
- Document everything. Photograph the flashing from a ladder, and measure the chimney’s uphill-side width. Anything over 30 inches puts you in cricket territory.
- Ask pointed questions. Push every contractor to name the specific failure mode before quoting a fix, and insist on a line-item quote rather than a flat number.
- Coordinate trades if needed. If the diagnosis points to masonry, loop in a mason alongside your roofer so both scopes get addressed in the same project.
Pro Tip: Take your hose-test photos with a timestamp visible, or text them to yourself. When you’re comparing quotes from three different contractors weeks apart, having dated evidence of exactly where water entered keeps everyone honest about scope.
Why Jaghomesnow Approaches Chimney Repairs This Way
A professional contractor handles roofing repair and replacement as part of broader exterior renovation work, alongside siding, windows, and full roof systems. That range matters here because a chimney flashing problem rarely stays isolated. It touches shingles, decking, sometimes trim, and Jaghomesnow’s crews are set up to catch and address those adjacent issues in the same visit instead of sending you back out for a second contractor.
A Jaghomesnow inspection follows the diagnosis-first approach outlined above:
- Attic and roof-level inspection to confirm the actual failure mode
- Photo documentation of the affected flashing sections
- A written, line-item quote naming the specific repair scope
- Coordination with a mason directly if the leak traces back to masonry
- A clear timeline before work begins, not after
That process is designed to keep a repair from becoming a repeat expense soon after.
A Contractor’s Take on What Actually Goes Wrong Here
Most callbacks I see trace back to one decision: someone chose caulk over a proper reglet cut because it was faster and cheaper that week. It buys a season, maybe two, then the leak comes back, usually worse, because water’s been finding its way behind the metal the whole time undetected. A full reflash with embedded counter flashing costs more upfront, but it stops the cycle instead of just delaying it. If you’re staring at a quote right now, ask what failure mode they diagnosed before you ask what it costs.
— Jeff
Get a Diagnosis-First Chimney Inspection From Jaghomesnow
A caulk gun and a ladder can mask a flashing problem for a season. What actually stops the leak is a contractor who identifies the failure mode first and quotes accordingly, which is the entire approach behind how Jaghomesnow handles chimney and roof work across Bucks County.

A thorough inspection includes an attic check during or after rain, photo documentation of the specific flashing sections involved, and a written quote that names the actual repair scope rather than a flat “reseal and caulk” number. If the leak traces back to masonry, coordination with a mason can be arranged to avoid managing two separate contractors on the same problem. For chimneys tied into a larger roofing need, the exterior renovation services page covers the full scope of available services. If you’re unsure whether your current contractor’s quote holds up, the contractor vetting guide is worth reading first. Reach out to a qualified contractor to schedule an inspection and get a line-item quote before you approve any repair.
Sources
- Chimney Flashing Leak: 6 Failure Modes & Repair Cost | TRB
- Chimney Flashing Repair | Costs, Signs & Repair vs Replace | Roofs Wiki
- How to Properly Replace Chimney Flashing on a Sided Chimney
- How to Replace Flashing on a Chimney to Keep Water Out of Your Home — Family Handyman