


If your roof has taken a direct hit from a storm with hailstones large enough to cause damage, there’s a real chance your shingles have functional damage, not just cosmetic marks. Grab your phone, take ground-level photos of your roof and gutters, and hold off on climbing up there. Insurance typically covers damage that shortens the roof’s life, but not surface marks that don’t affect performance, so getting that distinction right from day one matters more than almost anything else you’ll do.
TL;DR:
- Ground-level photos of gutters and soft metal damage are crucial for documenting hail impact before climbing on the roof.
- Damage severity depends on hail size, impact energy, and shingles’ temperature at the time of impact, with larger hail causing more functional damage.
- Insurance claims are typically justified when impacts cause fractures, cracks, or torn tabs, not just superficial granule loss or cosmetic marks.
- A professional inspection should include a verified impact count, photos, and a detailed report to strengthen your claim and prevent underestimation.
- Filing within a few days, avoiding early repairs, and gathering comprehensive documentation significantly improve the chances of claim approval.
Table of Contents
- What Does Hail Damage on Asphalt Shingles Actually Look Like?
- How Do You Safely Inspect a Roof for Hail Damage?
- Is the Damage Cosmetic or Functional, and Why Does That Distinction Matter?
- How Do Insurance Adjusters Evaluate Hail Damage?
- Should You Repair the Roof or Replace It?
- Should You Handle This Yourself or Bring in a Professional?
- Do Impact-Resistant Shingles and Maintenance Reduce Future Hail Risk?
- How Jaghomesnow Approaches Hail Damage Inspections
- What Should You Do Right Now, and How Long Will This Take?
- What Mistakes Do Homeowners Make Most Often When Filing a Hail Claim?
- What Can You Do if Your Hail Damage Claim Gets Denied?
- An Honest Take on What Actually Moves Hail Claims Forward
- Get a Documented Hail Inspection From Jaghomesnow
- Sources
What Does Hail Damage on Asphalt Shingles Actually Look Like?
Hail doesn’t punch neat holes in a roof the way people expect. It bruises, strips, and cracks shingles in ways that are easy to miss from the ground and just as easy to miss from a ladder if you don’t know what you’re looking for.
Asphalt shingles cover roughly 80% of single-family homes in the United States, and hail damages them in three distinct ways: it knocks loose the ceramic granules that protect the asphalt from UV light, it dents or bruises the mat underneath, and in more severe hits, it fractures the fiberglass layer that gives the shingle its structural integrity. Each of these failure modes shows up differently, and knowing the difference is the first step toward an accurate assessment.
Here’s what to watch for on a walk around your property:
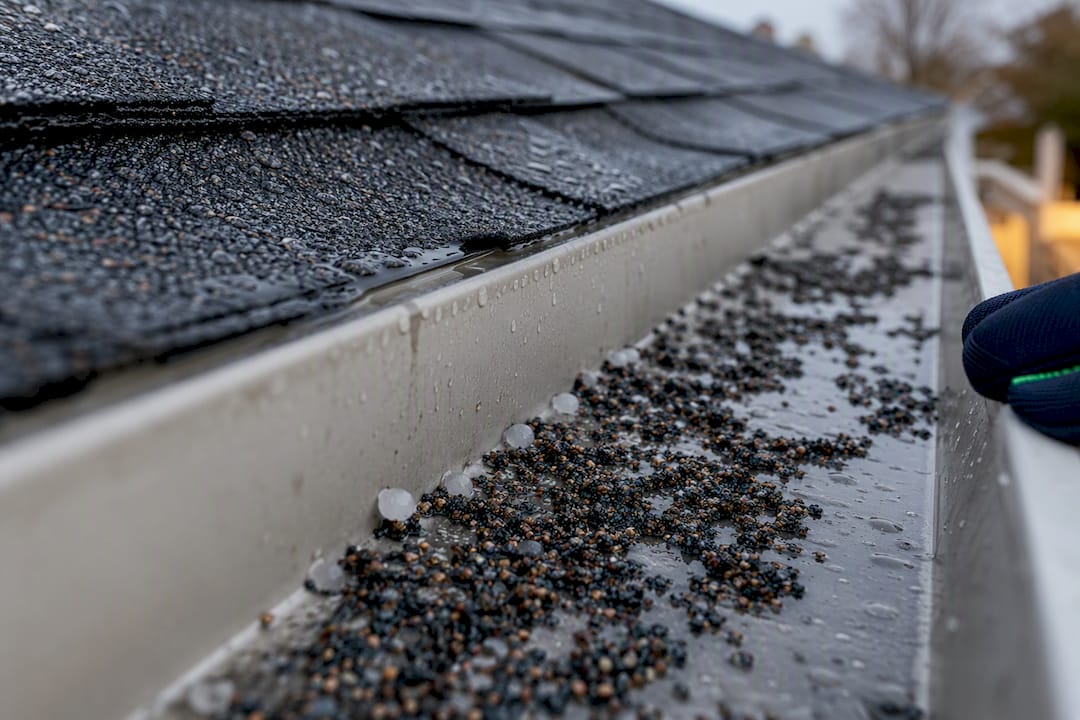
- Granule loss: dark, shiny patches on the shingle surface where the protective granules have been knocked away, often paired with granules collecting in gutters and at the base of downspouts.
- Bruising or divots: soft spots you can feel more than see, sometimes with a slight color change, that may hide a fractured mat underneath without any visible crack on top.
- Visible fractures or cracks: splits in the shingle surface that go deeper than surface wear, usually radiating from a clear impact point.
- Missing shingles or torn tabs: entire shingles blown off or tabs curled back, exposing the underlayment.
- Failed sealant strips: the adhesive strip that bonds shingle courses together has released, letting wind lift the tab even without an obvious hail mark.
Pro Tip: Granules piled up at the mouth of a downspout after a storm are one of the fastest visual cues that something significant happened up top. If you see a dark, sandy residue there, it’s worth a closer look before you assume it’s just normal wear.
Temperature plays a bigger role than most homeowners realize. Cold shingles are stiffer and brittle, so they tend to crack rather than dent, while warm shingles from a summer afternoon storm are more likely to bruise and absorb the impact without a visible break. That’s part of why a hailstorm in April can leave a different damage signature than one in July, even with similar stone sizes. The physics behind that severity curve is worth knowing too: impact energy scales with the cube of the hailstone’s diameter, so a stone that’s only slightly larger than another can hit with dramatically more force, which explains why damage tends to jump sharply once hail crosses that one-inch threshold rather than increasing gradually with size.
How Do You Safely Inspect a Roof for Hail Damage?
You don’t need to get on the roof to build a strong case that something happened up there. In fact, climbing up right after a storm is often the wrong move, both for your safety and for your claim.
Work through this sequence, starting with what you can see from solid ground:
- Scan from the ground with binoculars. Look for random, scattered marks across a slope rather than a tight cluster, since true hail damage tends to hit in a scattered but consistent pattern across the whole roof face that took the brunt of the wind-driven storm.
- Check your gutters and downspouts. Granule loss is often visible right there in the gutter troughs and at downspout outlets, and photographing that buildup is one of the fastest ways to document significant granule loss without ever touching a ladder.
- Inspect soft metal around the property. Roof vents, flashing, window screens, and even your air conditioner’s fins are softer than asphalt shingles and dent more easily. Dented soft metal in a pattern that matches your roof’s exposure is strong corroborating evidence that hail hit hard enough to matter.
- Look at your attic. Daylight coming through the roof deck, fresh water stains on the underside of the sheathing, or damp insulation are signs that a shingle failure has already let water in, which escalates the damage from cosmetic to functional pretty quickly.
- Stop if your roof pitch is steep or wet. Anything beyond a gentle slope, or any roof that’s still damp from the storm, isn’t worth the risk. Call a professional roofing inspector or ask about a drone inspection instead of pushing your luck on a ladder.
Storms that produce damaging hail are most common in spring and summer across hail-prone regions tracked by NOAA, so if you live somewhere that gets regular severe weather, it’s worth doing this ground-and-gutter check after every significant storm, not just the ones that make the local news.
If you notice any of the signs of a roof leak inside your home, like a stain spreading across a ceiling or a musty smell in an upstairs closet, that’s your cue to move from “keep an eye on it” to “get someone up there now.” Water doesn’t wait for your insurance paperwork to catch up.
Is the Damage Cosmetic or Functional, and Why Does That Distinction Matter?
This is the single most important question in the entire process, because it determines whether your insurer is likely to pay for anything at all.
Cosmetic damage changes how a shingle looks without changing how it performs. A shingle that lost some granules and shows a slightly discolored patch, but still sheds water and holds its seal, is cosmetically marked, not functionally compromised. Functional damage is different: it’s a fractured mat, a cracked shingle, a torn tab, or a failed seal that actually shortens how long the roof will last and protect your home. Industry guidelines for assessing hail damage draw this line explicitly: only functional damage typically justifies a claim, and granule loss alone, without an underlying fracture, usually doesn’t qualify.
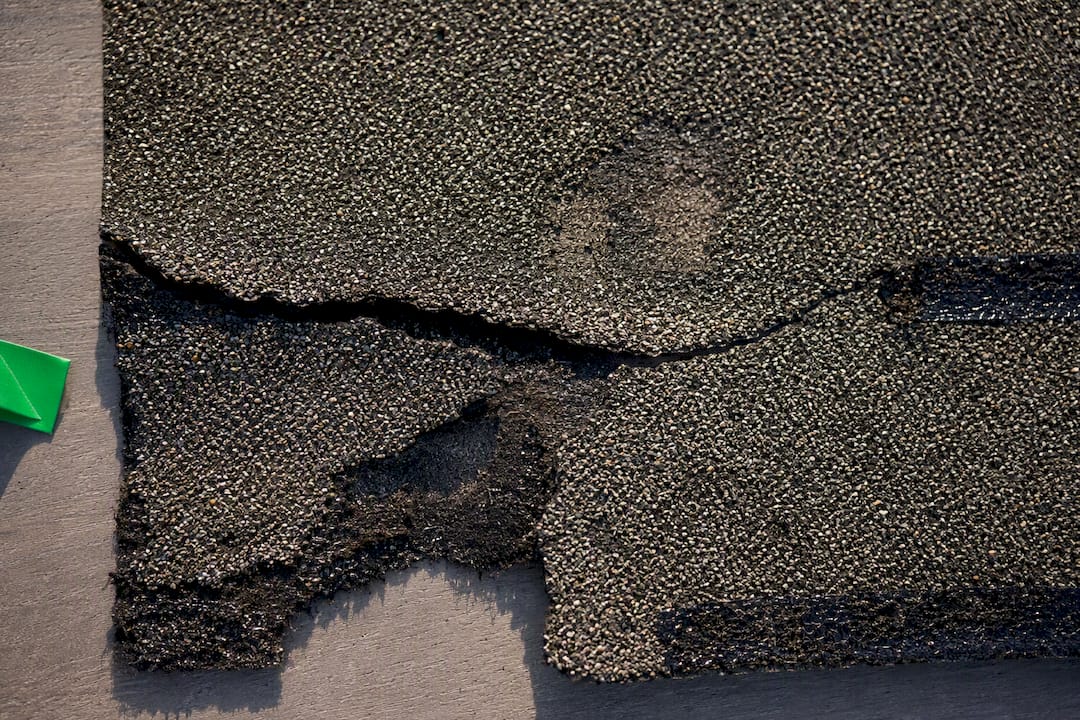
Concentration matters more than most homeowners assume. A few scattered marks spread thin across a whole slope read very differently to an adjuster than a tight cluster of hits in one section, even if the total granule loss looks similar. Concentrated functional damage on a single area is treated as more serious than the same amount of loss spread thin across the whole roof, because it signals a weak point that’s more likely to fail first.
There’s a simple test you can try yourself before calling anyone: rub carpenter’s chalk across a suspect area of the shingle. Chalk sticks in bruised, granule-stripped spots and wipes clean off undamaged surface. It won’t tell you whether the mat is fractured underneath, but it’s a fast way to map where the impacts landed before a professional gets up there.
- Cosmetic: minor granule loss, slight discoloration, no crack or bruise underneath.
- Functional: fractured mat, visible crack, torn tab, failed seal, or exposed underlayment.
- Gray area: a bruise that feels soft but shows no surface crack. This is where a trained inspector’s hands, not your eyes, make the call.
Age changes the equation, too. The exact same hailstorm can leave one roof with purely cosmetic marks and another with genuine functional failure, simply because asphalt stiffens and grows brittle as it ages. A five-year-old roof might shrug off a storm that cracks the mat on a fifteen-year-old roof next door.
How Do Insurance Adjusters Evaluate Hail Damage?
Adjusters don’t eyeball a roof and issue a verdict. Most rely on a structured method called the test square, and understanding it before the adjuster shows up puts you in a much stronger position.
The process typically works like this: the adjuster (or your contractor, if one is present) marks out a 10 foot by 10 foot section on each affected slope and counts every qualifying hit inside that square. A qualifying hit is one that shows real granule displacement or bruising, not just a mark. A commonly cited benchmark is around eight qualifying hits per test square to justify replacing that slope, though this number isn’t universal. Carrier rules vary by region and by policy, and some insurers apply stricter or looser standards depending on state regulations and local storm history.
Professional evaluators often apply a conservative rule when doing this math: they count no more than one qualifying impact per shingle when calculating percentage damage across a sample area, even if a shingle shows multiple marks. That keeps the scope honest and defensible if the claim gets challenged later.
Documentation is what turns “we think there’s damage” into “here’s the evidence.” Bring these to the table before your insurer even schedules a visit:
- Photos of gutter and downspout granule accumulation, taken the same day or within a day or two of the storm.
- Close-up shots of dented soft metal on vents, flashing, and AC units.
- Attic photos showing any staining, daylight, or wet insulation.
- A written report from a roofing contractor with a documented hit count per slope.
It’s also worth understanding the money side before you sign anything. Here’s how the terms that show up in most homeowner policies break down:
| Term | What It Means | Why It Matters |
|---|---|---|
| RCV (Replacement Cost Value) | Pays what it costs to replace the roof today | Higher payout, but often released in stages |
| ACV (Actual Cash Value) | RCV minus depreciation for the roof’s age | Lower payout on older roofs |
| Flat deductible | A fixed dollar amount you pay before coverage kicks in | Predictable, doesn’t scale with claim size |
| Percentage deductible | A percentage of your home’s insured value | Can be significantly higher on expensive homes |
Once you have your documentation together, follow this order: schedule a contractor inspection, photograph everything, then notify your insurer. Resist the urge to start any permanent repairs before the adjuster has documented the damage themselves. Fixing anything early, even patching a single shingle, can give an insurer grounds to question the claim later.
Should You Repair the Roof or Replace It?
The honest answer depends on three factors working together: how old your roof is, how widespread the damage is, and whether your exact shingle is still available to buy.
Age sets the baseline. A roof under roughly 10 years old, still well within its expected service life, is generally a better candidate for a targeted repair, assuming the damage is limited to one or two slopes. Once a roof passes the halfway mark of its expected lifespan, insurers and contractors alike lean toward replacement, since the remaining shingle stock is already showing wear that compounds with hail impact.
Spread matters just as much as age. Damage isolated to a single slope, especially one facing the direction the storm came from, is often handled as a slope-specific repair. Damage that shows up across multiple slopes, or in a scattered pattern across the whole roof, usually pushes insurers toward a full replacement, because patchwork repairs on a roof that old rarely hold up as well as a clean tear-off.
Then there’s the practical matter of matching shingles. Manufacturers discontinue color runs and product lines regularly, and if your exact shingle isn’t available anymore, a visible patch job, mismatched color, slightly different texture, becomes its own cosmetic problem even after a technically sound repair. This single issue pushes more borderline decisions toward full replacement than most homeowners expect.
On cost, expect a wide range depending on region and scope. A localized repair covering a handful of shingles on one slope often runs into the low thousands, while a full tear-off and replacement for an average roof typically runs several times that before insurance reimbursement factors in. Those figures shift a lot with roof size, pitch, and material, so treat them as a starting point for the conversation with your contractor, not a quote.
If you’re on the fence, our breakdown of repair versus replacement decisions walks through the same factors in more depth, and it’s worth reading before your adjuster visit so you’re not hearing these terms for the first time in the moment.
Should You Handle This Yourself or Bring in a Professional?
There’s a strong temptation to grab a caulk gun and patch a few obviously damaged shingles yourself. Resist it until the claim process has run its course.
- Don’t touch permanent repairs before documentation is complete. Starting repairs before an adjuster or contractor has counted and photographed the damage can jeopardize your reimbursement, since there’s no longer physical evidence for anyone to verify.
- Consider the safety and code angle. Roofing work often requires permits depending on your municipality, and improper installation can void a manufacturer’s warranty even on shingles that weren’t hail damaged.
- Know what a professional inspection actually delivers. A qualified roofer should hand you a written report with a documented hit count per slope, photos tied to specific locations on the roof, and a clear recommended scope of work, not just a verbal “yeah, it’s damaged.”
- Ask contractors pointed questions before hiring one. How many insurance claims have they documented in the past year? Do they provide photo-backed reports? What warranty comes with the repair or replacement work?
Pro Tip: A contractor who’s worked storm claims before will often walk the roof with you and the adjuster together. That’s not just good service. It’s a second set of trained eyes verifying the hit count in real time, which tends to smooth out disputes before they start.
Do Impact-Resistant Shingles and Maintenance Reduce Future Hail Risk?
If you’re replacing a roof anyway, this is the moment to think about whether your next shingle choice can cut your exposure the next time a storm rolls through.
UL 2218 is the impact-resistance standard that rates shingles from Class 1 to Class 4 based on how they hold up to steel balls dropped from increasing heights, simulating hailstones. Class 4 shingles offer the strongest resistance to mat fracture and are the product most likely to survive a severe hail event without functional damage. Class 3 sits a step below, offering meaningfully better performance than standard shingles without the full price premium of Class 4.
- Class 4 shingles resist larger impacts than standard three-tab or architectural shingles and can lower your replacement risk after future storms.
- Many insurers offer premium discounts for impact-rated roofing, though the discount amount and eligibility vary by carrier and state.
- Upgrading typically adds cost to a replacement project, so weigh that against the discount and the reduced odds of a future claim.
- Proper attic ventilation keeps shingles cooler in summer, and cooler shingles tend to bruise rather than fracture under impact, which is a meaningful factor in overall mat durability.
- Routine maintenance, clearing debris, checking seals annually, and addressing minor wear promptly, keeps shingles in the condition where they can absorb an impact rather than fail outright.
None of this prevents hail damage outright, since a large enough stone will mark almost any shingle. But the combination of a higher impact class and good ventilation measurably narrows the gap between “this storm was a nuisance” and “this storm cost us a new roof.”
How Jaghomesnow Approaches Hail Damage Inspections
We built our hail inspection process around the same principle this whole guide is built on: documentation wins claims, and guesswork loses them.
When you request an inspection, our team walks every accessible slope, applies the same test-square counting method adjusters use, and photographs every qualifying hit alongside the collateral evidence, gutter granules, dented vents, attic staining, that supports a stronger claim. You’ll get a written report with a photo library organized by location, a documented hit count per slope, and a recommended scope of work you can hand directly to your insurance adjuster.
Here’s what to have ready when you reach out:
- Your own ground-level and gutter photos from right after the storm.
- The approximate date of the hail event, since insurers often ask for this to cross-reference weather data.
- Your roof’s approximate age, since that affects both the cosmetic-versus-functional call and the repair-versus-replacement recommendation.
We also cover the manufacturer and workmanship warranty details that come with any replacement work, since a hail claim is often the moment homeowners first ask how their warranty actually works. If you’re weighing whether a repair will hold up long term, our guide on knowing when it’s time for a full roof replacement covers the same age and condition thresholds we use in the field.
What Should You Do Right Now, and How Long Will This Take?
Here’s the sequence that keeps your options open and your claim clean, from the moment the storm passes to the day repairs wrap up.
- Right now: photograph your roof from the ground, check your gutters for granules, and don’t attempt any permanent repairs yet.
- Within 24 to 72 hours: schedule a contractor inspection and photograph any collateral damage to vents, flashing, and AC units while it’s still fresh.
- After the inspection: notify your insurer, hand over your documentation, and schedule the adjuster visit, ideally with your contractor present.
- Expect a timeline: adjuster visits are typically scheduled within one to two weeks after filing, especially after a widespread regional storm when claim volume spikes, with repair or replacement work starting once the scope and payment terms are settled.
Every step here builds on the one before it. Skip the early photos, and you’re relying on memory during a claim dispute weeks later.
What Mistakes Do Homeowners Make Most Often When Filing a Hail Claim?
The most common mistake is waiting too long to document the damage. Granules wash away, dented metal gets bumped back into shape by wind, and the physical evidence that supports your claim degrades with every passing storm.
A close second is starting repairs before the adjuster has seen the damage. Even a well-intentioned patch job removes the evidence an adjuster needs to verify your claim, and it can create grounds for a denial if the insurer suspects the damage was pre-existing.
Homeowners also frequently file claims for purely cosmetic damage, expecting full coverage, then feel blindsided when the insurer denies it. Reading your policy’s specific language on cosmetic damage exclusions before you file saves a lot of frustration.
Another frequent error is accepting the first adjuster estimate without a contractor’s independent hit count. Adjusters are working through a high volume of claims after a regional storm, and a rushed inspection can undercount qualifying hits, especially on multi-slope roofs where damage isn’t evenly distributed.
Finally, some homeowners let the claim window close. Most policies set a deadline for filing after a storm event, often measured in months, and missing it can forfeit coverage entirely regardless of how clear the damage is.
What Can You Do if Your Hail Damage Claim Gets Denied?
A denial isn’t necessarily the final word. Start by requesting the adjuster’s full written report, including their test-square counts and photos. Compare it against your own contractor’s documentation, since discrepancies in hit counts or missed slopes are the most common grounds for a successful appeal.
If your contractor’s report shows a materially different hit count than the insurer’s adjuster, you have the right to request a re-inspection, sometimes with a different adjuster or a third-party appraiser involved. Many state insurance departments also offer a formal complaint or mediation process for disputed claims, and filing one costs nothing but time.
Understanding functional damage as insurers define it helps here too, since disputes often come down to whether specific damage meets that threshold or falls into the cosmetic category the policy excludes.
If the dispute stalls, a public adjuster or an attorney who specializes in property claims can review your policy language and push back on a denial with more leverage than most homeowners have alone. This step usually only makes financial sense on larger claims, given the fees involved, but it’s worth a conversation if the denial covers a full roof replacement rather than a minor repair.
Keep every piece of correspondence with your insurer in writing, even if it started as a phone call, since a documented paper trail is exactly what strengthens an appeal.
An Honest Take on What Actually Moves Hail Claims Forward
Most hail damage guides spend too much time on identification and not nearly enough on the documentation habits that actually decide whether a claim gets paid. The research behind this guide points to one clear conclusion: a homeowner with gutter photos, a contractor-verified hit count, and attic evidence taken within days of the storm has a fundamentally stronger position than one who waits and relies on the adjuster’s word alone.
The conventional advice, “call your insurer first”, often works against homeowners. Insurers move faster and more fairly when you arrive with a contractor’s documented scope already in hand, not when you’re the one waiting on their timeline to even schedule a look. The cosmetic-versus-functional distinction gets glossed over constantly, and that single misunderstanding is behind more denied claims than any dispute over price.
If you take one thing from this guide, prioritize the evidence trail before anything else. Everything downstream, the adjuster visit, the repair scope, the payout, depends on what you documented in the first 72 hours.
— Jeff
Get a Documented Hail Inspection From Jaghomesnow
We provide a documented, photo-backed inspection report you can hand directly to your insurance adjuster, with support available for warranty questions after the claim closes. You receive a written scope with a test-square count per slope and a photo library organized by location on the roof.

If your roof took a hit this season, the next move is simple: reach out and request an inspection before you file anything with your insurer. We’ll walk the roof, document what we find, and give you a report that holds up whether you’re pursuing a repair or a full replacement. For homeowners weighing a broader exterior refresh alongside the roof work, our exterior renovation services cover siding, gutters, and trim in the same visit, so storm damage assessment and long-term home value improvements can move forward together instead of as separate headaches.
Sources
- Guidelines to Assess Hail Damage to Shingle Roofs
- Hail damage to asphalt shingles: how it happens and how to spot it
- Hail damage roof repair: process, cost & insurance
- IBHS — shingle performance ratings