

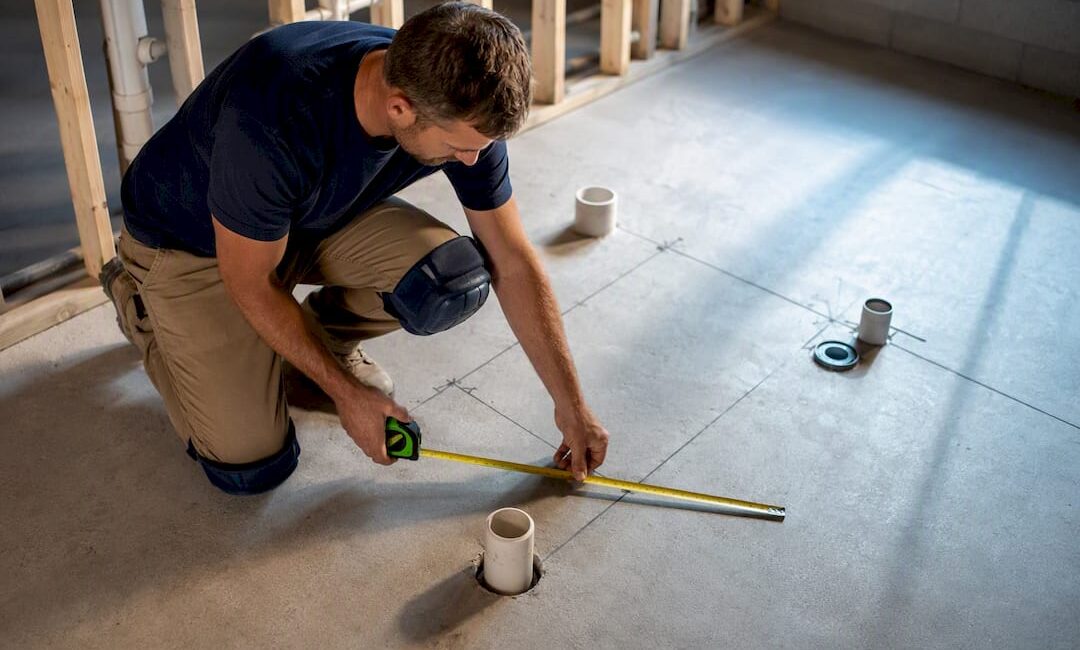
A basement bathroom rough-in is the set of capped drain, vent, and supply stubs placed so a future bathroom can connect without breaking the slab. The core pieces are a toilet stub, sink supply and waste lines, a shower drain, and vent stubs. Your next decision is whether those stubs sit high enough for gravity drainage or whether you need a pump or upflush solution: locate the stubs and any cleanout, then measure elevation or call a plumber.
TL;DR:
- Proper planning of elevation, fixture placement, and future access during rough-in can save thousands of dollars by avoiding costly rework and retrofit delays.
- A basement rough-in typically costs between $500 and $1,000 during initial construction, but retrofitting can reach $5,000 to $10,000 due to concrete cutting and patching.
- If the basement floor is within a few inches of the sewer invert, consider options beyond a pump system, like repositioning fixtures or verifying gravity drainage feasibility.
- Ensuring correct vent sizing, slope, and adherence to local codes is critical to prevent inspection failures and future drain or odor problems.
- Using designated tools and materials, coordinating trades, and planning for future upgrades can streamline installation and minimize homeowner regrets.
Table of Contents
- What’s included in a basement bathroom rough-in
- How to read the rough-ins already in your basement
- Gravity drains, ejector pits, and upflush systems compared
- Planning fixture placement to avoid costly rework
- Venting, slope, and the code basics that decide pass or fail
- Keeping moisture and odor out of a basement bathroom
- What rough-in work costs and how long it takes
- Getting ready for the contractor walk-through
- What your local code requires before you finalize plans
- Common mistakes homeowners make during a rough-in
- Tools and materials to have on hand for the rough-in
- Coordinating plumbing with electrical and framing work
- Building in room for tomorrow’s bathroom upgrade
- Why the planning stage prevents most homeowner regrets
- How JAG Home Enhancements can help with your basement bathroom project
- Sources
- FAQ
What’s included in a basement bathroom rough-in
When a builder or a previous owner says a basement is “roughed in,” they mean specific pipes are already in place, capped, and waiting. Knowing what each piece looks like helps you evaluate a house or a past renovation honestly.
- Toilet flange stub: usually a 3 inch or 4 inch pipe capped flush with or slightly above the floor, marking where the toilet will sit.
- Sink waste and supply stubs: a smaller drain pipe (typically 1.5 inch) paired with two capped water lines for hot and cold.
- Shower or tub drain: a 2-inch drain, sometimes inside a boxed-out area, a framed and slightly recessed section of slab poured lower to accommodate a shower base later.
- Vent stacks: pipes tied into the main vent system that let sewer gas escape and let drains flow properly.
- Cleanouts: capped fittings that give a plumber or camera access to the line for inspection or clearing a clog.
A boxed-out shower area saves the builder from having to cut concrete again later, since the lower pour already anticipates the shower pan’s depth.
How to read the rough-ins already in your basement
Before you call anyone, walk the basement floor and look for capped pipes poking up near an exterior wall or close to where the main stack runs through the house. These are usually grouped, since builders cluster fixtures to shorten runs.
- Photograph everything: take wide shots and close-ups of each capped pipe, including anything stamped or marked on the cap itself.
- Measure diameter: a 3 to 4 inch pipe is almost always the toilet stub, a 2 inch pipe usually serves a shower or tub, and 1.5 inch pipe serves a sink or floor drain.
- Find the cleanout: it looks like a capped fitting, often with a square or hex plug, and gives access to check slope and elevation.
- Check invert elevation: the simplest method is a string level or laser level run from the stub to the point where your line meets the home’s main sewer line or ejector pit. When you cannot get a clear read, ask a plumber to run a camera.
- Watch for red flags: stubs sitting flush with the slab and no visible slope toward an exit point, or a main line that exits the house well above the basement floor, usually mean you are looking at a pump-assisted job, not a gravity one.
Gravity drains, ejector pits, and upflush systems compared
The single biggest cost driver in a basement bathroom is whether waste can flow downhill to the sewer or septic line, or whether it needs mechanical help getting there.
- Gravity-fed drains work when the basement floor sits above the sewer’s invert elevation. They are the simplest and lowest-maintenance option, since there are no moving parts to fail.
- Sewage ejector pit and pump systems collect waste in a basin sunk into the slab, then pump it up to the main line. They require excavation for the basin, a dedicated electrical circuit, proper venting, and periodic pump maintenance.
- Macerating or upflush systems grind waste and push it through small-diameter pipe, often routed along the ceiling or through a wall. According to one comparison of ejector pumps and upflush toilets, these units can often be installed on top of the slab behind a rear-discharge toilet, which avoids cutting concrete entirely.
Your decision usually comes down to four factors: the elevation difference between your basement floor and the sewer invert, how much slab disruption you are willing to pay for, whether you’re on septic or municipal sewer (septic systems can have stricter pump and venting requirements), and your tolerance for the occasional hum of a macerator pump.
Pro Tip: If your basement floor sits within a few inches of the sewer invert, get a second opinion before committing to an ejector pit. Sometimes a slightly repositioned fixture layout is all it takes to make gravity work.
Planning fixture placement to avoid costly rework
Where you put the toilet, sink, and shower matters almost as much as how you plumb them. Stacking a basement bathroom directly under or near an existing upstairs bathroom, or locating it close to where the main sewer line exits the house, shortens pipe runs and lowers both material and labor costs.
- Plan for 30 inches of clear space in front of the toilet and 24 inches in front of the vanity, standard clearances that most codes and comfortable layouts share.
- Keep the toilet centerline at least 15 inches from any wall or fixture, a common minimum that prevents cramped installations.
- Group the toilet, sink, and shower along a single wet wall, a dedicated plumbing spine that makes future repairs or upgrades far easier to access.
- Leave the shower drain boxed out during the initial pour if you are not finishing the bathroom right away, since re-cutting a finished slab later costs far more than adjusting an unfinished one.
Good placement decisions made now are the difference between a smooth build later and a contractor telling you the layout you want means moving a drain.
Venting, slope, and the code basics that decide pass or fail
Every fixture needs a working trap to block sewer gas and a vent to let air in behind the flowing water, or drains will gurgle, drain slowly, or siphon dry. Get these wrong and your rough-in will fail inspection regardless of how good the rest of the work looks.
- Drain lines typically need a minimum slope of 1/4 inch per linear foot, though some jurisdictions allow 1/8 inch per foot in specific situations, so verify locally before you commit to a layout, per federal drainage slope guidance.
- The often-cited “135 rule” generally concerns vent pipe offsets and how far a fixture can sit from its vent connection, and the exact figures vary by code edition, so confirm the current standard with your local building authority.
- Inspectors typically check slope with a level, confirm vent continuity by looking for unbroken connections back to the stack, and verify that trap seals hold water before signing off.
- Expect the inspector to visit before the concrete pour if you’re roughing in during new construction, since covering the pipes makes later verification impossible.
Keeping moisture and odor out of a basement bathroom
Basements trap humidity more than any other room in the house, and a bathroom adds steam and standing water to that equation. Getting ventilation right up front protects your finishes for years.
- Size the exhaust fan using HVI or ASHRAE guidance, and evaluate its rating at 0.25 inch water gauge, the realistic static pressure in most duct runs, rather than the 0.1 inch water gauge many manufacturers used to advertise higher numbers, according to Building America’s ventilation guidance.
- Run the duct as short and straight as possible to a proper exterior termination, since long runs or sagging flex duct choke airflow and invite backdrafts.
- Use cement backer board, epoxy grout, porcelain tile, or sealed luxury vinyl plank behind and around wet areas, materials that resist the humidity a basement bathroom generates.
- Pair the fan with continuous or timer-based operation, and consider a standalone dehumidifier if the rest of the basement runs damp, an approach covered in more detail in our basement moisture control guide.
Pro Tip: A fan that sounds strong but leaves the mirror fogged after ten minutes is usually undersized for real-world duct pressure, not just noisy. Homeowners troubleshooting a similar symptom, like peeling paint near the ceiling, can find useful diagnostic steps in this guide to checking bathroom fan airflow.
What rough-in work costs and how long it takes
Cost depends heavily on timing. According to one comparison of rough-in versus retrofit costs, a rough-in placed during the original slab pour commonly runs a few hundred to around a thousand dollars, while retrofitting drains into an already-poured slab, which means cutting and patching concrete, can run several thousand for a basic bathroom.
- During new construction: pipes go in before the pour, inspection happens on exposed lines, and the actual rough-in work often takes a single day.
- Retrofit into existing slab: expect concrete cutting, trenching, pipe installation, inspection, and patching, which stretches the timeline to several days or more depending on excavation depth.
- Permits: most jurisdictions require a plumbing permit for a new bathroom, with inspectors checking drain slope, vent continuity, and, for pump systems, the dedicated electrical circuit.
- Cost inflators: long pipe runs back to the main stack, a sewer invert that requires deep excavation to reach, and septic systems with stricter venting or pump requirements all push the estimate higher.
Homeowners planning a full basement finish should also budget time for the inspection windows between rough-in and drywall, detailed in our basement finishing timeline.
Getting ready for the contractor walk-through
Walking a plumber through your basement with the right information in hand gets you comparable estimates instead of guesswork.
- Gather your data first: photos of existing stubs, pipe diameter measurements, cleanout location, and the elevation reading between your floor and the main stack.
- Ask about drainage recommendation: whether the plumber sees your situation as gravity-friendly or a candidate for an ejector pit or upflush unit, and why.
- Ask about the electrical and maintenance picture: any pump system needs a dedicated circuit and periodic servicing, so ask what that involves and how often.
- Require a written estimate: it should spell out permit handling, who pulls the permit, and what happens if the invert elevation forces a mid-project change.
- Ask about site protection: dust containment, floor protection, and debris removal expectations if slab cutting is part of the job.
What your local code requires before you finalize plans
Plumbing codes vary by jurisdiction, and a basement bathroom touches several code sections at once: drainage slope, vent sizing, trap requirements, and, if a pump is involved, electrical rules for the dedicated circuit. Most municipalities adopt a version of the International Plumbing Code or the Uniform Plumbing Code, then layer on local amendments, so the same rough-in that passes in one township can require changes in the next.
The safest approach is to treat any general guideline, including the slope and vent rules discussed earlier, as a starting point rather than a final answer. Building departments publish their adopted code edition and any local amendments, and a quick call or visit to the permit office before you finalize a layout can save a redesign later. If your basement bathroom will drain to a sewage ejector pump, expect the electrical inspector to check that the circuit is dedicated and properly grounded, separate from general household wiring.
Local exhaust fan requirements deserve the same scrutiny, since minimum CFM ratings and duct termination rules differ by area; our local guide to bathroom exhaust fan code walks through what inspectors in our service area typically check. Wherever you live, bring your layout sketch and elevation measurements to the permit office before pipes go in the ground. Catching a code conflict on paper costs nothing; catching it after the concrete cures costs real money.
Common mistakes homeowners make during a rough-in
The same handful of errors show up again and again in basement bathroom projects, and nearly all of them are avoidable with a little forethought.
- Skipping the elevation check. Homeowners assume gravity will work because “the pipe looks like it slopes,” without ever measuring against the actual sewer invert, then discover mid-project that a pump is required.
- Undersizing the vent. A drain without a properly sized, continuous vent will gurgle, drain slowly, and can fail inspection outright.
- Ignoring the boxed-out shower area. Pouring a flat slab without a recessed shower pan area means cutting concrete again later, an expense that a few extra minutes of planning avoids entirely.
- Choosing fixture locations for aesthetics before checking pipe runs. A beautifully placed vanity on the opposite side of the room from the stack can double your pipe run and your cost.
- Underestimating ventilation needs. A basement bathroom without adequate exhaust invites mold behind tile and warped trim within a year or two.
- Delaying the permit. Some homeowners start rough-in work before pulling a permit, assuming they will “get it inspected later.” Most jurisdictions require inspection of open trenches and exposed pipe before any concrete or drywall covers them, so working ahead of the permit risks having to undo finished work.
- Forgetting the dedicated circuit for a pump. An ejector pump wired into a shared circuit can trip breakers or, worse, fail silently during a power event.
Avoiding these mistakes usually costs little more than an extra measurement or a phone call, compared to the expense of correcting them after the fact.
Tools and materials to have on hand for the rough-in
A basement bathroom rough-in calls for a specific set of tools and materials, whether you’re supervising a contractor or simply want to understand what should show up on the job site.
Tools:
- Laser level or string level for checking pipe slope and invert elevation
- Reciprocating saw or PVC pipe cutter for cutting drain and vent lines
- Concrete saw and jackhammer, when slab cutting is required for a gravity retrofit
- Stud finder and tape measure for laying out clearances and wet wall framing
- Plumber’s camera or borescope, useful for confirming the condition and slope of an existing capped stub
Materials:
- PVC or ABS pipe in the diameters matching each fixture: typically 3 to 4 inch for the toilet, 2 inch for the shower, and 1.5 inch for the sink
- Cleanout fittings and caps for future access
- PEX or copper supply lines for hot and cold water
- Vent pipe and fittings sized to match local code requirements
- For pump-based systems, an ejector basin, pump, check valve, and dedicated electrical wiring, or a macerating upflush unit with its manufacturer-specified discharge pipe
Buying the correct diameter and material the first time avoids the delay and expense of a second trip to the supply house mid-project.
Coordinating plumbing with electrical and framing work
A basement bathroom rough-in rarely happens in isolation. The plumber, electrician, and framer all touch the same walls and floor space, and poor sequencing between them causes more delays than any single trade’s mistakes.
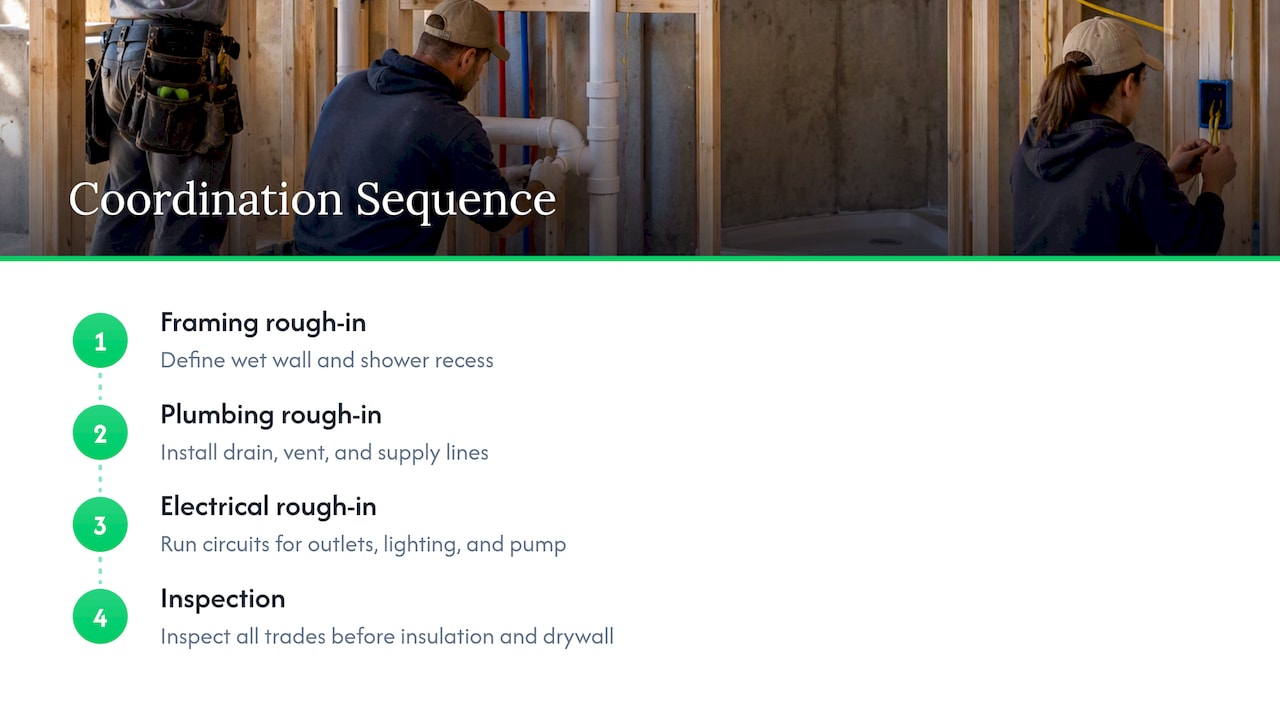
Framing typically needs to define the wet wall and any boxed-out shower area before the plumber sets final pipe locations, since moving a stud after pipes are set means recutting drain lines. Electrical work overlaps directly when a sewage ejector or macerating pump is part of the plan: that pump needs its own dedicated, properly grounded circuit, and the electrician needs to know its exact location before running wire through the framed walls. Lighting, a GFCI outlet near the vanity, and any exhaust fan wiring should also get planned during this phase, not added as an afterthought once drywall goes up.
A practical sequence looks like this: framing roughs in the wet wall and any recessed shower area first, the plumber sets drain, vent, and supply lines, the electrician runs circuits for outlets, lighting, and any pump, and then all three trades’ work gets inspected before insulation and drywall close everything in. Skipping ahead, say, closing walls before the electrical inspection, often means a contractor has to reopen finished work to prove compliance. Homeowners managing the project themselves should confirm with each trade who is responsible for scheduling their portion of the inspection, since a missed inspection window can stall the entire schedule by days or weeks.
Building in room for tomorrow’s bathroom upgrade
A rough-in installed today does not need to lock you into today’s fixtures forever. A few extra choices at this stage make future upgrades, a larger shower, a second sink, a heated floor, far simpler and cheaper to add later.
Oversizing the vent stub slightly, within what your local code allows, gives you flexibility if you later add a fixture that increases fixture unit load on that line. Leaving the wet wall accessible, rather than closing it permanently behind tile with no access panel, means a future repair or upgrade does not require tearing out finished work. If you box out a shower area now but do not finish the bathroom right away, oversize that recess slightly to accommodate a larger shower base than you might install today, since resizing a boxed-out area later is far cheaper than doing it after finish work is complete.
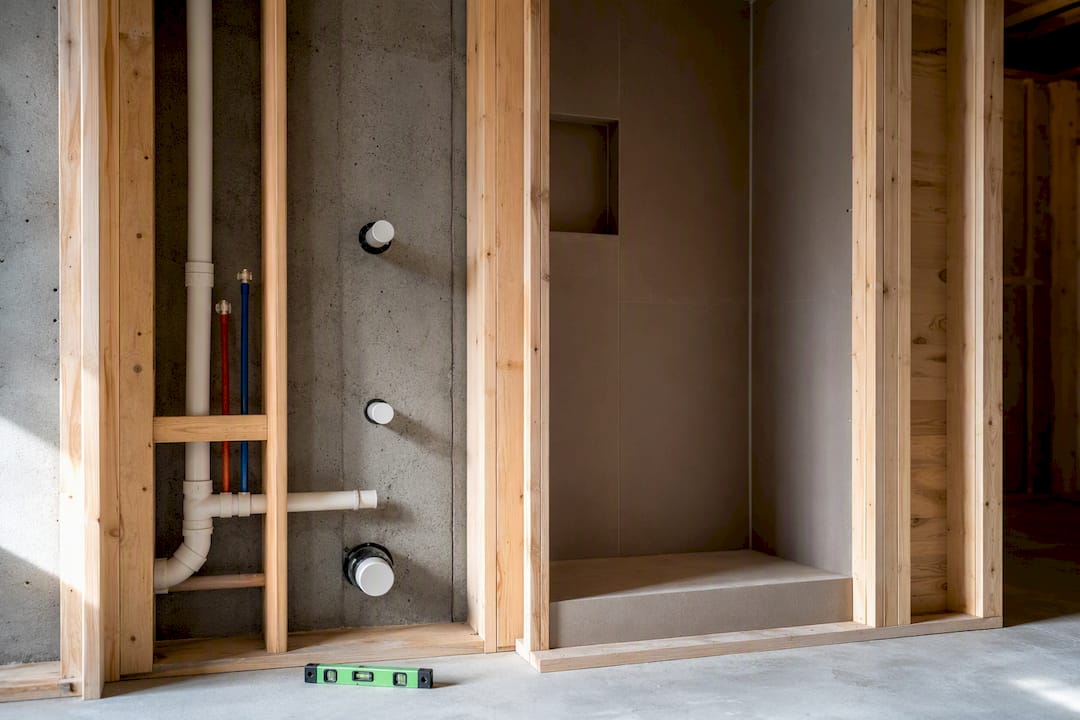
It’s also worth stubbing an extra capped line for a future half-bath sink or a wet bar if your basement layout could plausibly support one down the road. The incremental cost of an extra capped stub during the initial rough-in is minor compared to trenching for it years later.
Why the planning stage prevents most homeowner regrets
The homeowners I hear regret decisions from are almost always the ones who skipped elevation checks or fixture planning during initial construction, then paid for it during a retrofit. Contractor-led coordination between plumbing, framing, and electrical from day one avoids that unexpected cost and schedule risk. If you’re weighing your options, a site review before you commit to a layout is worth the conversation.
— Jeff
How JAG Home Enhancements can help with your basement bathroom project

Planning a basement bathroom rough-in is one thing, getting the whole space finished the way you pictured it is another. A professional remodeling company can handle basement remodeling and complete bathroom remodels as a single managed project, coordinating permitting, inspections, and every trade involved so you’re not left piecing together separate contractors. A consult starts with a site review and measurement of your existing rough-in, moves into a permitting plan built around your local code, and ends with a written estimate you can actually compare.
If you’re ready to see what your basement could look like finished, request a consult through our basement remodeling page and we’ll walk the space with you.
Sources
A few resources are worth having on hand when you talk plans with a plumber or contractor:
- Sewage ejector pumps vs upflush toilets
- CFR: Drainage and slope requirements (example code reference)
- Building America: Ventilation and Indoor Air Quality guidance
- Planning a Basement Bathroom Before You Build: Rough-In Plumbing and Layout
FAQ
How do you rough-in plumbing for a basement bathroom?
You locate the main sewer line and cleanout, measure the invert elevation against your basement floor, then run and cap drain, vent, and supply lines to the toilet, sink, and shower locations. When the floor sits below the invert, a sewage ejector pit or upflush system takes the place of a simple gravity line.
How much does it cost to rough-in a bathroom in the basement?
A rough-in done during the original slab pour commonly costs $500 to $1,000, while retrofitting drains into an already-finished slab can run $5,000 to $10,000, largely due to concrete cutting and patching, according to this cost comparison. Ejector pumps and electrical work add to either scenario.
Can you put a bathroom in a basement without a rough-in?
Yes, a macerating or upflush toilet system can often be installed on top of the existing slab behind a rear-discharge toilet, avoiding the need to cut concrete for a traditional rough-in, as described in this ejector pump versus upflush comparison. It’s a common solution when a slab retrofit is too costly or disruptive.
What is the 135 rule in plumbing?
The “135 rule” generally refers to code guidance on vent pipe offsets and how far a fixture trap can sit from its vent connection before venting is compromised. The exact figures and application vary by code edition and jurisdiction, so confirm the current standard with your local building department before finalizing your layout.