
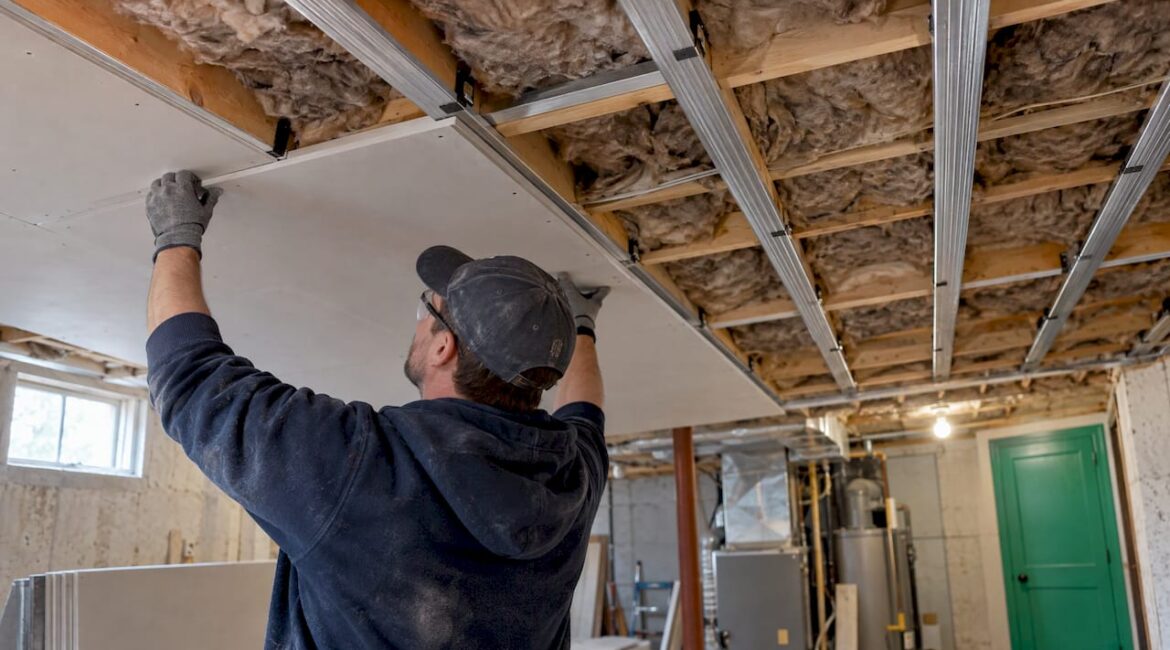
The most reliable way to soundproof a basement ceiling is to do four things in order: seal every air gap, fill the joist cavities with insulation, add mass with drywall, and separate (decouple) the new ceiling from the floor framing above. Each step helps. Stacked together, they make the difference between hearing every footstep and hearing a muffled thump. Below, we explain what each step does, what it costs, and how to pick the right level for your home, whether it’s a media room, a playroom or a bedroom for a family member.
TL;DR
- Sound travels through gaps and through the framing itself, so start by sealing gaps with acoustic caulk, then add insulation, mass and decoupling.
- Mineral wool in the joist bays plus two layers of drywall with a damping compound is the common middle path for good airborne-noise control.
- Footsteps (impact noise) need decoupling. Insulation alone does little for them.
- Budget roughly $500 to $2,500 for a simple ceiling treatment, and more for a full decoupled assembly. Cost depends on size, method and finish.
- The best time to do it is while the ceiling is open, before a basement remodel is finished.
Table of Contents
- Why a basement ceiling leaks so much sound
- Step 1: Seal the gaps first
- Step 2: Fill the joist cavities with insulation
- Step 3: Add mass with drywall and damping
- Step 4: Decouple the ceiling from the joists
- Three levels: pick the one that fits your goal
- What soundproofing a basement ceiling costs
- Work around the things that undo your ceiling
- Soundproofing as part of a basement remodel
- DIY or hire a contractor?
- Our perspective
- Planning a basement ceiling with JAG
- FAQ
- Sources
Why a basement ceiling leaks so much sound
A basement ceiling is the underside of your first floor. Every footstep, dropped toy and dishwasher cycle on the main level sends vibration into the joists, and the joists carry it straight down. Voices, TV audio and music from the basement travel the other way through the same path.
There are two kinds of noise to think about:
- Airborne noise: voices, television, music, a barking dog. It moves through air gaps and thin materials.
- Impact noise: footsteps, furniture dragging, a bouncing ball. It moves as vibration through solid framing.
They need different fixes, which is why one product rarely solves everything. A wooden subfloor does a poor job of blocking sound because it has gaps and vibrates in sympathy with sound waves. The strategy that works eliminates gaps and adds mass in layers that are decoupled from each other and from the joists.
Two ratings come up when you shop. STC (Sound Transmission Class) describes airborne sound blocking. IIC (Impact Insulation Class) describes impact noise. Higher is better for both. Weyerhaeuser’s engineering team notes that STC and IIC ratings above 50 are typically expected in multifamily construction, and that a single layer of gypsum fastened directly to wood joists with no insulation rates relatively low. That bare-bones ceiling is exactly what many basements have.
Step 1: Seal the gaps first
Sealing is the cheapest and most overlooked upgrade. Sound slips through any opening the way water finds a crack, and a ceiling with perfect insulation and open gaps still leaks.
If your joists are exposed, use acoustic caulk. It is an elastomeric sealant that stays flexible instead of hardening and cracking over time. Apply it:
- Around the perimeter of the subfloor where it meets the framing
- In visible gaps and seams between plywood sheets
- Around pipes and wires that pass through the floor
If the ceiling is already finished, seal around recessed lights, vents, and the edges where the drywall meets the walls. Recessed can lights deserve a mention: they punch holes through the ceiling, and a sound-rated cover or a surface-mounted fixture avoids that weak spot. Check the manufacturer’s heat and clearance requirements for any cover you add, and have an electrician handle anything involving wiring.
A cost guide for U.S. homeowners puts the sealing-and-insulation approach at about $0.50 to $1.50 per square foot, which makes it the best value per dollar of any step here.
Step 2: Fill the joist cavities with insulation
Empty joist bays act like drums. Insulation inside them absorbs sound energy before it can bounce around and escape through the drywall. Mineral wool is the usual pick because it is dense and absorbs airborne sound well. Fiberglass batts also help and cost less.
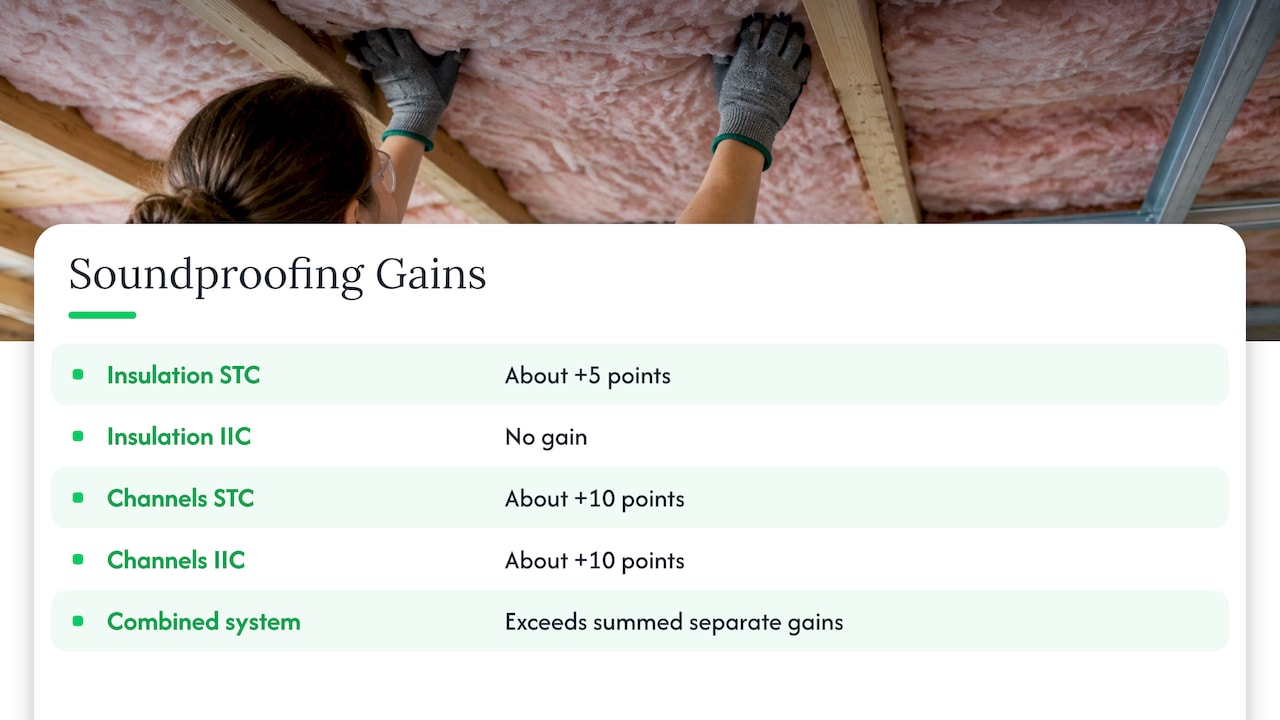
Set expectations honestly, though. In Weyerhaeuser’s published test data, insulation on its own gave a small STC gain of about 5 points and no gain for impact noise. Resilient channels alone improved both STC and IIC by about 10 points. The combination did better than the two added together. That is the key idea of this whole article: the layers work as a system.
Install batts snugly without compressing them, and keep them away from heat sources such as recessed light housings unless the product is rated for it. If you are weighing insulation for thermal reasons too, our guide on when basement ceiling insulation pays off covers where it makes sense.
Step 3: Add mass with drywall and damping
Heavy, dense layers resist vibration. For most homeowners, that means drywall.
Double drywall with a damping compound
If your ceiling is already finished and you want to avoid demolition, you can add a second layer of 5/8-inch drywall over the existing one. A liquid damping compound between the sheets limits sound further by dissipating vibration. The same source estimates the compound at about $45 to $60 per sheet of drywall, using two tubes per sheet.
Mass has limits. Canadian federal housing research (CMHC) found that doubling the mass of a drywall ceiling on resilient furring improved the STC rating by roughly 5 dB. The same test showed that on wood furring, doubling the drywall made no improvement at low frequencies. Heavier drywall helps most when the ceiling is not rigidly tied to the joists.
Practical tips for drywall layers
- Stagger the seams between layers so they never line up.
- Leave a small gap at the perimeter and fill it with acoustic caulk rather than leaving it rigid.
- Use screws long enough to pass through both layers into the framing or furring, spaced as the compound maker specifies.
- Check whether your local code requires fire-rated (Type X) board for the ceiling. Your township building office can tell you.
Step 4: Decouple the ceiling from the joists
Decoupling means breaking the solid connection that carries vibration. Without it, footsteps travel through the joists and into the drywall almost unimpeded. Decoupling and mass are the two most important methods of soundproofing a room. Continuous materials carry vibration, and resilient channels or sound isolation clips lessen those bridges.
Resilient channel or isolation clips
Both options hang the drywall on a flexible connection. Clips with furring channel generally give the stronger result, and they cost more to buy and install. Resilient channel is thin and easy to install wrong: a single screw that goes through the channel into the joist can short-circuit the whole effect. Installation care matters more than the product name.
What the research found
CMHC’s study of floor and ceiling assemblies reached some useful conclusions:
- Four different types of resilient furring performed almost identically, so install quality matters more than brand.
- Wood furring is not advisable, because the mechanical coupling it creates greatly reduced performance.
- The most efficient way to improve an existing assembly was building an additional ceiling under it. Half-inch drywall on 2-1/2 inch metal studs with batt insulation improved STC by 15 points.
- Joists at 16 inches on center seemed to produce a resonance at 160 Hz in the subfloor that lowered STC in many tests.
That study is Canadian and older, but the physics of floors and ceilings has not changed. It is useful for understanding why wood strapping screwed directly to joists, a popular shortcut, disappoints.
Three levels: pick the one that fits your goal
Not every basement needs a studio-grade ceiling. Match the treatment to how you will use the room.
| Goal | Typical approach | What you can expect |
|---|---|---|
| Take the edge off TV and voices | Acoustic caulk, insulation in the joists, one drywall layer | Noticeable improvement in airborne noise |
| Family room or playroom under living space | Mineral wool, resilient channel or clips, double drywall with damping compound | Strong airborne control, better footstep reduction |
| Home theater, drum or music room | Fully decoupled ceiling, mineral wool, double drywall, sealed penetrations, treated doors | Highest practical isolation for a house |
A trade-publication summary of expert guidance puts a double-drywall-with-damping ceiling in the STC 50 to 55 range, and a fully decoupled build with clips or channels at STC 55 to 65, as stated in that same article. Treat those as targets under good installation, not guarantees. Real results depend on workmanship, flanking paths through walls, and how well every opening is sealed.
What soundproofing a basement ceiling costs
Prices vary by region, ceiling size and how much finish work is needed. One 2026 U.S. cost guide reports that most homeowners pay between $500 and $2,500 for a typical basement ceiling, roughly $1 to $5 per square foot, and that a simple insulation job done yourself can come in well under $500. Price drivers include:
- Ceiling size and height
- Method: insulation only, a second drywall layer, or a full decoupled ceiling
- Material quality, such as mineral wool versus fiberglass
- Local labor rates
- Whether you also repaint, retexture or install a new finish
A full ceiling rebuild costs more than these figures because of labor, drywall finishing and trades that have to move ducts, lights or plumbing. We do not publish set prices for projects like this, because every ceiling is different. We give you a written estimate after we see the space.
Where the money is best spent
If your budget is tight, spend in this order: sealing, then insulation, then a decoupled drywall layer, then damping compound. Sealing and insulation give the most improvement per dollar. Decoupling is where the cost climbs but where footstep noise finally drops.
Work around the things that undo your ceiling
A great ceiling can be wasted by weak links nearby.
- Ductwork: Metal ducts carry sound between floors. Sealing duct joints and lining or wrapping runs near the ceiling helps.
- Recessed lights: As noted above, they create holes. Plan their placement before drywall goes up.
- Doors: A hollow door at the top of the stairs lets everything through. See our look at soundproof interior doors and what they cost.
- Floors above: Rugs and thick pads upstairs reduce footstep noise before it reaches the joists. Where you are already renovating the main level, flooring choices matter too.
- Low ceilings: Added layers eat height. If you are tight on clearance, read how to reclaim inches before a basement remodel.
Soundproofing as part of a basement remodel
The easiest time to do this work is while the ceiling is open. Insulation, sealing and channel installation take a fraction of the effort when joists are exposed, and nothing finished has to be torn out. If you plan a theater or game room, build the ceiling spec first and lay out lighting and speakers around it. Our basement home theater ideas walk through how those decisions connect.
Timing also matters. Soundproofing adds steps for insulation, extra drywall layers and drying time for finishing, so build it into the schedule. Our basement finishing timeline shows how long the stages typically take, and where inspections fit.
Before any ceiling goes up, deal with moisture. Insulation and drywall in a damp basement invite mold. Our page on basement moisture control for Bucks County homeowners explains what to address first.
DIY or hire a contractor?
Sealing gaps and laying batts between open joists is a reasonable weekend job for a handy homeowner. Wear a mask, gloves and eye protection when handling insulation, and keep clear of wiring and plumbing.
Hire a professional when:
- You need a decoupled ceiling with clips or channel, since small mistakes cancel the benefit
- Ducts, plumbing or wiring have to be relocated
- Drywall hanging and finishing across a whole ceiling is more than you want to take on
- You want it inspected and permitted as part of a larger finish
- Your project has a performance target, like a theater
Structural changes, electrical work and anything affecting fire-rated assemblies should go through your local building department. In Pennsylvania, requirements are enforced by your municipality, so ask your township before you start.
Our perspective
We see the same pattern in basements across Bucks County. A homeowner finishes the space, sets up a TV or a play area, and only then learns how loudly the house talks to itself. By then, fixing it means opening a finished ceiling.
Our advice is to decide what you want the room to do before the first board goes up. If the basement will be a family room under the kitchen, plan for insulation and a decoupled, double-layer ceiling from the start. It costs far less to build in than to retrofit, and it lets us coordinate lights, ducts and finishes around it.
We also tell people honestly that no ceiling makes a room silent. What we can do is match the assembly to your goals, keep the job site clean, explain every step, and manage the project from consultation to completion so the ceiling you pay for performs the way it was designed to.
Jeff
Planning a basement ceiling with JAG
If you are finishing or remodeling a basement and want noise handled properly, we can include the ceiling in a complete plan, from framing and insulation to drywall and finishes. See our basement remodeling services or our page on finished basement remodeling in Bucks County to see how we work.

Tell us how you will use the space and which rooms sit above it, and we will recommend a ceiling that fits your goals and budget. Start at jaghomesnow.com to request a consultation.
FAQ
What is the cheapest way to soundproof a basement ceiling?
Seal gaps with acoustic caulk and add insulation batts between the joists. A 2026 U.S. cost guide puts this approach at roughly $0.50 to $1.50 per square foot. It reduces airborne noise but does little for footsteps on its own.
Can I soundproof a finished basement ceiling without removing the drywall?
Yes. You can add a second layer of 5/8-inch drywall with a damping compound between the sheets. Seal the perimeter with acoustic caulk. This helps airborne sound, but it will not decouple the ceiling, so footstep noise improves less.
Does insulation alone stop footsteps?
No. In published floor-system test data, insulation alone gave a small airborne gain and no impact-noise benefit. Impact noise needs decoupling, such as resilient channels or isolation clips, combined with insulation and added mass.
Are resilient channels or isolation clips better?
Both decouple the drywall from the joists. Clips with furring channel are generally the stronger option and cost more. Research on resilient furring found that the types tested performed almost identically, so careful installation matters most.
Should I soundproof the ceiling before or after finishing the basement?
Before. With joists exposed, sealing, insulating and installing channels is faster and cheaper, and nothing finished is damaged. Plan lighting, ducts and speaker locations around the ceiling assembly early in the remodel.
Sources
- What To Know About Soundproofing a Basement Ceiling, Family Handyman
- How to Soundproof a Ceiling, The Spruce
- Soundproofing Floors Phase 1: The Underside of the Floor, CMHC
- Sound Performance of Residential Trus Joist Floor Systems, Weyerhaeuser
- Soundproofing a Basement Ceiling: Cost Guide (2026)