

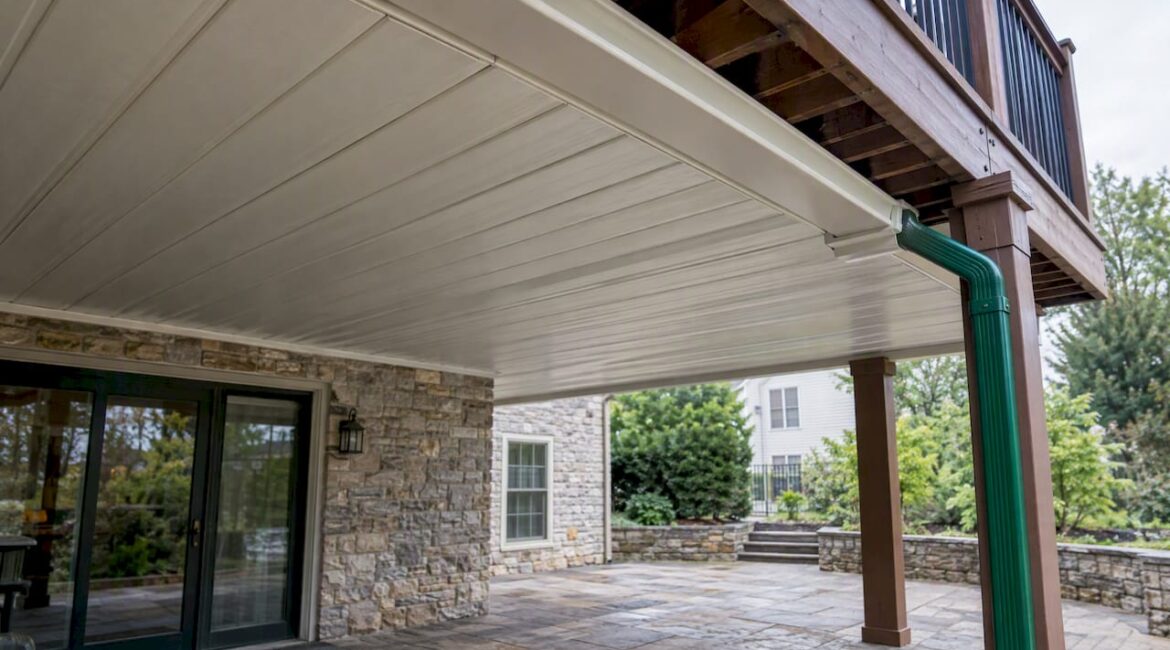
An under deck drainage system catches the water that falls through your deck boards and sends it to a gutter and downspout, so the space below stays dry. There are two main kinds: overmount systems that sit on top of the joists, and undermount systems that hang below them. Which one fits depends on whether your deck is new or existing, how high it sits, and what you want to do with the space underneath. Below we cover how each works, what they cost, how to maintain them, and what to ask before you hire anyone.
TL;DR
- Overmount systems go above the joists and keep the framing dry. They are best installed during a new build or a deck board replacement.
- Undermount systems go below the joists and are easier to add to an existing deck, but they can leave the framing wet.
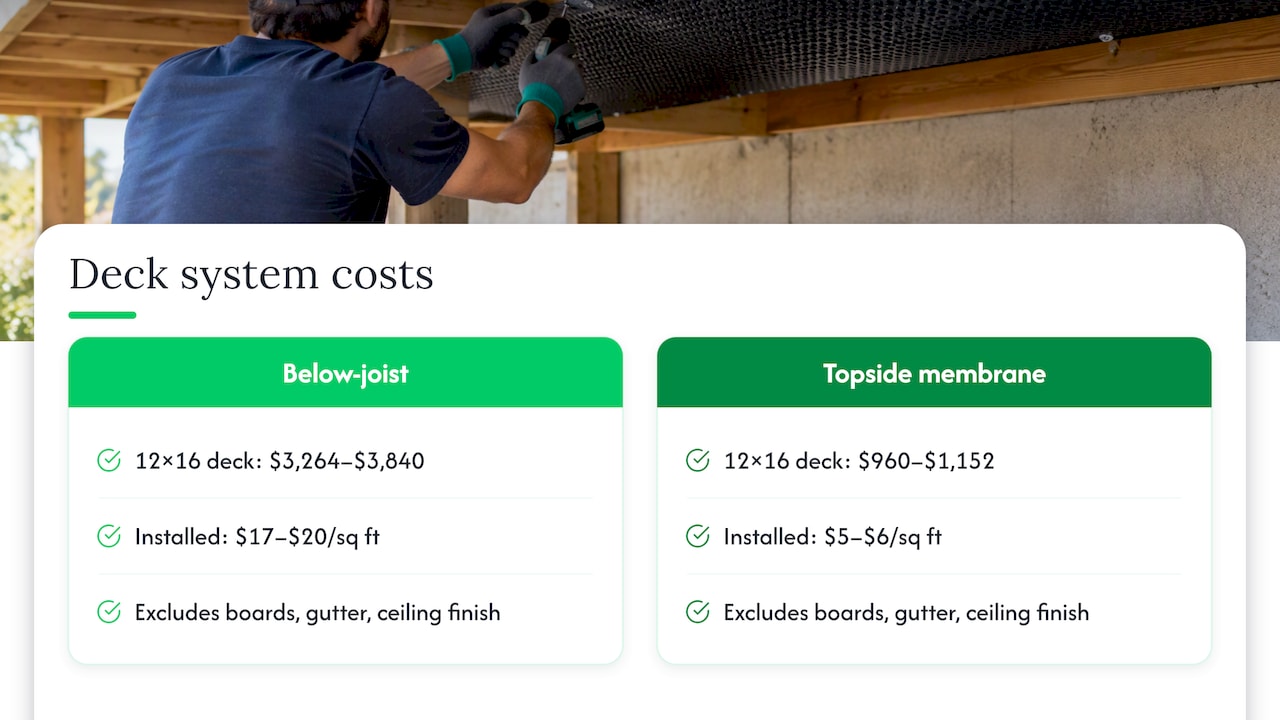
- One trade roundup priced below-joist systems at about $17 to $20 per square foot installed and a topside membrane at $5 to $6 per square foot.
- Slope, flashing, sealed seams and access for cleaning matter as much as the product you pick.
- A dry space under a second-story or raised deck can hold lighting, fans and storage, but it needs a plan for where the water goes.
Table of Contents
- How an under deck drainage system works
- Overmount vs. undermount: the choice that shapes everything
- Is an under deck drainage system worth it?
- What does it cost?
- Getting the details right
- Can you add one to an existing deck?
- Diverting water without a full system
- Turning the space below into something useful
- Our perspective
- Let us plan your dry space
- FAQ
- Sources
How an under deck drainage system works
Deck boards are never watertight. Rain and snowmelt drop through the gaps, run down joists and beams, and land on whatever is below. On a ground-level deck that is mostly a rot and mildew issue. On a raised deck over a patio, it means drips on your furniture and a damp, dark space you cannot use.
A drainage system adds a waterproof layer that intercepts that water. According to the manufacturer’s guidance, these systems divert water from the deck: undermount panels catch water and slope it away, while overmount troughs drain water to a gutter and downspout.
The water still has to go somewhere. Most systems finish at a gutter along the deck edge or house side, then a downspout that carries the water off. That last step is where many projects go wrong, and we come back to it below.
Overmount vs. undermount: the choice that shapes everything
Systems fall into two categories: undermount, installed below the deck joists, and overmount, installed above them.
Overmount (above the joists)
Troughs, tape or a membrane go on top of the joists, under the deck boards. Water never touches the framing. That matters because below-joist systems can wet the framing and trap moisture, which can lead to wood rot, while overmount systems keep water off the joists.
The tradeoff: overmount systems require removing the deck boards. If your boards are near the end of their life anyway, that is a good moment to do it. If they are in good shape, it is more work.
Another upside is the space below. Above-the-joist systems make it simple to install lights, fans and other electrical accessories beneath the deck, since the joists are exposed and there is nothing hanging below them.
Undermount (below the joists)
Panels or sloped sheets attach to the underside of the joists and form a ceiling. They are easy to retrofit on existing decks, and the Fine Homebuilding guide confirms that undermount drainage can be added to an existing deck. Nothing on the walking surface has to be disturbed.
The limit is that industry guidance from Fine Homebuilding in 2020 describes below-joist systems as easier and often cheaper to retrofit, but without the same structural protection for the framing that overmount systems give. That is why joist protection, such as flashing tape on the tops of the joists, deserves a conversation before installation.
Side by side
| Overmount | Undermount | |
|---|---|---|
| Where it goes | On top of the joists, under the boards | Below the joists, like a ceiling |
| Existing deck | Boards come up first | Usually no board removal |
| Framing protection | Water stays off the joists | Joists can stay wet |
| Space below | Open joists, easy for lights and fans | Finished ceiling look |
| Best for | New builds, re-decking | Retrofits with sound boards |
Is an under deck drainage system worth it?
For a raised deck with usable space beneath it, usually yes. The manufacturer’s own guidance says a system can waterproof a new or existing deck, protect its substructure, extend its life and create extra outdoor or storage space that may appeal to future buyers. That is a vendor’s view, so weigh it against your own situation.
The decision comes down to a few questions:
- Is there a patio, door or storage area under the deck that you want dry?
- Is the deck high enough to make a ceiling worthwhile?
- Are the deck boards due for replacement within a few years?
- Do you want lights, a ceiling fan or an outdoor seating area below?
If you answered yes to the first and last, a system pays off in comfort. If the deck is low to the ground and the space below is just crawl height, you may be better served by good slope and ventilation than a full system. We would rather tell you that up front than sell you something you will never use.
What does it cost?
Builders rarely agree on a single number because the price depends on deck size, height, access and the system you pick. A published trade roundup in Journal of Light Construction’s deck builder section priced below-joist systems at about $17 to $20 per square foot installed, and a topside membrane at $5 to $6 per square foot. Treat that as a ballpark for comparison, because materials and labor costs move.
To see why the overmount figure looks lower, remember it excludes what you may have to pay to lift and re-lay the deck boards. If you are already replacing the surface, the extra cost is small. If you are not, the labor can close the gap.
For a 12 by 16 foot deck, 192 square feet, the roundup’s ranges work out to roughly $3,264 to $3,840 for a below-joist system and $960 to $1,152 for a topside membrane before any board work, gutter or ceiling finishing. That is our arithmetic from the published ranges, not a quote.
We do not publish prices for our projects because every deck is different. We give written estimates after a site visit.
Getting the details right
A good product installed carelessly will leak. These are the points that decide whether the system works for decades or fails in a few winters.
Start with slope
Water needs somewhere to go. The deck framing should be set at a pitch of 1% to 2%, which is 1/8 to 1/4 inch per foot, sloping away from the building. The surrounding landscape should also fall away from the house. When the grade is wrong, even a perfect system just moves the puddle.
Protect the framing
NADRA’s guidance is to assess site slope, protect the substructure with flashing tape and plan an access panel if you enclose the space beneath the deck. Flashing tape on top of the joists keeps screw holes from becoming entry points for water.
Tape every seam, and keep it clean
For troughs and membranes, manufacturers instruct installers to tape all seams, make sure troughs and downspouts are dry and free of debris before taping, and add gutter outlets every 12 to 14 feet. Tape sticks poorly to a dirty or damp surface, and a failed seam is a leak.
Plan for cleaning
Every deck collects leaves, pollen and grit between the boards. Fine Homebuilding notes that debris inevitably gets between deck boards, so you need access points for periodic washing. Its suggestion is to screw down one course of boards near the house and one near the outer edge so they can come up and let you hose out the system and clean the gutter.
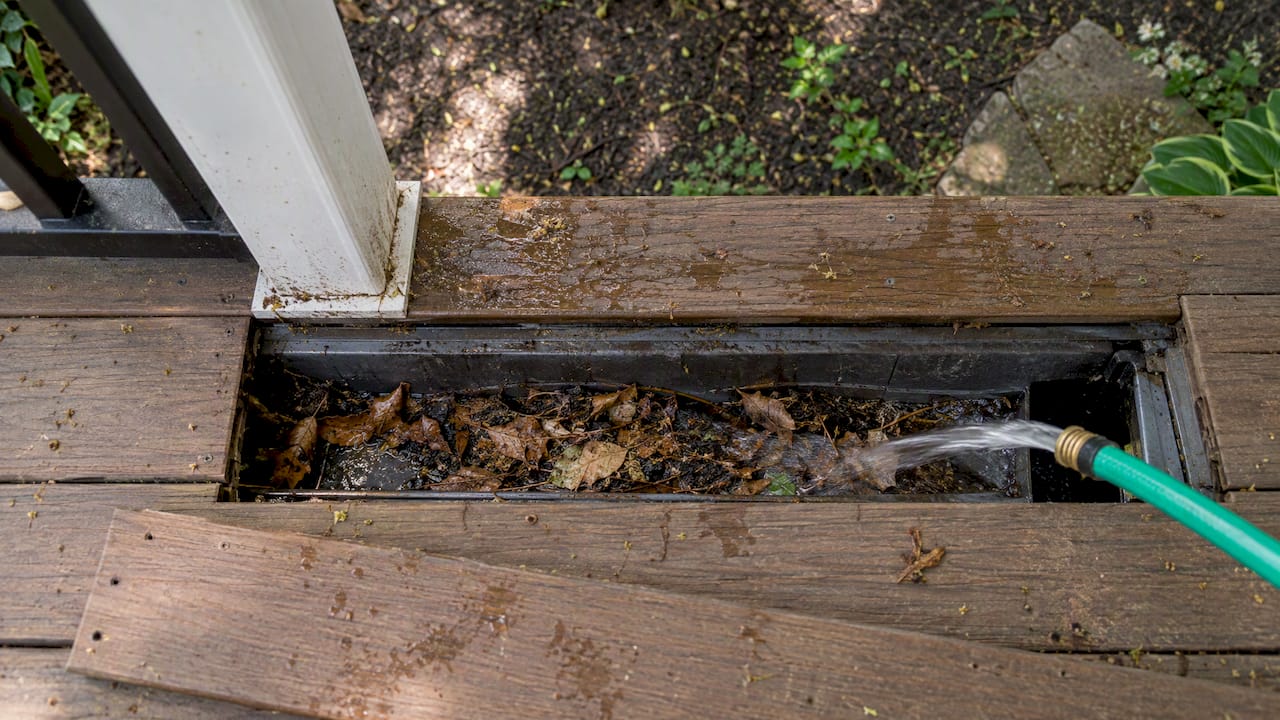
In Bucks County, with heavy tree cover in many neighborhoods, that is not optional. Fall leaves and spring pollen will clog a gutter quickly. Our deck maintenance schedule shows what to check each season.
Decide where the water lands
A downspout that dumps beside your foundation or onto a slope can undo the whole project. Direct it to a splash block, a drain line or a prepared bed of stone. The principles for handling outflow are the same ones used in gravel drainage solutions: move the water away and give it a path through ground that can take it.
Can you add one to an existing deck?
Yes. Undermount systems are the usual retrofit because they do not require lifting the boards. Before you commit, we check three things:
- Framing condition. A system hides what is above it. We probe the joists and ledger first. If you notice bounce or dips, read our guide to stopping a sagging deck from returning before covering anything.
- Footings and structure. Adding weight and enclosing the space should not push a marginal structure further. Our Pennsylvania deck footing requirements page covers the 36 inch frost depth and permit basics.
- Height and clearance. A ceiling needs headroom. Lights, fans and ducting need room, too.
If the boards are old, resurfacing and installing an overmount system together often makes more sense than layering a ceiling under a tired deck.
Diverting water without a full system
Not every deck needs a ceiling. If the space below is low or you only want to protect the framing, the simpler steps help. NADRA recommends that you slope the landscape and deck framing so water drains away from the building and deck structure. Add to that:
- Keep gutters above the deck clean so roof runoff does not pour onto the boards. Our guide to drip edge vs. gutter apron explains how roof edge details send water where you want it.
- Leave gaps between boards as the manufacturer specifies, so water drains rather than pools.
- Keep soil and mulch from touching the framing.
These measures help, but they do not create a dry room. For that you need a barrier.
Turning the space below into something useful
Once the area is dry, you can use it. Common choices:
- A covered patio with outdoor furniture, lighting and a ceiling fan
- Storage for mowers, bikes and cushions
- An outdoor kitchen or bar area
- Skirting or lattice to enclose the area for storage
If you plan to enclose it, include an access panel so you can inspect the underside, as NADRA advises. Our deck skirting ideas page covers materials and what they cost. If the deck needs a roof overhead as well, see our deck roof checklist for Bucks County homeowners.
Our perspective
We build and repair decks across Bucks County, and our view is simple: drainage is easiest and cheapest to do while the deck is open. If you are replacing boards, tell us before the work starts. Putting protective tape and an overmount system on the joists at that point costs far less than reopening the deck later.
We also think the product matters less than the details around it. Slope, flashing, sealed seams, a clear path for the downspout and a way to clean the system are what decide whether a dry space stays dry. We plan those before we choose a material.
For existing decks with sound boards, we will tell you honestly whether a below-joist ceiling fits, what it will and will not protect, and whether the structure is ready for it. You get clear communication, a clean job site and a plan you understand before we begin.
Jeff
Let us plan your dry space
If you want a deck that stays dry underneath, we can look at your framing, your slope and your downspout options, then recommend a system that fits. We handle the full project from consultation to completion, including new deck construction, resurfacing, composite decking, railings and built-in seating.

See our custom deck and outdoor living services or contact us through our site to schedule an estimate in Doylestown, Warwick, Buckingham and nearby communities.
FAQ
What is the best under deck drainage system?
There is no single best one. Overmount systems protect the framing and suit new builds or re-decking, while undermount systems suit existing decks with good boards. Choose by deck height, board condition, budget and how you plan to use the space below.
Can I install an under deck drainage system myself?
Some manufacturers publish DIY guides, and one says two people with no experience can install 70 square feet in an hour. Real decks have tricky corners, ledger flashing and downspout routing, so we recommend having a contractor check the structure and plan the outlet.
How do I keep water from pooling under my deck?
Slope the ground and deck framing away from the house, keep gutters and drainage channels clear, and send downspouts well past the foundation. If you want a fully dry space, add a drainage system and plan access for cleaning.
Will a drainage system damage my deck framing?
Not when it is installed correctly. Below-joist systems can leave the framing wet, so we protect the joists with flashing tape and make sure the space can dry. Overmount systems keep water off the joists altogether.
Sources
- Under Deck Drainage System for Existing Decks
- How to DIY an Under-Deck Drainage System
- Create a Dry Space Under Your Deck, Fine Homebuilding
- Site-Built Deck Drainage, Fine Homebuilding
- Five Steps to Building a Water-Resistant Deck, NADRA
- Under-Deck Drainage Roundup, Journal of Light Construction