
Every aging-in-place bathroom needs five things: non-slip surfaces, grab bars anchored into wall blocking, an accessible shower or tub, layered lighting with a clear bed-to-bathroom path, and enough open floor space to move or turn safely. If you’re ready to act, start with a home-safety assessment or tackle the quick, low-cost fixes first before planning a bigger remodel.
TL;DR:
- Anchor grab bars into studs or dedicated blocking, typically 33 to 36 inches high, and test placement against the resident’s actual transfers before drilling.
- A curbless shower removes the step over hazard and suits wheelchairs, walkers, or tired bathers; a low threshold shower with a seat is a fallback.
- Choose a 32 inch clear doorway, ideally 36, and a five foot turning radius; a T shaped turn can work in tighter rooms.
- Install anchored bars, nonslip mats, nightlights, and lever handles now; add blocking, plumbing changes, and wider doorways while walls are open to avoid costly retrofits.
- Keep the water heater at or below 120 degrees Fahrenheit and use a temperature limiting valve to prevent sudden temperature spikes during showers.
Table of Contents
- Why Bathrooms Carry So Much Fall Risk
- Priority Features: What to Install First and Why
- Doorways, Turning Space, and Getting Around Safely
- Fixtures and Finishes for Everyday Comfort
- Low-Cost Fixes Now, Bigger Changes When Walls Are Open
- Planning Your Budget and Timeline Without Surprises
- Who to Bring In: Occupational Therapists and Experienced Remodelers
- Storage That Works From a Seated or Standing Position
- Keeping Water Temperature Safe and Predictable
- Smart Technology That Supports Independence
- Practical Perspective: Balancing Style and Safety
- How We Approach Aging-in-Place Bathroom Remodels
- FAQ
- Sources
Why Bathrooms Carry So Much Fall Risk
Bathrooms combine water, hard surfaces, and tight spaces, which makes them the most common site for falls among older adults at home. The CDC’s fall-prevention guidance points to a specific set of culprits: slippery tub and shower floors, dim lighting, missing grab bars, and loose rugs or other trip hazards near the tub.
None of these risks exist in isolation. A dim bathroom makes a slick floor more dangerous because you can’t see where the wet spots are. A high tub threshold becomes a bigger problem for someone on blood pressure medication that causes occasional dizziness. Vision changes, balance issues, and certain medications all interact with the physical environment, so a single fix rarely solves the whole problem.
That’s why we think about aging-in-place bathrooms as a system rather than a checklist. The features below work together:
- Traction underfoot reduces the chance of a slip in the first place.
- Grab bars give you something secure to hold if your balance shifts.
- Lighting lets you see hazards before you step on them.
- Layout and clearance give you room to move without twisting or reaching awkwardly.
Later sections walk through each of these in detail, including exactly where to place grab bars and which shower style fits different mobility levels. The goal is a bathroom where the pieces reinforce each other instead of relying on one safety feature to do all the work.
Priority Features: What to Install First and Why
Some upgrades matter more than others. Here’s how we prioritize them, along with placement and installation guidance you or your contractor can follow.
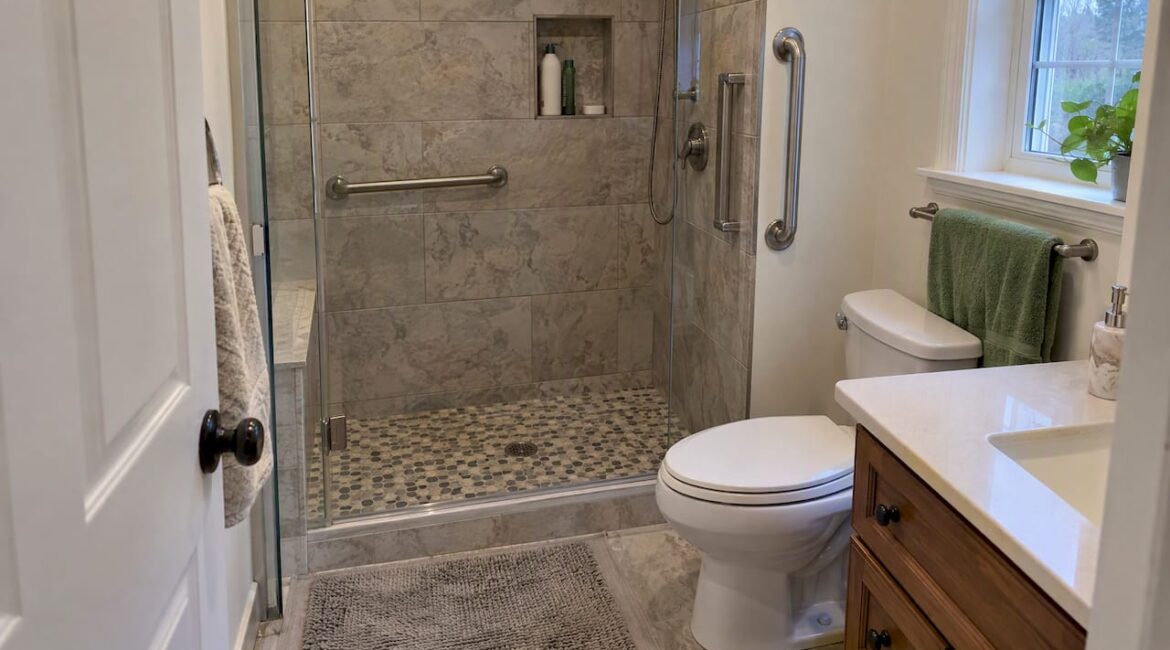
- Grab bars with real blocking. Install bars inside the shower, on the back wall, and just outside the shower or tub, plus a vertical or angled bar near the toilet. Bars need to anchor into wall studs or dedicated blocking, not just drywall anchors, because a bar that pulls loose during a fall is worse than no bar at all. Mounting height typically runs 33 to 36 inches above the floor, though actual placement should match the resident’s height and reach.
- An accessible shower or tub solution. A curbless, roll-in shower is widely considered the safest bathing option because it removes the step-over hazard entirely and works for a wheelchair, a walker, or simply someone who gets tired standing. A transfer shower with a low threshold and a built-in seat is a middle-ground option when a fully curbless design isn’t feasible. Tub-to-shower conversions solve the step-over problem for households that no longer need a tub for bathing young children or soaking.
- Non-slip flooring. Textured porcelain or matte-finish tile with a higher coefficient of friction performs better than glossy tile, especially when wet. Some homeowners add slip-resistant coatings or mats as an interim fix before a full floor replacement.
- Lighting that follows you from bed to bathroom. Layered lighting, overhead, task lighting at the mirror, and a low-level nightlight, helps you see clearly without the glare of flipping on a bright overhead light at 2 a.m. The CDC’s Check for Safety checklist specifically recommends nightlights along the path from bedroom to bathroom, and motion-activated fixtures remove the need to fumble for a switch.
- Comfort-height toilets and clear lavatory space. A comfort-height toilet, usually 17 to 19 inches to the seat, makes sitting and standing easier on hips and knees. For the sink, the U.S. Access Board’s guidance suggests a maximum lavatory height around 34 inches with clear knee space underneath for a forward approach, which matters if a wheelchair or rolling shower chair is ever part of the picture.
Pro Tip: Test grab bar placement by mimicking the actual transfer motion, standing, sitting, and stepping, before anyone drills a single hole.
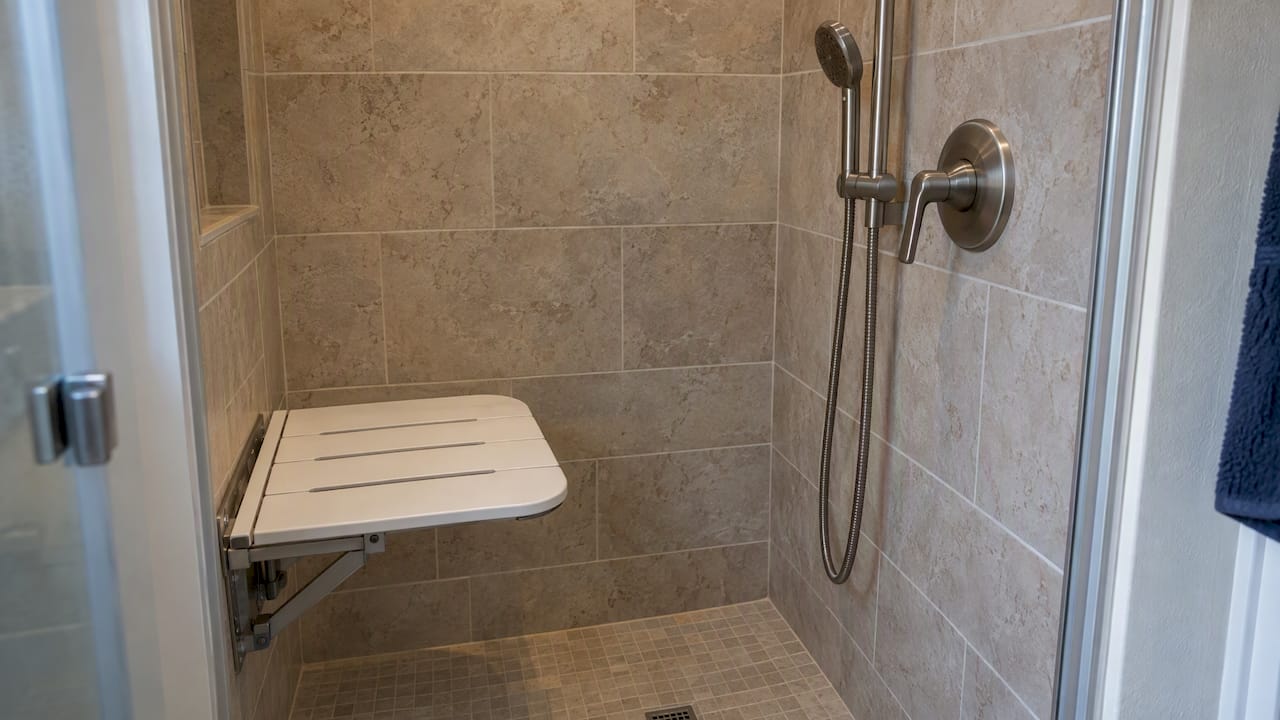
Seating and controls deserve a mention here too. Shower seats and controls work best when placed within easy reach from a seated position, typically on the wall nearest the entry so you’re not reaching across the full width of the shower. We’ll cover specific fixture choices in more detail shortly.
Doorways, Turning Space, and Getting Around Safely
A beautifully equipped bathroom doesn’t help much if you can’t get through the door or turn around once inside. Door and floor space planning deserves real attention, especially in older homes with narrow hallways.
- Door width: A clear opening of at least 32 inches, and ideally 36 inches, accommodates walkers and most wheelchairs without scraping knuckles on the frame. This is a common design reference drawn from accessibility guidelines, not a legal requirement for every home.
- Turning space: A full 5-foot turning radius gives the most flexibility, but a T-shaped turn can work in tighter bathrooms where a full circle isn’t realistic. Which one makes sense depends on whether the household currently uses a wheelchair or is planning for the possibility down the road.
- Fixture placement: Keep the path between the door, toilet, and shower free of swinging obstructions. An inward-swinging door can block rescue access or crowd a wheelchair’s turning space, so converting to an out-swinging or pocket door often solves the problem without expanding the room’s footprint.
- Tight-home solutions: Pocket doors recover floor space that a swinging door would otherwise claim, and barn-style doors offer a similar benefit when a pocket isn’t structurally possible. For more on door choices and installation approaches, this guide to bathroom door options walks through the trade-offs between barn doors, pocket doors, and traditional swing doors.
When space is genuinely limited, prioritize clearance at the shower and toilet first since those are where transfers happen. A slightly narrower path elsewhere is a smaller compromise than a cramped shower entry.
Fixtures and Finishes for Everyday Comfort
The fixtures you choose determine whether a bathroom feels usable every single day or just technically accessible.
- Shower controls: Single-lever faucets are easier to operate with limited grip strength than twist knobs, and thermostatic valves prevent sudden temperature swings. Mount controls near the entry, within reach from outside the water stream, so you can adjust temperature before stepping in.
- Handheld showerheads and slide bars: A handheld unit on an adjustable slide bar lets you direct water while seated or standing, which is far more practical than a fixed showerhead for anyone with limited mobility.
- Shower seating: Folding seats save space when not in use, while fixed benches offer more stability for someone with significant balance concerns. Either option should be installed with the same stud-anchored approach as grab bars.
- Vanity design: A vanity with the right height and clearance supports both standing and seated use. Removable cabinet fronts under the sink create knee space if a wheelchair or shower chair ever becomes part of daily routine.
- Flooring and ventilation: Choose grout lines and transitions that sit flush to avoid trip points, and make sure the bathroom fan is sized to clear humidity quickly since persistent moisture both slickens floors and encourages mold.
- Hardware: Lever-style door and cabinet handles are easier to operate than knobs for anyone with arthritis or reduced grip strength, and low-profile threshold trims reduce the step-over at the shower entry.
For fixture-level recommendations on faucets and valves that balance reachability with reliable performance, this rundown of plumbing fixtures covers practical options worth discussing with your contractor.
Low-Cost Fixes Now, Bigger Changes When Walls Are Open
Not every improvement requires a full remodel, and knowing which upgrades to make immediately versus which to save for a renovation keeps both your budget and your household running smoothly.
- Do these now, inexpensively: Grab bars anchored into studs, non-slip strips or mats in the tub, nightlights along the bathroom path, and lever-style handles are all upgrades a handyman can usually complete in a day.
- Plan these for when walls are open: Wall blocking for future grab bars, relocated plumbing for a curbless shower, and wider doorways are far cheaper to handle during a gut remodel than as standalone retrofits later. AARP’s renovation guidance specifically recommends adding blocking during new construction or any remodel that opens the walls, since the incremental cost at that stage is small compared to tearing out finished walls later.
- Sequence major work logically: Start with quick safety wins, move to a tub-to-shower conversion if bathing is the main concern, and reserve a full remodel for when layout, plumbing, or structural changes are genuinely needed.
- Avoid expensive surprises: If you’re also finishing a basement bathroom or adding plumbing elsewhere in the house, roughing in those lines during other work prevents a costly standalone retrofit down the road. One guide to basement bathroom rough-ins breaks down how early planning avoids a much larger bill later.
The underlying principle is simple: blocking and rough plumbing are cheap when a wall is already open and expensive when it isn’t.
Planning Your Budget and Timeline Without Surprises
A few quick safety upgrades might take a single weekend, while a tub-to-shower conversion often runs one to two weeks, and a full bathroom remodel with layout changes typically stretches several weeks once demolition, plumbing, tile, and finish work are sequenced. A week-by-week remodel timeline gives a clearer sense of how those phases stack up.
Cost depends heavily on scope. Moving plumbing, changing the floor plan, or widening a doorway into a load-bearing wall adds both time and expense compared to swapping fixtures within the existing footprint. AARP’s cost examples illustrate how blocking, comfort-height toilets, and shower conversions each carry their own cost range depending on local labor and material choices.
Permits typically come into play once you’re moving plumbing, electrical, or structural elements, so check with your municipality before work begins. Treat ADA and Access Board guidelines as a useful design reference for clearances and heights rather than a strict legal requirement for a private residence, since those standards were written primarily for public and commercial spaces.
Before requesting an estimate, gather:
- Measurements of the existing bathroom, including door and hallway widths.
- Photos of the current layout, especially tight corners or structural elements.
- A clear list of the resident’s current and anticipated mobility needs.
Walking into a consultation with this information in hand leads to a faster, more accurate quote.
Who to Bring In: Occupational Therapists and Experienced Remodelers
A good aging-in-place bathroom starts with understanding how the resident actually moves, not just which fixtures look accessible. An occupational therapist can assess transfer ability, balance, vision, and nighttime habits, and CDC STEADI materials note that this kind of home-safety assessment may be covered by Medicare in some cases, so it’s worth asking your physician about a referral before committing to a remodel plan.
Once you know what the space needs to do, an experienced remodeling contractor handles the rest:
- Structural work, including blocking for grab bars and verifying walls can support the load.
- Trade coordination between plumbing, electrical, and tile work so nothing gets built in the wrong order.
- Permits and code compliance for any plumbing or structural changes.
- Warranty coverage on both materials and labor.
When interviewing contractors, ask specifically about aging-in-place experience, request references from similar projects, confirm insurance coverage, and get a written timeline and warranty in the proposal. Our aging-in-place remodeling services page outlines how we approach these projects from first consultation through final walkthrough.
Storage That Works From a Seated or Standing Position
Cabinets and shelves only help if you can actually reach them. Standard vanity cabinets with low shelves and deep, hard-to-reach backs force you to kneel or stretch, both of which raise fall risk in a room that’s already wet.
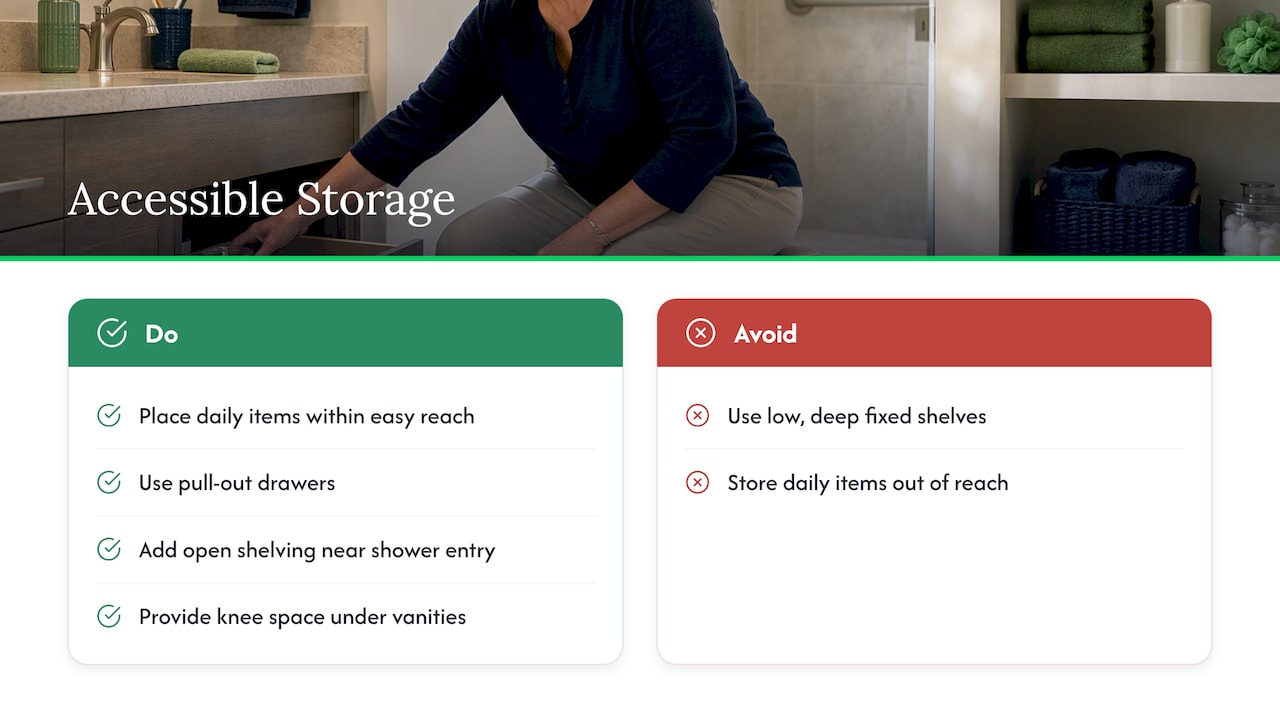
A better approach lowers frequently used storage to between waist and shoulder height, whether you’re standing or seated in a shower chair. Pull-out drawers beat fixed shelves because you can see and reach the entire contents without digging. Open shelving near the shower entry keeps towels and toiletries within arm’s reach without requiring a cabinet door to be opened one-handed while wet.
For vanities, a wall-mounted or open-base cabinet creates knee space underneath for anyone using a wheelchair or rolling shower seat, while a removable cabinet front under a traditional vanity offers the same flexibility if needs change later. Medicine cabinets mounted slightly lower than standard, with adjustable shelving, accommodate a wider range of users without looking clinical.
The goal isn’t to strip out every cabinet, it’s to make sure the items used daily, like soap, razors, and medication, sit in the easiest-to-reach zones, while less frequently used items can stay in less accessible areas.
Keeping Water Temperature Safe and Predictable
Scalding is a real risk for older adults, partly because skin thins with age and reacts to heat differently, and partly because slower reflexes mean less time to react to a sudden temperature spike. Anti-scalding devices address this directly.
A thermostatic mixing valve maintains a consistent water temperature regardless of what’s happening elsewhere in the house, so a toilet flush or dishwasher cycle won’t send a scalding surge through the shower. Pressure-balancing valves offer similar protection against sudden pressure changes that would otherwise shift water temperature unexpectedly.
Many municipal codes already require anti-scald valves in new shower installations, so if you’re doing any shower work, this is one upgrade that’s often built into the project rather than added as an afterthought. Setting the home’s water heater to a safer maximum, typically no higher than 120 degrees Fahrenheit, adds another layer of protection without sacrificing comfortable bathing temperatures.
These controls work quietly in the background. You won’t think about them day to day, but they remove one more variable from a bathroom routine that should feel predictable rather than risky.
Smart Technology That Supports Independence
Smart bathroom features have moved well past novelty and into genuinely practical territory for aging-in-place design. Voice-activated lighting means you don’t need to locate a switch in the dark or reach across a wet counter. Motion-sensor lights accomplish something similar without requiring a voice command at all, simply illuminating the path the moment you step into the room.
Smart water temperature controls can preset a safe maximum and remember personal preferences, reducing the guesswork of mixing hot and cold manually. Some systems can even send an alert to a family member if water has been running unusually long, a small but meaningful layer of awareness for households where a resident lives independently but has family checking in remotely.
None of these technologies replace the physical safety features covered earlier, grab bars, non-slip flooring, and adequate lighting still do the heavy lifting. But layered on top of a well-designed bathroom, smart controls remove small daily frictions: fumbling for a switch, guessing at water temperature, or struggling to adjust settings with limited dexterity. Choose technology that has a simple manual override, since depending entirely on voice commands or an app can become its own obstacle if hands are full or a device isn’t nearby.
Practical Perspective: Balancing Style and Safety
Safety features and good design aren’t in competition. A concealed-mount grab bar finished to match the tile, or a built-in bench tiled to blend with the shower walls, delivers the same protection as an institutional-looking fixture without the clinical feel. The smartest money in any remodel goes toward blocking and rough-ins you’ll never see once the walls close up. Skip that step now, and you’re paying for it twice later.
— Jeff
How We Approach Aging-in-Place Bathroom Remodels
We build aging-in-place bathrooms the same way we’d build one for our own families: safety features that don’t look like an afterthought, and structural decisions made before the walls close up, not after someone’s already had a close call.
Our work on these projects typically includes bathroom remodels with features such as curbless showers, comfort-height toilets, and properly blocked grab bars, along with blocking and plumbing rough-ins planned from the start, even in a basement bathroom, to facilitate future upgrades without major demolition. We also provide project management coordinating plumbing, electrical, and tile trades to help keep timelines predictable.
Because we’ve handled these details on past projects, we know where the retrofit costs usually hide, and we plan around them from day one. If you’re ready to talk through your bathroom’s layout and needs, visit our complete bathroom remodeling page to start the conversation.
FAQ
What is the most important safety feature in an aging-in-place bathroom?
Grab bars anchored into wall studs or blocking are often considered the single most important feature, since they give you something secure to hold during a slip or balance loss. The CDC recommends pairing grab bars with non-slip flooring and better lighting, since these features work together rather than in isolation.
Do I need a permit to add grab bars or remodel a bathroom?
A permit usually isn’t required just to add grab bars, since that’s considered a minor modification in most jurisdictions. However, moving plumbing, changing the layout, or doing structural work for a curbless shower typically does require a permit, so check with your local building department before starting.
Should I get an occupational therapy assessment before remodeling?
An occupational therapy assessment helps identify the resident’s specific transfer, balance, and reach needs before you finalize a design, which avoids guessing at grab bar placement or seat height. CDC STEADI guidance notes these assessments may be covered by Medicare in some cases, so it’s worth asking a physician for a referral.
Is a curbless shower worth it if no one currently uses a wheelchair?
A curbless shower benefits more than wheelchair users since it also helps anyone dealing with temporary pain, fatigue, or reduced flexibility, which is why many design guides recommend specifying one even before mobility needs become urgent. It also removes the step-over hazard that causes many bathroom falls regardless of age.
What should I install now versus wait for a full remodel?
Inexpensive fixes like grab bars anchored into studs, non-slip mats, nightlights, and lever-style handles can go in immediately without opening walls. Larger changes like relocated plumbing, wider doorways, or wall blocking for future grab bars are best planned for whenever you’re already doing a remodel, since AARP notes that adding them during open-wall work costs far less than retrofitting later.
Sources
- CDC — Falls and older adults: prevention strategies
- U.S. Access Board — ADA and ABA Accessibility Guidelines
- AARP — Aging-friendly renovation improvements